
The Ultimate Homelab Security Guide (2026): Hardening SWAG, Authelia, and CrowdSec

Throughout my 20+ years in IT, I’ve consistently advocated for a layered and dynamic security approach – a strategy where defences are built in parallel and depth, creating a robust and resilient system. Think of your public IP address as the drawbridge to your digital castle. It’s the link to the outside world and as such, needs to be keenly protected. This blog post will delve into three powerful tools – Fail2Ban, CrowdSec, and Authelia – that, when combined, create a formidable defence against malicious activity targeting your Nginx / selfhosted setup behind your firewall.
🔹 Digital Castle TL;DR
- SWAG = entry point
- Authelia = identity
- CrowdSec & Fail2Ban = threat blocking
- VLANs = containment
This blog post will delve into three powerful tools - SWAG (Fail2Ban), CrowdSec, and Authelia—that, when combined, create a formidable defense against malicious activity targeting your self-hosted setup.
We aren't just opening ports; we are building a siege-ready fortress.
The Self-Hosting Roadmap
Prerequisite Steps:
- Completed docker compose setup guide here!✅
- Completed the NGINX (SWAG) guide or, if you've already got SWAG running, continue below!✅
🏰 What is the “Digital Castle” Architecture?
We are moving beyond simple "Firewalls." We are building Defence in Depth.
- Layer 1 (The Moat): Your Router/Firewall (OPNsense/Unifi) blocking all ports except 443.
- Layer 2 (The Traps): Fail2Ban (Integrated into SWAG). The classic "Three strikes and you're out" defender.
- Layer 3 (The Watchman): CrowdSec reads the logs. If an IP acts suspicious (scanning, spamming login), it is banned instantly - and shared with the global community.
- Layer 4 (The Gatekeeper): Authelia intercepts valid traffic. Even if a hacker bypasses the firewall, they cannot pass without your unique 2FA token.
🐳 Part 1: Setting up SWAG (Nginx) for Secure Remote Access
We will deploy the entire stack using Bind Mounts and docker compose for full control.
Installing SWAG (Docker)
If you haven't already installed SWAG, no sweat, can continue on here but if you run into any issues you might want to skip back to the dedicated SWAG guide and follow through.
Folder Structure & Bind Mounts
Create a folder structure like this:
/home/user/digital-castle/ <-- Whatever path you want. Mine is /opt/DOCKERS/
├── docker-compose.yml <-- Or wherever you want to keep it
├── .env                <-- CRITICAL for security variables
├── swag/
├── crowdsec/
└── authelia/You can also just use the default user defined bridge network as well. Read up more on docker networking.
Why: MACVLAN is blocked from the host by default, acts like a real network appliance, and segregates this (SWAG) docker from everything else.
Part 1.A The Master Compose File
Save this as docker-compose.yml. Note the use of ${VARIABLES} which we will define shortly. This includes SWAG, with the new Crowdsec below that, all put together. We'll immediately begin configuring CrowdSec below. Patience!
networks:
  vlan7_home:
    driver: macvlan
    driver_opts:
      parent: enp40s0f1 # Use your actual parent interface
    ipam:
      config:
        - subnet: 10.0.0.0/24 # Any class C / RFC1918 range
          gateway: 10.0.0.1 # Gateway of this subnet/vlan/network
  backend:
    name: dockernet
    driver: bridge

### SWAG config begin
  swag:
    image: lscr.io/linuxserver/swag
    container_name: swag
    networks:
      docker_vlan:
        ipv4_address: X.X.X.X
    cap_add:
      - NET_ADMIN
    environment:
      - PUID=1000
      - PGID=1000
      - TZ=America/Toronto
      - URL=corelab.tech
      - VALIDATION=dns #can be http or dns
      - SUBDOMAINS=wildcard #optional
#      - CERTPROVIDER= #optional
      - DNSPLUGIN=cloudflare
      - DOCKER_MODS=linuxserver/mods:swag-crowdsec|linuxserver/mods:swag-dashboard|linuxserver/mods:swag-cloudflare-real-ip
#      - PROPAGATION= #optional
#      - EMAIL= #optional
      - ONLY_SUBDOMAINS=false #optional, set as false will have swag fetch certs for my extra domains as well!
      - EXTRA_DOMAINS=corelab.tech #optional
#      - STAGING=false #optional
#      - DISABLE_F2B= #optional
#      - SWAG_AUTORELOAD= #optional
#      - SWAG_AUTORELOAD_WATCHLIST= #optional
      - CROWDSEC_API_KEY=${CROWDSEC_API_KEY} | OR put your API key here directly
      - CROWDSEC_LAPI_URL=http://crowdsec:8080 <--- Can be IP or name of your crowdsec below
    volumes:
      - /brain/DOCKERS/swag:/config
    ports:
      - 443:443 # Mandatory, required for functioning
      - 80:80 # Optional
      - 81:81 # If you enabled the dashboard mod above
    restart: unless-stopped

  crowdsec:
    container_name: crowdsec
    image: crowdsecurity/crowdsec:latest
    depends_on:
      - swag
    networks:
      docker_vlan:
        ipv4_address: X.X.X.X
    environment:
      - COLLECTIONS=crowdsecurity/nginx crowdsecurity/base-http-scenarios crowdsecurity/appsec-virtual-patching crowdsecurity/whitelist-good-actors
      - CUSTOM_HOSTNAME=crowdsec
      - PID=1000
      - GID=1000
      - BOUNCER_KEY_SWAG=${CROWDSEC_API_KEY} | Or API key
    volumes:
      - /yourpath/DOCKERS/swag/log/nginx:/var/log/swag:ro
      - /yourpath/DOCKERS/crowdsec/data:/var/lib/crowdsec/data:rw
      - /yourpath/DOCKERS/crowdsec/config:/etc/crowdsec:rw
      - /var/log:/var/log/host:ro
    security_opt:
      - no-new-privileges=true
    restart: unless-stopped
Part 1.B - Firing it up!
Docker commands: docker compose up -d or you can do docker compose up -d crowdsec, if you just want to focus on one. Also, docker compose down crowdsec, or docker compose down for all your dockers.
- Once you start the SWAG & CrowdSec docker up, give it a minute or so, then shut it down. This generates all default folders/files needed.
- Go edit the acquis.yaml file to add the proper log sources in. (Shown below)

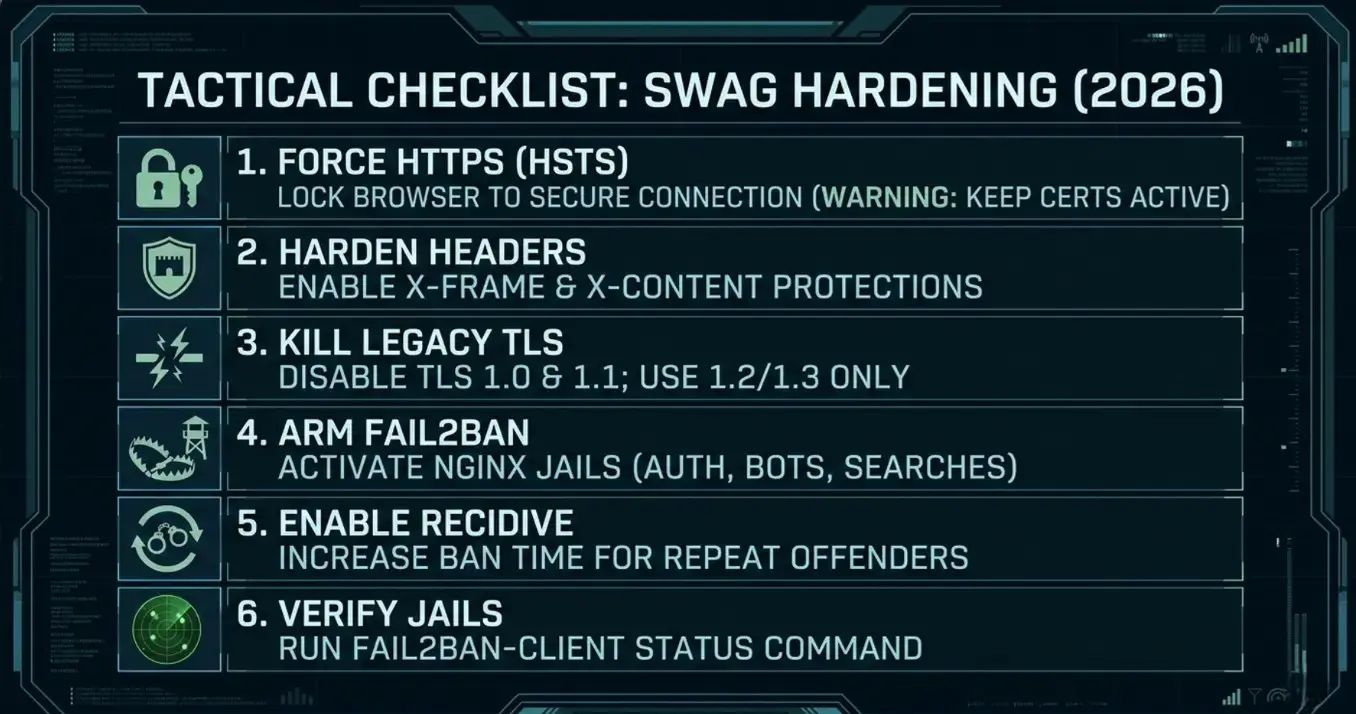
Part 2: SWAG Security Hardening - HSTS, Headers, and TLS 1.3
🎯 The Goal: HSTS & The A+ Rating
To get that elusive "A+" rating, we need to enable HSTS (HTTP Strict Transport Security).
- What it does: It tells browsers, "Never, ever try to talk to me over HTTP again. HTTPS only. Period."
- ⚠️ Tactical Warning: Only enable this if your SSL certificates (Certbot) are working perfectly. If they expire with HSTS active, you will be locked out of your own domain.
- The Reward: It stops "Protocol Downgrade Attacks" dead in their tracks.
🛠️ Step 1: The "One-Line" HSTS Fix
The LinuxServer team has already done the heavy lifting; they commented out the HSTS line in the default config to protect beginners from locking themselves out.
- Open your SWAG config: Navigate to your mapped volume:
/swag/config/nginx/ssl.conf. - Find the HSTS line: Scroll down until you see the
# HSTSsection. You will see a line starting with# add_header Strict-Transport-Security.... - Uncomment it: Remove the
#so it looks like this:
add_header Strict-Transport-Security "max-age=63072000; includeSubDomains; preload" always;- Note:
max-age=63072000is 2 years. Qualys requires at least 6 months (approx 15.7M seconds) for an A+. - Save and Restart SWAG:
docker restart swag🚨 Reminder: Only do this if you have a working SSL certificate and you are confident your auto-renewal (Certbot) is working!
🛡️ Step 2: Hardening HTTP Headers
While we are in the config, let's stop other sites from "framing" your services (a common phishing/clickjacking tactic) or injecting bad scripts.
Still in /swag/config/nginx/ssl.conf, ensure these lines are active (uncommented):
# Stop other sites from embedding yours (Clickjacking protection)
add_header X-Frame-Options "SAMEORIGIN" always;

# Stop the browser from "guessing" the MIME type (MIME Sniffing protection)
add_header X-Content-Type-Options "nosniff" always;

# Enable the browser's built-in XSS filter
add_header X-XSS-Protection "1; mode=block" always;

# Referrer Policy (Privacy)
add_header Referrer-Policy "strict-origin-when-cross-origin" always;
🚫 Step 3: Killing Legacy TLS (1.0 & 1.1)
In 2026, NGINX might still support TLS 1.0 or 1.1 for ancient devices (think: Android phones from 2012). For a Digital Castle, we cut the weak links. Only allow modern, encrypted lanes.
- In
ssl.conf, look forssl_protocols. - Change it to:
ssl_protocols TLSv1.2 TLSv1.3;- Optional: If you want to be bleeding edge (and potentially break older smart TVs), you can use
TLSv1.3only, but1.2is still considered secure and "Green" by Qualys.
🪤 Step 4: Arming Fail2Ban (The Bot Traps)
By default, Fail2Ban might only be watching for SSH attemptas. But for a web server, the attacks are coming via HTTP (people guessing passwords, bots scanning for wp-login.php, etc.).
SWAG comes with pre-written "Jails" for Nginx, but they are often disabled (commented out) or need explicit activation.
- Open your Jail Config: Navigate to
/swag/fail2ban/jail.local. - Find the NGINX section: Scroll down until you see the headers like
[nginx-http-auth]. - Enable the Core 5: Ensure
enabled = trueis set for these specific jails. If they are missing, add them:
[nginx-http-auth]
enabled  = true
filter   = nginx-http-auth
port     = http,https
logpath  = /config/log/nginx/error.log

[nginx-badbots]
enabled  = true
filter   = nginx-badbots
port     = http,https
logpath  = /config/log/nginx/access.log

[nginx-botsearch]
enabled  = true
filter   = nginx-botsearch
port     = http,https
logpath  = /config/log/nginx/access.log

[nginx-deny]
enabled  = true
filter   = nginx-deny
port     = http,https
logpath  = /config/log/nginx/error.log

[nginx-unauthorized]
enabled  = true
filter   = nginx-unauthorized
port     = http,https
logpath  = /config/log/nginx/error.log
FULL config below:
# This is the custom version of the jail.conf for fail2ban
# Feel free to modify this and add additional filters
# Then you can drop the new filter conf files into the fail2ban-filters
# folder and restart the container

[DEFAULT]
# Prevents banning LAN subnets
ignoreip = 10.0.0.0/8
           192.168.0.0/16
           172.16.0.0/12

# Changes the default ban action from "iptables-multiport", which causes issues on some platforms, to "iptables-allports".
banaction = iptables-allports

# "bantime" is the number of seconds that a host is banned.
bantime  = 1800

# A host is banned if it has generated "maxretry" during the last "findtime"
# seconds.
findtime  = 600

# "maxretry" is the number of failures before a host get banned.
maxretry = 3

[ssh]
enabled = false

[nginx-http-auth]
enabled  = true
filter   = nginx-http-auth
port     = http,https
logpath  = /config/log/nginx/error.log

[nginx-badbots]
enabled  = true
port     = http,https
filter   = nginx-badbots
bantime  = 12h
logpath  = /config/log/nginx/access.log
maxretry = 2

[nginx-botsearch]
enabled  = true
port     = http,https
filter   = nginx-botsearch
logpath  = /config/log/nginx/access.log

[nginx-deny]
enabled  = true
port     = http,https
filter   = nginx-deny
logpath  = /config/log/nginx/error.log

[nginx-unauthorized]
enabled  = true
port     = http,https
filter   = nginx-unauthorized
logpath  = /config/log/nginx/access.log
maxretry = 6

[nginx-limit-req]
enabled = true
port    = http,https
filter  = nginx-limit-req
logpath = /config/log/nginx/error.log
bantime = 7200- Restart SWAG:
docker restart swag🧠 Deep Dive: What are these traps actually catching?
nginx-http-auth: The classic brute-force protector. If someone fails HTTP Basic Auth (the popup login box) too many times, they get banned.nginx-badbots: Blocks known malicious User Agents (scrapers like "EmailSiphon" or "80legs") that harvest your site data.nginx-botsearch: This is the most active one. It catches scripts looking for known vulnerabilities like/phpmyadmin,/wp-login.php, or/setup.cgi. If an IP asks for a non-existent file that implies hacking intent, they are gone.nginx-unauthorized: Bans IPs that trigger a "401 Unauthorized" error repeatedly.
⛓️ Step 5: The "Perma-Ban" (Recidive Jail)
When they really piss you off!
Standard bans are temporary (usually 10 minutes). Smart bots know this; they wait 11 minutes and try again. The Recidive jail stops this cycle.
- Open
jail.localagain. - Add/Enable the Recidive block:
[recidive]
enabled  = true
logpath  = /config/log/fail2ban/fail2ban.log
banaction = iptables-allports
bantime  = 1w  ; Ban for 1 week
findtime = 1d  ; Look back 1 day
maxretry = 3 ; If they get banned 3 times in 1 day... bye bye.- Restart SWAG.
docker compose up -d --force-recreate swag
Why this matters: This keeps your logs clean. Instead of seeing the same Russian bot IP get banned 50 times a day, you see it get banned once by the standard jail, then once by Recidive, and then silence for a week. Or a year, you decide!
✅ Step 6: Verification & The "Ban-Hammer"
You configured the jails, but are they actually running? Fail2Ban often fails silently if there is a typo in your jail.local. Let's verify the guard dogs are awake.
- Check the Status: Run this command in your terminal (outside the container):
docker exec -it swag fail2ban-client status- The Correct Output: You should see a list of your enabled jails under "Jail list". It should look like this:
Status
|- Number of jail:	6
`- Jail list:	nginx-badbots, nginx-botsearch, nginx-deny, nginx-http-auth, nginx-limit-req, nginx-unauthorized
If you see "Number of jail: 0" or missing names, check your jail.local for typos!
- Check the Banned List (Optional): Want to see if you have caught anyone yet? Check the
nginx-botsearchjail specifically:
docker exec -it swag fail2ban-client status nginx-botsearchIt will list the specific IP addresses currently in the "penalty box."
Monitoring and Fine-Tuning
A robust Fail2ban configuration isn't a set-and-forget solution. Continuous monitoring and fine-tuning are essential. Regularly review your Fail2ban logs to identify false positives and adjust your filters accordingly. Pay attention to the number of bans triggered by each jail and investigate any unusual activity. Consider implementing a centralized logging system to aggregate Fail2ban logs for easier analysis.
Commands for Monitoring:
s docker exec -it swag /bin/bashfail2ban-client status: Shows the status of all jails.fail2ban-client status <jail_name>: Shows the status of a specific jail.fail2ban-client set <jail_name> <parameter> <value>: Changes a jail's parameters dynamically (live, on the fly).
Important Notes and Cautions
- Testing is Crucial: Always test your configuration changes in a non-production (if possible/available) environment before deploying them to production. Incorrectly configured filters can lead to legitimate users being blocked.
- Regular Updates: Keep your Fail2ban software and filters up to date to protect against new attack vectors.
- Understand Your Logs: Familiarize yourself with your web server and system logs to write effective filters.
- Fail2ban is a Defence Layer: Fail2ban is a valuable security tool, but it’s not a silver bullet. It should be part of a comprehensive security strategy along with CrowdSec and a reverse proxy, plus a firewall. See how many layers we're talking about here and we haven't even gotten into IDS/IPS nor WAF yet!
🛡️ Part 3: Implementing CrowdSec for Real-Time Threat Intelligence
This is where most guides fail. They tell you to run the container, but they don't tell you how to link the Bouncer securely. CrowdSec (The Brain) needs to give SWAG (The Bouncer) an API Key so it can execute bans.
Bouncer Setup
Next, nano /opt/DOCKERS/swag/crowdsec/acquis.yml Ensure it looks like the code below:
filenames:
  - /var/log/swag/*
#this is not a syslog log, indicate which kind of logs it is
labels:
  type: nginx
---
filenames:
 - /var/log/auth.log*
 - /var/log/syslog
labels:
  type: syslog
#---
#filename: /var/log/apache2/*.log
#labels:
#  type: apache2
Pro Tip: If you skip this, CrowdSec is running blind. It needs the type: nginx label to know which parser to use.
Now you can drop yourself into the crowdsec docker to check things out quickly. Type: docker exec -it crowdsec /bin/sh
You'll get dropped into the crowdsec's shell. This means the container is running and alive. You can try cscli metrics and will see some output. This is good. Type exit until it drops you back to normal console/command prompt on your host again.
Now check their logs one at a time, CTRL-C to drop out.
docker logs -f swag or docker logs -f crowdsec and then CTRL-C to cancel.
Now, we generate the API key that will link the bouncer to crowdsec and allow blocks to start happening.
docker exec -t crowdsec cscli bouncers add swag⚠️ STOP: Copy the API Key immediately. You cannot see it again. Paste it into notepad++ or whatever you can paste it in. Now you need to edit the .env file (The "Missing Tip"). We do not hardcode secrets in docker-compose.yml. You CAN if you're having issues but you should put them in the .env file.
Create a file named .env in your folder and paste your key that you just copied above:
nano .env and;
Paste the key you just copied into the top line.

#Crowdsec config
CROWDSEC_API_KEY=yourkeywhichisveryrandom- CROWDSEC_API_KEY=${CROWDSEC_API_KEY} in your compose file we created earlier pulls from this hidden file. It keeps your config clean and secure.Confirmation & Testing
Now at this stage, I run:
docker compose down && docker compose up -dThis restarts the entire stack, if things aren't quite working, try this:
docker compose up -d --force-recreate swagWhich rebuilds SWAG, ensuring it picks up the new mods & variables you have set, and starts communicating with CrowdSec! Check logs like this, one at a time:
docker logs -f swag
docker logs -f crowdsec
CTRL-C to cancel
You should see that crowdsec has picked up and read logs you specified in acquis.yaml and now by running: docker exec -t crowdsec cscli bouncers list
docker exec -t crowdsec cscli bouncers list
───────────────────────────────────────────────────────────────────────────────────────────
 Name  IP Address  Valid  Last API pull         Type                    Version  Auth Type
───────────────────────────────────────────────────────────────────────────────────────────
 SWAG  10.0.0.4    ✔️     2026-04-12T03:06:26Z  crowdsec-nginx-bouncer  v1.1.3   api-key
───────────────────────────────────────────────────────────────────────────────────────────
So long as you see there's a DTG in the "Last API pull" and a check mark, you're GTG! ✅
Now check CrowdSec is fully functional with:
docker exec -t crowdsec cscli metrics
docker exec -t crowdsec cscli decisions list
With the first command, you'll see a pile of info about everything it's downloaded and about it's 'buckets' and logs parsed. You really want to ensure it has logs parsed and not unparsed! It's pretty lengthy so I'll enclose the output in a toggle you can expand:
Output of docker exec -t crowdsec cscli metrics
╭─────────────────────────────────────────────────────────────────────────────────────────────────────────────────────────╮
│ Acquisition Metrics │
├───────────────────────────────┬────────────┬──────────────┬────────────────┬────────────────────────┬───────────────────┤
│ Source │ Lines read │ Lines parsed │ Lines unparsed │ Lines poured to bucket │ Lines whitelisted │
├───────────────────────────────┼────────────┼──────────────┼────────────────┼────────────────────────┼───────────────────┤
│ : │ - │ - │ - │ - │ 202 │
│ file:/var/log/swag/access.log │ 67.98k │ 67.98k │ - │ 41.17k │ 6.75k │
│ file:/var/log/swag/error.log │ 24 │ 24 │ - │ 13 │ - │
╰───────────────────────────────┴────────────┴──────────────┴────────────────┴────────────────────────┴───────────────────╯
╭──────────────────────────────────────────────╮
│ Local API Alerts │
├──────────────────────────────────────┬───────┤
│ Reason │ Count │
├──────────────────────────────────────┼───────┤
│ LePresidente/http-generic-401-bf │ 1 │
│ LePresidente/http-generic-403-bf │ 7 │
│ crowdsecurity/http-crawl-non_statics │ 1 │
╰──────────────────────────────────────┴───────╯
╭───────────────────────────────────────────╮
│ Local API Decisions │
├─────────────────┬────────┬────────┬───────┤
│ Reason │ Origin │ Action │ Count │
├─────────────────┼────────┼────────┼───────┤
│ http:bruteforce │ CAPI │ ban │ 24809 │
│ http:crawl │ CAPI │ ban │ 2554 │
╰─────────────────┴────────┴────────┴───────╯
╭─────────────────────────────────────╮
│ Local API Metrics │
├────────────────────┬────────┬───────┤
│ Route │ Method │ Hits │
├────────────────────┼────────┼───────┤
│ /v1/decisions │ GET │ 56288 │
│ /v1/heartbeat │ GET │ 5497 │
│ /v1/usage-metrics │ POST │ 550 │
│ /v1/watchers/login │ POST │ 94 │
╰────────────────────┴────────┴───────╯
╭──────────────────────────────────────────╮
│ Local API Bouncers Metrics │
├─────────┬───────────────┬────────┬───────┤
│ Bouncer │ Route │ Method │ Hits │
├─────────┼───────────────┼────────┼───────┤
│ SWAG │ /v1/decisions │ GET │ 56287 │
╰─────────┴───────────────┴────────┴───────╯
╭─────────────────────────────────────────────╮
│ Local API Bouncers Decisions │
├─────────┬───────────────┬───────────────────┤
│ Bouncer │ Empty answers │ Non-empty answers │
├─────────┼───────────────┼───────────────────┤
│ SWAG │ 56287 │ 0 │
╰─────────┴───────────────┴───────────────────╯
╭──────────────────────────────────────────╮
│ Local API Machines Metrics │
├──────────┬───────────────┬────────┬──────┤
│ Machine │ Route │ Method │ Hits │
├──────────┼───────────────┼────────┼──────┤
│ crowdsec │ /v1/heartbeat │ GET │ 5497 │
╰──────────┴───────────────┴────────┴──────╯
╭───────────────────────────────────────────────────────────────────╮
│ Parser Metrics │
├────────────────────────────────────┬─────────┬─────────┬──────────┤
│ Parsers │ Hits │ Parsed │ Unparsed │
├────────────────────────────────────┼─────────┼─────────┼──────────┤
│ child-crowdsecurity/http-logs │ 204.01k │ 141.45k │ 62.55k │
│ child-crowdsecurity/nginx-logs │ 68.03k │ 68.00k │ 24 │
│ crowdsecurity/cdn-whitelist │ 202 │ 202 │ - │
│ crowdsecurity/dateparse-enrich │ 68.00k │ 68.00k │ - │
│ crowdsecurity/geoip-enrich │ 61.25k │ 61.25k │ - │
│ crowdsecurity/http-logs │ 68.00k │ 68.00k │ - │
│ crowdsecurity/nginx-logs │ 68.00k │ 68.00k │ - │
│ crowdsecurity/non-syslog │ 68.00k │ 68.00k │ - │
│ crowdsecurity/overseerr-whitelist │ 68.00k │ 68.00k │ - │
│ crowdsecurity/public-dns-allowlist │ 68.00k │ 68.00k │ - │
│ crowdsecurity/rdns │ 202 │ 202 │ - │
│ crowdsecurity/seo-bots-whitelist │ 202 │ 202 │ - │
│ crowdsecurity/whitelists │ 68.00k │ 68.00k │ - │
╰────────────────────────────────────┴─────────┴─────────┴──────────╯
╭──────────────────────────────────────────────────────────────────────────────────────────────────────────╮
│ Scenario Metrics │
├────────────────────────────────────────────┬───────────────┬───────────┬──────────────┬────────┬─────────┤
│ Scenario │ Current Count │ Overflows │ Instantiated │ Poured │ Expired │
├────────────────────────────────────────────┼───────────────┼───────────┼──────────────┼────────┼─────────┤
│ LePresidente/http-generic-401-bf │ - │ - │ 12 │ 12 │ 12 │
│ LePresidente/http-generic-403-bf │ - │ - │ 6 │ 6 │ 6 │
│ crowdsecurity/http-admin-interface-probing │ - │ 45 │ 407 │ 554 │ 362 │
│ crowdsecurity/http-backdoors-attempts │ - │ 11 │ 98 │ 109 │ 87 │
│ crowdsecurity/http-bad-user-agent │ - │ - │ 86 │ 86 │ 86 │
│ crowdsecurity/http-crawl-non_statics │ 2 │ - │ 24.79k │ 29.63k │ 24.79k │
│ crowdsecurity/http-path-traversal-probing │ - │ - │ 7 │ 8 │ 7 │
│ crowdsecurity/http-probing │ - │ 161 │ 4.53k │ 9.82k │ 4.37k │
│ crowdsecurity/http-sensitive-files │ - │ - │ 276 │ 288 │ 276 │
│ crowdsecurity/http-wordpress-scan │ - │ 95 │ 333 │ 675 │ 238 │
╰────────────────────────────────────────────┴───────────────┴───────────┴──────────────┴────────┴─────────╯
╭───────────────────────────────────────────────────────────────────────────────────────────────╮
│ Whitelist Metrics │
├────────────────────────────────────┬────────────────────────────────────┬───────┬─────────────┤
│ Whitelist │ Reason │ Hits │ Whitelisted │
├────────────────────────────────────┼────────────────────────────────────┼───────┼─────────────┤
│ crowdsecurity/cdn-whitelist │ CDN provider │ 202 │ 202 │
│ crowdsecurity/overseerr-whitelist │ Overseerr whitelist │ 68002 │ - │
│ crowdsecurity/public-dns-allowlist │ public DNS server │ 68002 │ - │
│ crowdsecurity/seo-bots-whitelist │ good bots (search engine crawlers) │ 202 │ - │
│ crowdsecurity/whitelists │ private ipv4/ipv6 ip/ranges │ 68002 │ 6752 │
╰────────────────────────────────────┴────────────────────────────────────┴───────┴─────────────╯
Decisions list shows you if it's made any active decisions to block already. Likely that will take quite some time unless you have a busy publicly facing site.
Now, if you're hosting anything publicly, run docker exec -t crowdsec cscli alerts list and see what you get. At the moment I'm showing some brute force IP's being blocked:
 docker exec -t crowdsec cscli alerts list
╭──────┬───────────────────┬──────────────────────────────────────┬─────────┬───────────┬───────────┬──────────────────────┬──────────╮
│  ID  │       value       │                reason                │ country │     as    │ decisions │      created_at      │   kind   │
├──────┼───────────────────┼──────────────────────────────────────┼─────────┼───────────┼───────────┼──────────────────────┼──────────┤
│ 8014 │ Ip:142.127.208.18 │ LePresidente/http-generic-403-bf     │ CA      │ 577 BACOM │ ban:1     │ 2026-04-05T06:08:21Z │ crowdsec │
│ 8013 │ Ip:142.127.208.18 │ LePresidente/http-generic-403-bf     │ CA      │ 577 BACOM │ ban:1     │ 2026-04-05T06:07:21Z │ crowdsec │
│ 8012 │ Ip:142.127.208.18 │ LePresidente/http-generic-403-bf     │ CA      │ 577 BACOM │ ban:1     │ 2026-04-05T06:05:48Z │ crowdsec │
│ 8011 │ Ip:142.127.208.18 │ LePresidente/http-generic-403-bf     │ CA      │ 577 BACOM │ ban:1     │ 2026-04-05T06:04:30Z │ crowdsec │
│ 8010 │ Ip:142.127.208.18 │ LePresidente/http-generic-403-bf     │ CA      │ 577 BACOM │ ban:1     │ 2026-04-05T06:02:57Z │ crowdsec │
│ 8009 │ Ip:142.127.208.18 │ LePresidente/http-generic-403-bf     │ CA      │ 577 BACOM │ ban:1     │ 2026-04-05T06:01:39Z │ crowdsec │
│ 8008 │ Ip:142.127.208.18 │ crowdsecurity/http-crawl-non_statics │ CA      │ 577 BACOM │ ban:1     │ 2026-04-05T06:00:37Z │ crowdsec │
│ 8007 │ Ip:142.127.208.18 │ LePresidente/http-generic-401-bf     │ CA      │ 577 BACOM │ ban:1     │ 2026-04-05T06:00:37Z │ crowdsec │
│ 8006 │ Ip:142.127.208.18 │ LePresidente/http-generic-403-bf     │ CA      │ 577 BACOM │ ban:1     │ 2026-04-05T06:00:37Z │ crowdsec │
╰──────┴───────────────────┴──────────────────────────────────────┴─────────┴───────────┴───────────┴──────────────────────┴──────────╯
Real-time Blocking
You now have live, real-time blocking on the fly protecting your exposed services.
Why it beats Fail2Ban
CrowdSec's power is the crowd-sourced threat intelligence. You are protected and defended by all the other users utilizing CrowdSec and this is it's true power. Fail2Ban simply blocks things based on defined variables and lists. CrowdSec adapts and moves on the fly with it's crowd-sourced threat feeds.
Part 4: OSI Model Security - Mapping the CIA Triad to your Homelab
Infrastructure & Network Segmentation (layering)
Let's reinforce the core concept: layered security. It’s not about relying on a single solution. It’s about creating a defence-in-depth strategy. Remember the OSI model from my networking series? Here's how it ties into security with multiple layers:
flowchart TB
    %% ========================
    %% Layer 7: Application
    subgraph L7["🖥️ L7 Application"]
        direction TB
        L7a["🛡️ WAF - C/I"]
        L7b["💻 Secure coding - I"]
        L7c["🔐 Auth & MFA - C/I"]
        L7d["🛡️ EDR - C/I"]
    end

    %% Layer 6: Presentation
    subgraph L6["🎨 L6 Presentation"]
        direction TB
        L6a["🔐 TLS - C/I"]
        L6b["📝 Encoding & sanitization - I"]
        L6c["🔑 Masking & tokenization - C/I"]
    end

    %% Layer 5: Session
    subgraph L5["🤝 L5 Session"]
        direction TB
        L5a["⏳ Timeouts - C"]
        L5b["🔑 Tokens - C/I"]
        L5c["🛡️ VPN / ZTNA - C"]
    end

    %% Layer 4: Transport
    subgraph L4["📦 L4 Transport"]
        direction TB
        L4a["🔐 TLS / SSH - C/I"]
        L4b["🚪 Port filtering ACLs - C"]
        L4c["⚡ Rate limiting / DoS - A"]
    end

    %% Layer 3: Network
    subgraph L3["🛰️ L3 Network"]
        direction TB
        L3a["🔥 Firewall - C/A"]
        L3b["🕵️ IDS/IPS - C/I"]
        L3c["🧱 Segmentation VLANs - C"]
        L3d["🔐 IPsec tunnels - C/I"]
    end

    %% Layer 2: Data Link
    subgraph L2["🔗 L2 Data Link"]
        direction TB
        L2a["🔒 802.1X NAC - C"]
        L2b["🏷️ MAC filtering - C"]
        L2c["📜 ARP/DHCP checks - I"]
        L2d["📶 WiFi WPA3 - C"]
    end

    %% Layer 1: Physical
    subgraph L1["⚡ L1 Physical"]
        direction TB
        L1a["🔐 Locks - C"]
        L1b["🎥 CCTV - C/I"]
        L1c["⚡ Power/HVAC/Fire - A"]
        L1d["🗑️ Media sanitization - C/I"]
    end

    %% Layer flow (top-down)
    L7 --> L6 --> L5 --> L4 --> L3 --> L2 --> L1

    %% Class Definitions: CIA Neon/Cyberpunk
    classDef conf fill:#00ffff,stroke:#00ffff,stroke-width:2px,color:#111,font-weight:bold;
    classDef integ fill:#ff00ff,stroke:#ff33ff,stroke-width:2px,color:#111,font-weight:bold;
    classDef avail fill:#ff8c00,stroke:#ffaa33,stroke-width:2px,color:#111,font-weight:bold;

    %% Glow effect for cyberpunk
    classDef confGlow stroke:#00ffff,stroke-width:4px,stroke-dasharray:2 1;
    classDef integGlow stroke:#ff00ff,stroke-width:4px,stroke-dasharray:2 1;
    classDef availGlow stroke:#ff8c00,stroke-width:4px,stroke-dasharray:2 1;

    %% Assign classes
    class L7a,L7c,L7d,L6a,L6c,L5a,L5b,L5c,L4a,L4b,L3a,L3b,L3c,L3d,L2a,L2b,L2d,L1a,L1b,L1d conf,confGlow;
    class L7a,L7b,L7c,L7d,L6a,L6b,L6c,L5b,L4a,L3b,L3d,L2c,L1b,L1d integ,integGlow;
    class L4c,L3a,L1c avail,availGlow;
Confidentiality (C) → cyan (#0ff)
Integrity (I) → magenta (#ff00ff)
Availability (A) → bright orange (#ff8c00)
Obviously in a home network you likely won't have all of this, but it's to illustrate that you should kinda be aiming for it. Just having "a firewall" isn't enough. That's like, the moat around your castle only!
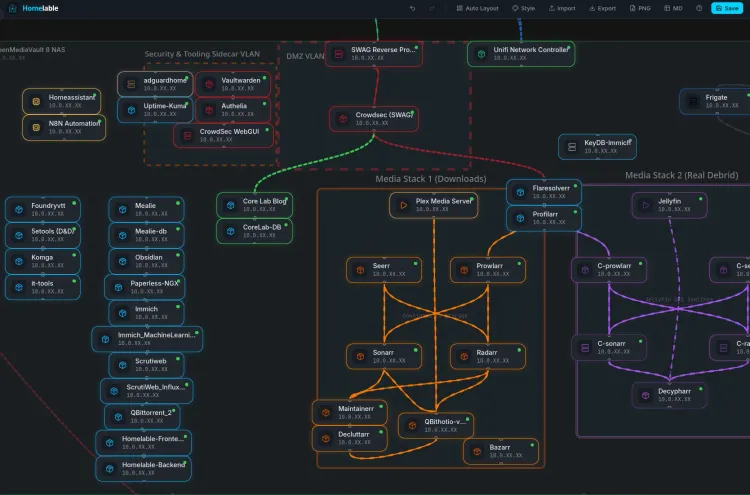
Network Segmentation (VLANs)
If you followed my networking series and setup your VLANs properly, you can now have something like this! Head over to the OPNsense setup guide, if you don't have an effective firewall or want one that SLAPS.
flowchart TD
    %% ==========================
    %% Host Layer
    subgraph Host["🖥️ Docker Host / Engine"]
        H["💻 Host OS / Docker Engine"]
    end

    %% ==========================
    %% WAN / Firewall
    subgraph Firewall["🛡️ OPNsense Firewall / WAN"]
        FW["🌐 WAN / Internet"]
        FW --> H
    end

    %% ==========================
    %% SWAG / NGINX Reverse Proxy
    subgraph SWAG["🏰 SWAG Container / NGINX Reverse Proxy"]
        NGINX["🌐 NGINX Proxy"]
        H --> NGINX
        NGINX --> FW
    end

    %% ==========================
    %% Backend Containers - Bridge Network
    subgraph BridgeNet["🌉 Bridge Network Backend"]
        Ghost["👻 Ghost Blog"]
        Jellyseerr["🎬 Jellyseerr"]
        HomeAssistant["🏠 Home Assistant"]
        NGINX --> Ghost
        NGINX --> Jellyseerr
        NGINX --> HomeAssistant
        Ghost --- Jellyseerr
        Jellyseerr --- HomeAssistant
        Ghost --- HomeAssistant
    end

    %% Backend Containers - Macvlan / IPVLAN
    subgraph MacvlanNet["🔗 Macvlan / IPVLAN Backend"]
        Radarr["🎞️ Radarr"]
        Sonarr["📺 Sonarr"]
        NGINX --> Radarr
        NGINX --> Sonarr
        Radarr --- Sonarr
    end

    %% Backend Containers - Internal Docker-only
    subgraph InternalNet["🔒 Internal Docker Network"]
        Redis["🟢 Redis DB"]
        Postgres["🐘 Postgres DB"]
        Ghost --- Redis
        Jellyseerr --- Postgres
        Redis --- Postgres
    end

    %% ==========================
    %% Node Styling
    style H fill:#f88,stroke:#333,stroke-width:2px,color:#111
    style FW fill:#fbbf24,stroke:#333,stroke-width:2px,color:#111
    style NGINX fill:#d8b4fe,stroke:#333,stroke-width:2px,color:#111
    style Ghost fill:#93c5fd,stroke:#333,stroke-width:1px,color:#111
    style Jellyseerr fill:#5eead4,stroke:#333,stroke-width:1px,color:#111
    style HomeAssistant fill:#60a5fa,stroke:#333,stroke-width:1px,color:#111
    style Radarr fill:#fcd34d,stroke:#333,stroke-width:1px,color:#111
    style Sonarr fill:#fbbf24,stroke:#333,stroke-width:1px,color:#111
    style Redis fill:#34d399,stroke:#333,stroke-width:1px,color:#111
    style Postgres fill:#3b82f6,stroke:#333,stroke-width:1px,color:#111

    %% ==========================
    %% Subgraph Styling (dashed outlines)
    style Host fill:transparent,stroke:#888,stroke-width:1px,stroke-dasharray:4 4
    style Firewall fill:transparent,stroke:#888,stroke-width:1px,stroke-dasharray:4 4
    style SWAG fill:transparent,stroke:#888,stroke-width:1px,stroke-dasharray:4 4
    style BridgeNet fill:transparent,stroke:#888,stroke-width:1px,stroke-dasharray:4 4
    style MacvlanNet fill:transparent,stroke:#888,stroke-width:1px,stroke-dasharray:4 4
    style InternalNet fill:transparent,stroke:#888,stroke-width:1px,stroke-dasharray:4 4
🛑 Explainer: Fail2Ban (The Silent Defender)
Fail2Ban is a daemon that monitors log files for suspicious activity and automatically blocks offending IP addresses. It's incredibly easy to set up and use but luckily for you, it's 👉included in SWAG by default 🏁
Fail2Ban monitors your logs for "dumb" attacks - script kiddies trying admin/admin 50 times in a second.
- Verification: Check your
./swag/fail2ban/jail.local. - The Default Jails: SWAG includes 5 jails by default (including
nginx-http-authandnginx-botsearch). - Why keep it? CrowdSec is smart, but Fail2Ban is fast. It handles the "noise" so CrowdSec can focus on the complex threats.
🛡️ Explainer: CrowdSec (The Watchmen)
This is where most guides fail. They tell you to run the container, but they don't tell you how to link the Bouncer securely.
CrowdSec takes threat detection to the next level by employing behavioural analysis. Unlike Fail2Ban, which relies on predefined patterns, CrowdSec learns the "normal" behaviourof your system.
- How it Works: CrowdSec analyzes network traffic in real-time, identifying anomalies and deviations from established baselines. It uses a lightweight, distributed architecture and is "crowdsourced". The beauty of this is you share your bans with all the other users of CrowdSec, and vice-versa!
- Key Features:
- Behavioural Rules: Define rules based on traffic patterns (e.g., requests per second, URL access, etc.).
- Automatic Learning: CrowdSec continuously adapts to changes in your system's behaviour and receives updates from the "Crowd".
- Integration with Firewalls: Can automatically block traffic based on its analysis with the Bouncer.
Part 5: Authelia - Centralized Multi-Factor Authentication & Authorization
Authelia provides a centralized solution for user authentication and authorization, simplifying user management and enhancing security for your Nginx applications.
🎇This can be a bit of a beast to setup for the first time, but is worth it in the end. Make sure your SWAG instance is running properly, and you have a handle on the basics like enabling a new subdomain served site. Example, you have yourdomain.com but you want to simply serve sonarr.yourdomain.com right? That's actually a subdomain site served via SWAG! This requires proper DNS setup for whomever you run DNS through as well.
How Authelia Performs Multi-Factor Authentication
- How it Works: Authelia acts as an intermediary between your reverse proxy (SWAG) and apps someone would want to access, intercepting all incoming requests and performing authentication and authorization checks before forwarding them to your SWAG protected applications.
- 👉I chose to make a simple user file, but you might prefer to use LDAP or another method.
- Add this to your docker-compose.yml directly below your SWAG and then CrowdSec portions!
5.1 Authelia Docker Compose:
# Authelia begin
# to add a user, add directly to `authelia/users_database.yml`
# then get the encrypted password with
# docker run --rm ghcr.io/authelia/authelia:4.34.6 authelia hash-password yourpassword
# https://www.linuxserver.io/blog/2020-08-26-setting-up-authelia#users_database-yml
  authelia:
    image: ghcr.io/authelia/authelia:latest
    container_name: authelia
    networks:
      backend:
      docker_vlan:
        ipv4_address: X.X.X.X
    environment:
      TZ: 'America/Toronto'
      PUID: '1000'
      PGID: '100'
#    expose:
#      - 9091
#    env_file:
#      - common.env
    volumes:
      - /yourpath/DOCKERS/authelia:/config
    restart: unless-stopped

  KeyDB-Authelia:
    image: eqalpha/keydb:latest
    container_name: keydb-authelia
    restart: unless-stopped
    environment:
      REDIS_ARGS: "--save 60 10"
    networks:
      - backend
See full documentation & setup guidance here.
I am utilizing keydb vs redis because redis went closed source, and keydb is a more performant drop in replacement! FOSS or death!
If you're not hosting email or don't want to have to integrate email with authelia, you can do what I did and just make a file as your users 'database'. Simple as nano /yourpath/authelia/users_database.yml
5.2 users_database.yml
# yamllint disable rule:line-length
---
###############################################################
#                         Users Database                      #
###############################################################

# This file can be used if you do not have an LDAP set up.

users:
  first_user:
    displayname: "myusername"
    password: "crazyargon2_hashed_pw" <--Change this!!!
    email: [email protected]
    groups:
      - admins
      - dev
  second_user:
    displayname: "My Buddy"
    password: "Hiscrazy_encrypted_pw"
    email: [email protected]
    groups: []

...
# yamllint enable rule:line-length
😏Users declaration
users: at the top has to stay that way, this is where you are 'declaring' all users below that line. It's YML so again, be careful with your indents! Placeholder first_user: can be anything, such as john or Tim_Bob or whatever you want. I kept my username and display name the same for simplicity but you could do something like displayname: "Mr Soandso" and their username is actually, Adam Soandso.
🤫Password declaration
This is a hashed password you cannot simply just type in. To get the proper hashed password you must run a command, which temporarily runs an instance of authelia, generates the password after you enter it, you COPY THIS HASH and paste it into your already created users_database.yml. As here:
docker run --rm -it authelia/authelia:latest authelia crypto hash generate argon2Now enter and confirm your typed password - Hassanl0v3sBDAYs! as an example (don't use that!)
Copy the hash string, it'll start with $argon2id$v=... blah blah blah it'll be relatively long. Argon2 hashed password complete!
Open your users_database.yml again and paste it into the password: spot inside quotes "$argon2is$v...blahblah"
Further reading from their official docs here: https://www.authelia.com/reference/guides/passwords/
5.3 Authelia Configuration - Read carefully‼️
You can get to your authelia config after you've fired up authelia with docker compose. It will populate the default configuration.yml for you whatever path you put authelia at. Example: nano /yourpath/authelia/configuration.yml
---
###############################################################################
#                           Authelia Configuration                            #
###############################################################################
theme: dark

identity_validation:
  reset_password:
    jwt_secret: 'big_string' # change this to at least a 32-character string

server:
#  address: "tcp://:9091/authelia"
  address: 'tcp://0.0.0.0:9091/authelia' # do not change
  buffers:
    read: 4096
    write: 4096

log:
  level: info
  file_path: /config/logs/authelia.log
  keep_stdout: true

totp:
  issuer: authelia.yourdomain.ca # such as auth.yourdomain.com
  period: 30
  skew: 1

authentication_backend:
  password_reset:
    disable: true # change to true if you want to stop users from resetting their passwords
  refresh_interval: 30m # I found that the default of 5 is too short
  file:
    path: /config/users_database.yml # don't change this
    password:
      algorithm: argon2id
      iterations: 1
      key_length: 32
      salt_length: 16
      memory: 1024
      parallelism: 8

access_control: # Recommend reading up on all the options for access control
  default_policy: deny
  rules:
    - domain:
      - yourdomain.ca
      - "*.yourdomain.ca" # This is for a wildcard cert and subdomains
      policy: two_factor

session:
  name: authelia_session # do not change
  secret: 'Make your own' # make this a long strong, 26 characters or so
  same_site: 'lax'
  expiration: '1h'
  inactivity: '5m'
  remember_me: '1M'
  cookies:
    - domain: 'yourdomain.ca' # change
      authelia_url: 'https://authelia.yourdomain.ca' # change
      default_redirection_url: 'https://yourdomain.ca'
      name: 'authelia_session'
      same_site: 'lax'
      inactivity: '5m'
      expiration: '1h'
      remember_me: '1d'
  redis:
    host: keydb-authelia # change to your host machine's IP if this doesn't work
    port: 6379 # if you use IP above, make sure this matches the mapped port
    # password: "" # do not change. if this doesn't work, remove the "" and try again
    # database_index: 0
    # maximum_active_connections: 10
    # minimum_idle_connections: 0

regulation:
  max_retries: 3
  find_time: 10m
  ban_time: 2h

storage:
  encryption_key: 'make your own!' # use a 20-character random string
  local:
    path: /config/db.sqlite3

notifier: # you can only use one of smtp or filesystem. uncomment/comment below as necessary to choose which
  filesystem:
    filename: /config/notification.txt
  disable_startup_check: false
  # smtp:
    # username: [email protected]
    # password: "YOUR_EMAIL_PASSWORD"
    # address: smtp.gmail.com:587 # change to match your smtp uri and port
    # sender: [email protected]
    # subject: "[Authelia] {title}"
    # startup_check_address: [email protected]
    # disable_require_tls: false
    # disable_html_emails: false
    # tls:
      # skip_verify: false
      # minimum_version: TLS1.2
So that's a lot... You can get VERY fine-grained and detailed control, having it ignore your local LAN and bypass 2FA/MFA, integrate with LDAP, the works. This is a more basic config that is bulletproof and just works.
notifier: section! That is where you will find your one time authentication key for linking your Google authenticator to your authelia instance!5.4 Google Authenticator with Authelia
Yes, you can (and I do) use Google Authenticator with my Authelia. So no, you don't necessarily HAVE to use yet another MFA app on your phone! Please read in detail all you need here: https://www.authelia.com/overview/authentication/one-time-password/
If you have authelia running, as above, and your users_database.yml, all GTG. Proceed!
Steps:
- LOGIN to Authelia for the first time with your username and password you put in 3.2 the users_database.yml. Yes your normal password, not that crazy hashed password.
- As soon as you login, you have completed the "First Factor" and you will see some options. ▶️Click One-Time Password method and then;
- ➡️Register device. To register your google authenticator, go look at that file I pointed out a few minutes ago "notifier".
nano /yourpath/authelia/config/notification.txtorcat /yourpath/authelia/config/notification.txt - It should spit out a link you can now click or copy and paste into your browser of choice which will then display a QR code. Exciting yes?
5.5 Enabling Authelia protection with SWAG, finally
Now that the hard parts are all over, to make SWAG & Authelia dance and protect what you want publicly exposed, simply uncomment a couple lines in the SWAG config, and restart SWAG!
Steps:
- Create a DNS entry to act as a subdomain for you. Example: sonarr.yourdomain.com
- Should point to your root domain, or to your WAN IP depending which DNS provider you're using.
nano /yourpath/swag/nginx/proxy-confs/sonarr.subdomain.confnow uncomment the 2 lines where it literally says, # enable for Authelia.- Once you've uncommented those 2 lines, you restart SWAG and test.
docker compose up -d --force-recreate swag- Check the logs to see the container restarted properly and all looks well:
docker logs -f swag
- Try to login from outside your house / turn off wifi on your phone and hit it!
- You should get prompted for your Authelia login first, then the OTP token in your Authenticator!
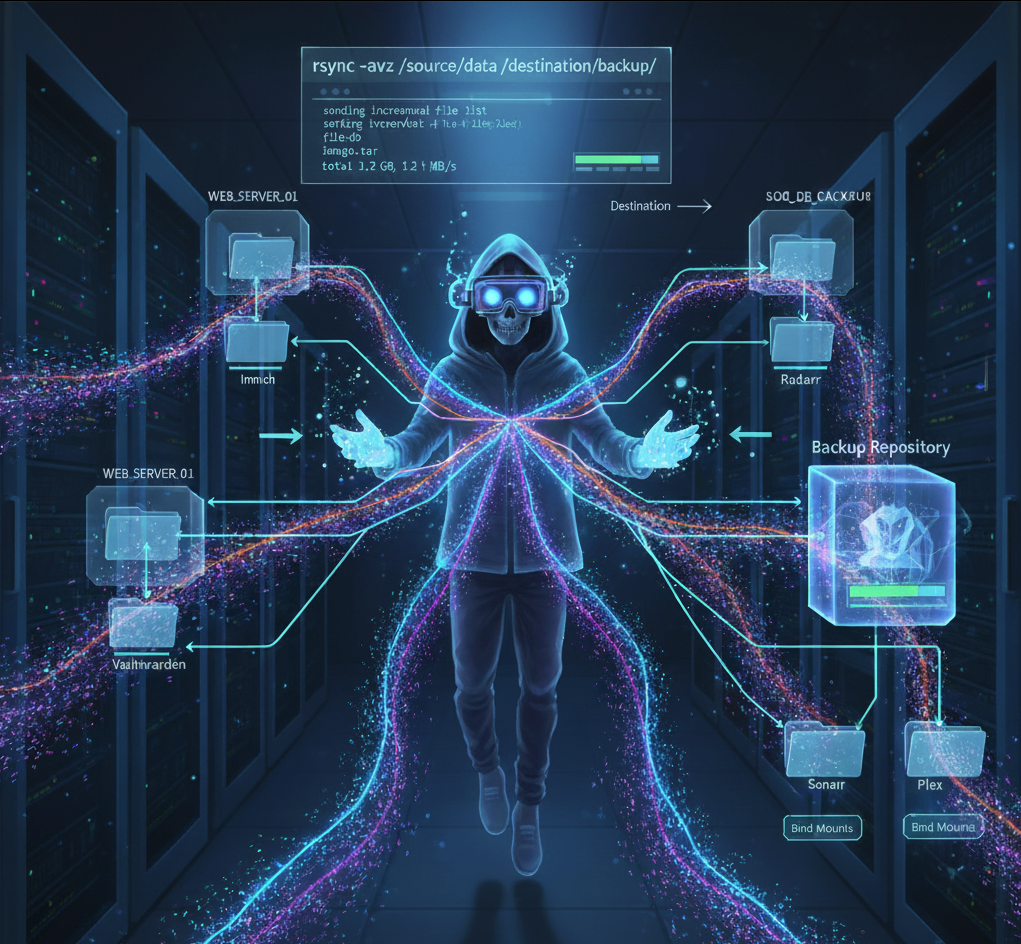
Part 6: Backup & Recovery (Ransomware Reality)
You have several ways to get backups running. Two steps I immediately recommend you take are:
1. Deploy Dockhand! It can do backups for you and;

- Setup my backup script, which intelligently backs up your entire docker infrastructure.
Congrats! You now have fully functioning MFA with SWAG!

🏁 The Result: The Castle Gates Are Closed
You have successfully built a Digital Castle.
Troubleshooting Pro-Tip: If CrowdSec says "bouncer connected" but isn't banning anything, check docker logs crowdsec. If you see "file not found" errors, your acquis.yaml path maps are wrong. Remember: The path in acquis.yaml must match the path inside the container (/var/log/swag), not your host path.
Deploy your own firewall from the Core Lab's complete practical cybersecurity roadmap:
🛡️ Optional: Contributing to the Global Shield (AbuseIPDB)
If you want to be a nice guy - you can contribute what you ban as repeat bad offenders, to the abuse.ch database! Although this is partially redundant and you're already receiving active defence from CrowdSec, it helps the FOSS community.
Steps:
- Create an account at Abuse.ch here.
- Generate an API key once you've done this and SAVE IT in notepad++ or something...
- Modify your jail again:
nano /your/path/swag/fail2ban/jail.localScroll down to the bottom of the [DEFAULT] part and add this to the bottom:
# Abuse IPDB reporting! Categories are from most common.
action = %(action_)s
         %(action_abuseipdb)s[abuseipdb_apikey="YOUR_API_KEY_HERE", abuseipdb_category="5,14,15,18,19,21"]
If done right should look like:
[DEFAULT]
# Prevents banning LAN subnets
ignoreip = 10.0.0.0/8
           192.168.0.0/16
           172.16.0.0/12

# Changes the default ban action from "iptables-multiport", which causes issues on some platforms, to "iptables-allports".
banaction = iptables-allports

# "bantime" is the number of seconds that a host is banned.
bantime  = 1800

# A host is banned if it has generated "maxretry" during the last "findtime"
# seconds.
findtime  = 600

# "maxretry" is the number of failures before a host get banned.
maxretry = 3

# Abuse IPDB reporting! Categories are from most common.
action = %(action_)s
         %(action_abuseipdb)s[abuseipdb_apikey="YOUR_OWN_ABUSE_APIKEY", abuseipdb_category="5,14,15,18,19,21"]
Important: After making changes to jail.local, reload Fail2ban again:
docker exec -it swag /bin/bashfail2ban-client reloadfail2ban-client status
The Digital Castle: Frequently Asked Questions
Q: Will enabling HSTS lock me out of my local network access? A: No. HSTS (HTTP Strict Transport Security) is domain-specific. As long as you access your server via its local IP (e.g., 192.168.x.x), HSTS will not trigger. It only applies when accessing your services via your public domain (e.g., vault.yourdomain.com).
Q: Why run both Fail2Ban and CrowdSec? Isn't that redundant? A: Think of them as a "Layered Defense." Fail2Ban is your local, high-speed reactive agent; it catches "dumb" scripts and brute-force attempts instantly based on your local logs. CrowdSec is your proactive "Watchman"; it uses community-sourced threat intelligence to ban known malicious IPs before they even touch your castle. Together, they provide both speed and global awareness.
Q: I enabled the jails, but fail2ban-client status shows 0 jails. What happened? A: This is almost always a syntax error in jail.local. Ensure you don't have duplicate [header] sections and that every jail has enabled = true. Crucially, verify that your logpath inside the container (e.g., /config/log/nginx/access.log) matches the internal path of the SWAG container, not your host path.
Q: Is TLS 1.2 still safe in 2026? A: Yes. While TLS 1.3 is the modern gold standard, TLS 1.2 remains secure when configured with strong ciphers. We keep 1.2 enabled in this guide to ensure compatibility with older "smart" devices (like older TVs or IoT hubs) that don't yet support 1.3. For the ultimate "Digital Castle," you can restrict to 1.3 if all your clients support it.
Q: Can I get an A+ rating without a Reverse Proxy? A: It is extremely difficult. A Reverse Proxy like SWAG acts as the "Security Negotiator" for your traffic. Without it, your individual apps (Plex, Ghost, etc.) would have to handle their own SSL and complex security headers, which most are not designed to do natively.
Q: If I use Authelia (MFA), do I still need a VPN? A: They serve different purposes. Authelia provides Zero Trust access to specific web apps. A VPN (like Wireguard) provides a secure pipe into your entire network. For maximum security, use Authelia for public-facing web services and a VPN for sensitive admin tasks like OPNsense or Proxmox management.
Q: What happens if I get banned by my own Fail2Ban or CrowdSec? A: Switch to a different network (like your phone's LTE) to access your terminal.
- For Fail2Ban: Run
docker exec -it swag fail2ban-client set <jail-name> unbanip <your-ip>. - For CrowdSec: Run
docker exec -it crowdsec cscli decisions delete --ip <your-ip>.
Q: Why use KeyDB instead of Redis for Authelia? A: In early 2024, Redis moved to a non-open-source license. KeyDB is a high-performance, multithreaded fork that remains fully open-source (BSD licensed). It's a drop-in replacement that aligns better with the "Core Lab" ethos of digital sovereignty.


Member discussion