> ## Content Index
> Fetch the complete content index at: https://corelab.tech/llms.txt
> Use this file to discover other available public pages before exploring further.
# OPNsense Part 3: Layer 7 Control & Threat Intelligence
- URL: https://corelab.tech/opnsensept3/
- Published: 2025-11-19T14:45:37.000Z
- Updated: 2026-11-01T16:35:06.000Z
- Description: Secure your OPNsense firewall with next-gen threat protection. Configure Suricata IDS/IPS, Zenarmor Layer 7 filtering, CrowdSec, and GeoIP blocking.
- Author: Core Lab Joe
- Tags: OPNsense, Zenarmor, Firewall, #2025, Networking, #table-of-content
Now that your network base architecture is established in my [Master Pillar Hub](https://corelab.tech/opnsensept1/) and your stateful firewall rules, NATs, and inter-VLAN flows are locked down in [Part 2](https://corelab.tech/opnsensept2/), it is time to elevate your defense-in-depth posture.
Learning Path • Firewall & Defensive Architecture
### Mastering OPNsense Firewall Architecture
Deploy enterprise-grade routing on bare metal, construct resilient alias hierarchies, enforce Layer 7 threat defence, and automate encrypted off-site disaster recovery.
Lesson 3 of 7 43% Complete
Difficulty Curve Intermediate
Beginner Advanced
[ ✓ Lesson 01 · Planning & Hardware Completed The Ultimate OPNsense Architecture & Hardware Setup Guide → ](https://corelab.tech/opnsensept1/) [ ✓ Lesson 02 · Firewall Rules & NAT Completed Firewall Rules, NAT Configuration, and Traffic Flows → ](https://corelab.tech/opnsensept2/)
03
Lesson 03 · Threat Defence & GeoIP Current Lesson
Advanced Threat Protection, CrowdSec & GeoIP Blocking
[ 04 Lesson 04 · Deep Packet Inspection Suricata IDS/IPS in 26.4+: Inline vs Divert Mode Architecture → ](https://corelab.tech/opnsense-ids-ips-suricata-inline-vs-divert-mode/) [ 05 Lesson 05 · Remote Access VPN OPNsense WireGuard Road Warrior & Remote Access Guide → ](https://corelab.tech/opnsense-wireguard-guide/) [ 06 Lesson 06 · Multi-Gigabit WAN UGREEN USB 3.0 to 2.5GbE Adapter as OPNsense WAN Interface → ](https://corelab.tech/ugreen-usb-2-5g-opnsense-wan/) [ 07 Lesson 07 · Disaster Recovery Capstone Automating OPNsense Backups: Hardened SFTP, Git Audits & REST API → ](https://corelab.tech/automating-opnsense-backups/)
Tested in production on bare-metal hardware
Core Lab Learning Track · Zero Tracking & Direct Implementation
---
In Part 3, we'll focus on **Deep Security & Threat Intelligence**. We will upgrade OPNsense from a standard stateful packet filter into an active threat-prevention gateway using modern intrusion detection (Suricata), layer-7 web filtering (Zenarmor), crowdsourced IP reputation (CrowdSec), and geographic perimeter isolation (GeoIP).
## 1\. Intrusion Detection & Prevention (IDS/IPS with Suricata)
OPNsense includes **Suricata**, a high-performance Network IDS/IPS engine capable of deep packet inspection (DPI).
flowchart TD
IN[Incoming WAN Traffic]
DPI["Suricata Engine
Deep Packet Inspection"]
ATT[Known Attack Signature]
CLEAN[Clean Packet Flow]
DROP["🚫 Drop & Log IP"]
PASS["✅ Pass to LAN / DMZ"]
IN --> DPI
DPI --> ATT
DPI --> CLEAN
ATT --> DROP
CLEAN --> PASS
classDef firewall fill:#001a12,stroke:#00ff88,color:#00ff88,stroke-width:3px
classDef threat fill:#1a0008,stroke:#ff2255,color:#ff2255,stroke-width:2px
classDef safe fill:#001f1a,stroke:#00ffaa,color:#00ffaa,stroke-width:2px
class IN,DPI firewall
class ATT,DROP threat
class CLEAN,PASS safe
### Setup & Configuration Workflow
- **Why:** Detect and automatically drop malicious payloads (port scans, exploit attempts, malware command-and-control beacons) before they reach internal hosts.
- **Where:** Navigate to **Services → Intrusion Detection → Administration**.
#### Implementation Steps
1. Under the **Settings** tab, check **Enabled** and **IPS Mode** (to actively block traffic rather than just log alerts).
2. Select your WAN interface under **Interfaces**.
3. Navigate to **Download Rules**, select rule sets (e.g., `ET Open` / `Abuse.ch`), and click **Download & Update Rules**.
4. Under **Rules**, set default rule actions from `Alert` to `Drop` for critical threat severity classes.
> **Beginner Checkpoint:** Running Suricata in IPS mode requires significant CPU resources and interface hardware support (Netmap). If you experience throughput drops or network instability, start in **IDS mode (Alert only)** first to baseline performance before enabling **IPS Mode (Block)**.
Books have been written on IDS/IPS, and this is just the very tip of the iceberg! For a dedicated more thorough config, hit my OPNsense Suricata guide after:
[How to Configure Suricata IDS/IPS in OPNsense 26.4+ (Inline vs Divert)Learn how to configure Suricata IDS/IPS in OPNsense 26.4+. Compare Inline vs Divert mode, optimize performance, and secure your self-hosted services.Core LabCore Lab Joe](https://corelab.tech/opnsense-ids-ips-suricata-inline-vs-divert-mode/)
---
## 2\. Next-Gen Layer 7 Filtering (Zenarmor Integration)
While traditional firewall rules block by IP address and port, **Zenarmor (Sensei)** inspects traffic at Layer 7 (Application Layer).
### Zenarmor vs. Suricata Feature Matrix
| Security Feature | Suricata (IDS/IPS) | Zenarmor (NGFW) |
| -------------------- | ------------------------------------------ | ----------------------------------------------------- |
| **Primary Focus** | Signature-based exploit detection | L7 application control & web category filtering |
| **Inspection Depth** | Deep Packet Inspection (DPI) | Application & TLS/SNI classification |
| **Use Case** | Blocking inbound attack vectors & exploits | Blocking malicious sites, adult content, app controls |
| **Placement** | WAN / per-interface | Internal VLAN interfaces (LAN, IoT, DMZ) |
**Where:** Zenarmor installs as a two-step vendor flow, not a single package, so don't stop after the first install if you don't immediately see it:
1. Navigate to **System → Firmware → Plugins** and install the vendor repository first: `os-sunnyvalley`.
2. Refresh the plugin list. The actual Zenarmor package now appears, still internally branded as Sensei: install `os-sensei`.
3. Refresh the page. A new **Zenarmor** menu entry appears in the left sidebar. If it doesn't show up immediately, a hard refresh usually surfaces it.
Similar to Suricata above, Zenarmor (and WAF services) has a wildly deep configuration UI, for more on that, dig into my Zenarmor dedicated guide:
[OPNsense Advanced Threat Protection: IDS/IPS & Layer 7Secure your OPNsense firewall with next-gen threat protection. Configure Suricata IDS/IPS, Zenarmor Layer 7 filtering, CrowdSec, and GeoIP blocking.Core LabCore Lab Joe](https://corelab.tech/opnsense-zenarmor/)
---
## 3\. Collaborative Threat Intelligence with CrowdSec
Traditional tools like Fail2ban only respond to local attacks after they occur. **CrowdSec** introduces a crowdsourced threat detection engine that pulls real-time IP reputation lists from thousands of participating firewalls globally.
flowchart LR
NET["Global CrowdSec Network
Shared Threat Database"]
FW[Your OPNsense Firewall]
BLOCK["🚫 Instant Block on WAN"]
NET -->|Real-time IP Reputation| FW --> BLOCK
classDef backbone fill:#001a1a,stroke:#00dddd,color:#00dddd,stroke-width:2px
classDef firewall fill:#001a12,stroke:#00ff88,color:#00ff88,stroke-width:3px
classDef threat fill:#1a0008,stroke:#ff2255,color:#ff2255,stroke-width:2px
class NET backbone
class FW firewall
class BLOCK threat
### **Why Community-Driven Defense Matters**
CrowdSec adds a dynamic layer. It monitors logs for malicious behavior (scans, brute force attempts, etc.) and shares detected attacker IPs with a central community blocklist. Your firewall then automatically blocks IPs flagged by the community. Think of it like a next-gen community driven Fail2Ban, if you're familiar with that. It's a fantastic and simplistic security feature which greatly helps you lock your perimeter down. For more details, visit them [here](https://www.crowdsec.net/?ref=corelab.tech).
**By this point in the series** you'll end up actually running *three different "block bad traffic" layers*, and it's worth being clear on which one does what so you don't end up wondering "wait, don't I already have this covered?"
| Layer | Type | What It Actually Blocks |
| ------------------------------------------ | -------------------------- | -------------------------------------------------------------------------------------------------------------------------------------------------------------- |
| **FireHOL / Spamhaus Blocklists** (Part 1) | Static, pre-compiled alias | Known-bad IP ranges (botnets, spam sources, etc.) published by threat-intel projects. Refreshes on a schedule, but doesn't "learn" anything new on its own. |
| **CrowdSec** (this section) | Dynamic, community-driven | IPs actively caught attacking *any* participant in the CrowdSec network right now. This is the layer that adapts in real time as new attackers show up. |
| **GeoIP Blocking** (Phase 5, below) | Static, country-based | Every IP from entire countries/regions you choose, regardless of whether that specific IP has done anything malicious. A blunt instrument, not a targeted one. |
They're complementary, not redundant - FireHOL/Spamhaus catches known-bad infrastructure, CrowdSec catches active real-time attackers, and GeoIP cuts down noise from regions you don't do business with. Running all three isn't overkill; each one covers a gap the others don't.
### **Installing the CrowdSec Agent & Bouncer**
1. Navigate to **System -> Firmware -> Plugins**.
2. In the search bar, type `crowdsec`.
3. Find `os-crowdsec` and click the `+` (Install) button next to it. Confirm the installation.
### **Basic CrowdSec Configuration**
1. Navigate to **Services -> CrowdSec -> Settings**.
2. **General Settings:**
- Check **Enable CrowdSec Agent**. This runs the local service that analyzes logs.
- Check **Enable Firewall Bouncer**. This service takes the blocklist from the agent and applies it to the firewall.
3. **Save**.
**Note:** If you don't enable the bouncer, nothing will be blocked!
Now if you go to your Firewall->Rules (new)-Floating and click the '👁️🗨️Inspect' at the top of the rules, you'll see enabling the bouncer has setup some new block rules!
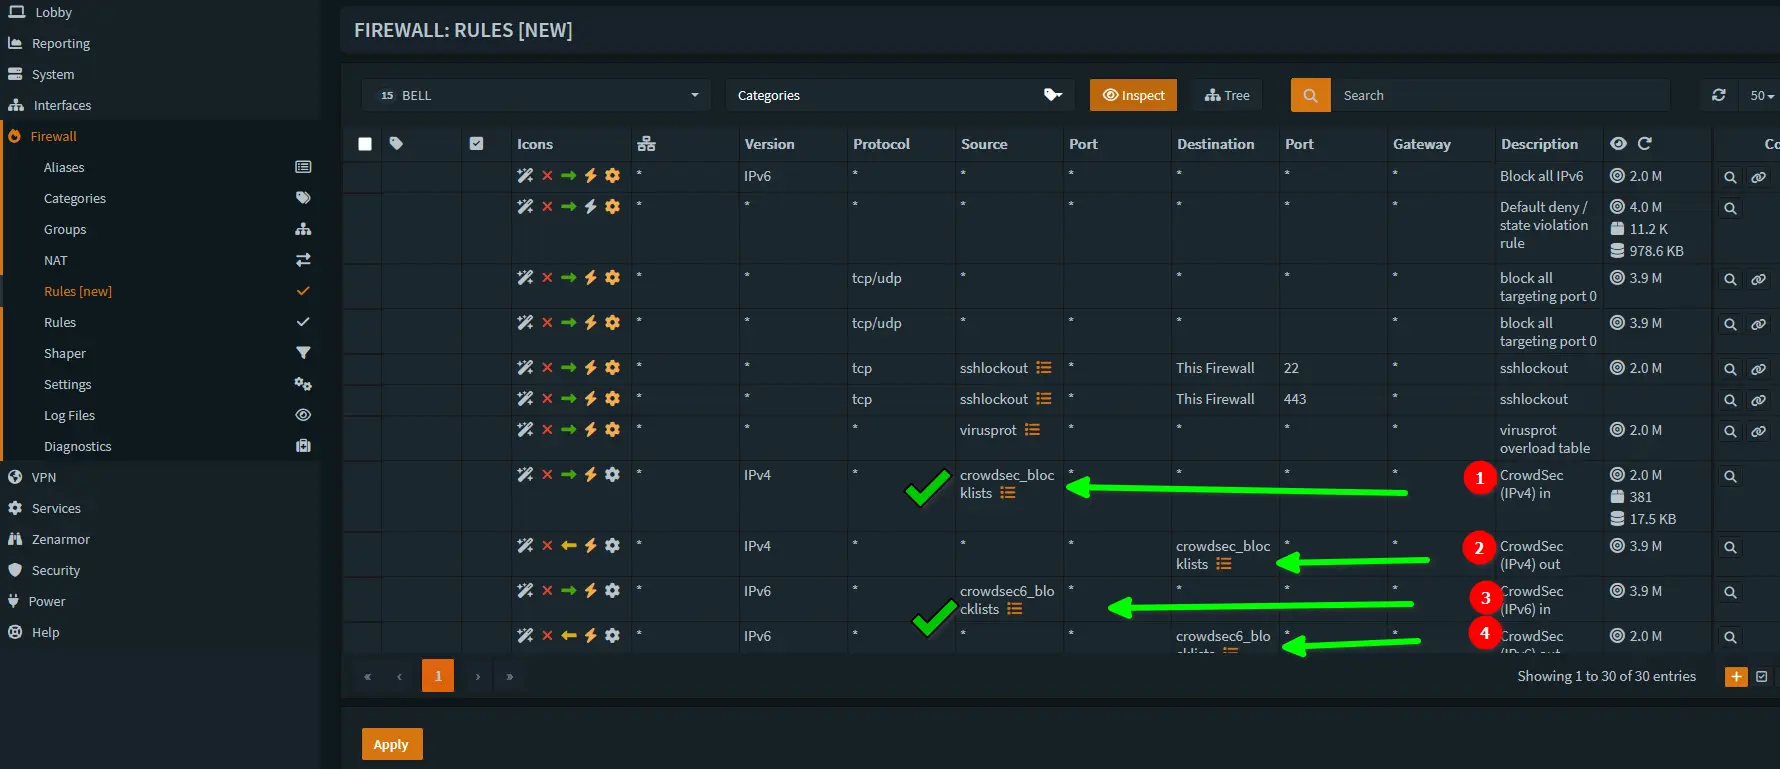
Note the directions it's blocking!
If you'd like to setup an instance of CrowdSec to work with your reverse proxy, check this out:
[Secure Your NGINX with CrowdSec, Fail2Ban & AutheliaLearn how to enhance your Nginx security with a powerful combination of Fail2Ban, CrowdSec, and Authelia. Step-by-step guide for advanced users.Core LabCore Lab Joe](https://corelab.tech/crowdsec-fail2ban-swag-hardening/#2-crowdsec-intelligent-threat-detection)
### **Check Status of CrowdSec (Is it operational?)**
1. Go to **Services -> CrowdSec -> Overview**.
2. After a few minutes, you should see the Agent and Bouncer services running.
3. Look at the **Metrics** section. You should eventually see "Active Decisions" (IPs currently being blocked) populate as the bouncer downloads the community blocklist.
4. You can view the currently blocked IPs under **Services -> CrowdSec -> Decisions**.
CrowdSec is now running! It will analyze OPNsense logs (like firewall logs, web GUI access logs) and automatically update its blocklist based on both local detections and the global consensus list. **Note:** This instance of CrowdSec is protecting your OPNsense & firewall only. Not other services you are hosting and likely setup a NAT rule for, in OPNsense!
#### Recommended Setup Breadcrumbs
1. Navigate to **Services → CrowdSec → General Settings** and check **Enable CrowdSec Agent** and **Enable LAPI**.
2. Enroll your firewall instance into the CrowdSec Console for cloud monitoring and automatic threat intelligence feed updates, if you like.
> **Troubleshooting: bouncer shows no IP address or timestamp.** If `cscli bouncers list` shows a registered bouncer with a blank IP Address and Last API Pull column (metrics and decisions still work, but registration looks incomplete), check for mixed Docker networking modes between CrowdSec and the service bouncing off it (e.g., SWAG on a macvlan while CrowdSec sits on the default bridge). Put both on the same networking mode, host or a shared macvlan work equally well, and point the bouncer's LAPI URL at an address actually reachable from that network. A clean re-registration after fixing the networking mismatch should populate all the missing fields.
---
## 4\. Setup OPNsense GeoIP Blocking / GeoFencing
GeoIP blocking allows you to restrict traffic based on the geographical location associated with an IP address. This is commonly used to block incoming connections from countries known for high levels of malicious activity or to restrict access *to* your services *from* specific regions. **NOTE:** It's ***not effective*** if someone is targeting you specifically, vs just random scans. They can simply use a proxy or VPN to connect into your country, or even same city / geographic area and attack. If someone is targetting your homelab specifically, you've got bigger problems! If you're running OPN for some kind of company or Enterprise, you likely have an advanced persistent threat actor and GeoIP blocking alone will not save you.
### Implementing GeoIP Blocking Rules
| Setting Field | Configuration Value |
| ----------------- | --------------------------------------------- |
| **Data Provider** | MaxMind GeoLite2 (Registered URL Key) |
| **Alias Name** | GeoIP\_Allowed\_Countries |
| **Type** | GeoIP |
| **Content** | Select your home country/region codes |
| **Rule Action** | Block non-matching inbound connections on WAN |
- **Where:** **Firewall → Aliases** (Set up GeoIP URL source) → **Firewall → Rules → WAN**.
> **Deep Dive Available:** Want to combine GeoIP blocking with custom port knocking and HTTP header stripping? Check out my dedicated guide: [**Perimeter Hardening & Security Through Obscurity →**](https://corelab.tech/security-through-obscurity-opnsense-guide/)
### **Configuring MaxMind GeoLite2: Obtain a MaxMind GeoLite2 Account & License Key**
OPNsense uses MaxMind databases for GeoIP functionality. You'll need a free GeoLite2 account.
1. Go to the [MaxMind Signup Page](https://www.maxmind.com/en/geolite2/signup?ref=corelab.tech).
2. Fill out the form to create a free account. (You might need to wait for approval).
3. Once your account is active, log in to your MaxMind account.
4. Navigate to "Manage License Keys" (often found under "My Account" or similar).
5. Generate a new license key. **Copy this key immediately** and store it securely. MaxMind may only show it to you once. Give it a descriptive name like "OPNsense Key". Select "No" when asked if you use `geoipupdate`.
6. You need to form the input for OPNsense as such -
```bash
https://AccountID:LicenseKey@download.maxmind.com/geoip/databases/GeoLite2-Country-CSV/download?suffix=zip
Which looks liike (sample/pretend accountID & liensekey:
https://748324:ch47893c743r234rt@download.maxmind.com/geoip/databases/GeoLite2-Country-CSV/download?suffix=zip
```
### **Configure MaxMind in OPNsense**
1. Navigate to **Firewall -> Aliases -> GeoIP settings**.
2. Paste your copied MaxMind **License Key** into the corresponding field.
3. Click **Apply**. OPNsense will download the GeoIP database in the background (this can take a few minutes). You can check the status under **System -> Log Files -> Backend**.
### **Creating Country-Based Aliases**
Now, create aliases representing the countries you want to block.
1. Navigate to **Firewall -> Aliases**. Click the `+` (Add) button.
2. **Name:** Give it a descriptive name (e.g., `GeoIP_Block_Countries`).
3. **Type:** Select `GeoIP`.
4. **Content:** Start typing the names of countries you wish to block (e.g., Russia, China, North Korea). Select them from the dropdown list. You can add multiple countries to a single alias.
5. **Description:** "Countries blocked via GeoIP".
6. **Save**.
### **Create Firewall Rule(s) to Block GeoIP Aliases**
It's most common to block *inbound* traffic *from* these countries on your WAN interface.
1. Navigate to **Firewall -> Rules -> WAN**.
2. Click `+` (Add).
3. **Action:** `Block`
4. **Quick:** Check this box.
5. **Interface:** `WAN`
6. **Direction:** `in`
7. **Protocol:** `any`
8. **Source:** Select your GeoIP alias (`GeoIP_Block_Countries`).
9. **Destination:** `any`
10. **Log:** Check this box.
11. **Description:** "Block Inbound traffic from specific GeoIP countries".
12. **Save**.
13. **Apply Changes**.
1. You can optionally apply this as a floating rule to, but you could break your internets!
[Configure Spamhaus DROP — OPNsense documentation](https://docs.opnsense.org/manual/how-tos/drop.html?ref=corelab.tech)
### **Best Practices for Geo-Blocking Rules**
- **Rule Order:** Place this block rule near the top of your WAN rules, typically below any rules allowing essential traffic like VPNs if applicable.
- **Outbound Blocking:** Blocking *outbound* traffic *to* specific countries can break access to legitimate services or CDNs. Be very cautious if implementing outbound GeoIP rules.
- **Accuracy:** GeoIP databases are not perfect. There can be inaccuracies, and VPNs/proxies can easily bypass these restrictions. It's one layer of defense, not a complete solution.
---
## 5\. DNS-over-TLS & Domain-Based Blocking with oisd.nl
Everything above blocks at the IP or connection layer. This layer works earlier, at DNS resolution, encrypting your upstream queries and refusing to resolve known-bad domains before a connection is ever attempted. I use Adguard Home so I don't use this method personally any longer, but I used to.
### Encrypting Upstream DNS with DNS-over-TLS
1. Navigate to **Services → Unbound DNS → General**.
2. Under DNS Query Forwarding, add an upstream server using **DoT**: Cloudflare (`1.1.1.1@853`) or Quad9 (`9.9.9.9@853`) are the standard, well-tested choices.
3. Enable **DNSSEC** validation while you're in here, no reason to leave it off.
### Domain and Wildcard Blocking with oisd.nl
**oisd.nl** is a free, actively-maintained community blocklist covering ads, tracking, malware domains, and a meaningful chunk of Windows/telemetry endpoints, with a genuinely low false-positive rate, it's built specifically to avoid breaking legitimate sites. It supports full wildcard matching (`*.doubleclick.net`, not just exact-match domains), which most simple hosts-file-style blocklists don't.
1. Navigate to **Services → Unbound DNS → Blocklists**.
2. Add a custom blocklist URL pointing at oisd.nl's "big" list (broad coverage) or "small" list (lighter, fewer false positives) depending on how aggressive you want to be.
3. Set an update schedule, daily is reasonable, the list is maintained actively.
> **This complements, not replaces, everything above.** Static blocklists and CrowdSec operate on IPs and connections; GeoIP operates on origin country; oisd.nl operates on domain names at resolution time. A request can pass every IP-based check and still be blocked here because the domain itself is known-bad, and vice versa. Layer them, don't pick one.
---
## 6\. Centralized Logging & Auditing Best Practices
Running multiple threat engines generates substantial log output. Proper log management prevents storage exhaustion while keeping your security insights clear.
1. **Storage Optimization:** If running OPNsense on flash storage (SSD/NVMe), ensure your filesystem uses **ZFS with compression enabled** or stream logs to a remote SIEM (like Grafana/Loki or Elastic/ELK) via Syslog.
2. **Log Retention:** Navigate to **System → Settings → Logging** and configure log rotation sizes to prevent disk-space exhaustion.
3. Be specific with what rules you want logging. You can GREATLY reduce the "noise" of your logs by setting certain rules to not log.
4. If you have a very small hard drive, it's a great idea to select the option to NOT log all the default denies the firewall throws!
---
## Complete Core Series Summary & Satellite Guides
Congratulations! With Parts 1, 2, and 3 deployed, your OPNsense firewall is fully architected, isolated with stateful VLAN rules, and reinforced with multi-layer threat intelligence.
### Next Steps & Deep-Dive Satellite Guides
- **Need to build out managed switch interfaces and trunk lines?** Read my [**Advanced Networking & VLANs Guide**](https://corelab.tech/opnsense-advanced-networking-guide/).
- **Upgrading dynamic host management?** Transition to modern DHCP using my [**Kea DHCP & Dnsmasq Upgrade Guide**](https://corelab.tech/opnsense-26-1-upgrade-kea-dnsmasq-guide/).
- **Want extreme boundary lockdown?** Explore perimeter obfuscation tactics in [**Perimeter Hardening & Security Through Obscurity**](https://corelab.tech/security-through-obscurity-opnsense-guide/).
- **Need remote access into your homelab from outside your network?** Set up an encrypted road-warrior tunnel with my [**OPNsense WireGuard Setup Guide**](https://corelab.tech/opnsense-wireguard-guide/).
- **Exposing services and want automated, trusted certificates?** My [**Cloudflare Protection guide**](https://corelab.tech/cloudflare-protection-free/) covers ACME automation and free edge protection together.
---
## **How This Hardening Guide Relates to Real-World Cybersecurity**
The firewall configuration you just went through is not just a "good idea"—it is a direct, practical application of the core principles found in the cybersecurity guidelines from all three major cybersecurity organizations across Canada & USA. 🌎
While they may not publish a specific guide for OPNsense, your rule (`Allow to !RFC1918`) is a textbook implementation of the high-level frameworks they all mandate, and that you would find across any of the "5 eyes" countries.🇨🇦🇺🇸🇦🇺🇳🇿🇬🇧👀
Here is how your OPNsense setup aligns with their recommendations.
### 1\. Canadian🇨🇦 Centre for Cyber Security (CCCS)
The CCCS heavily emphasizes **network segmentation** and moving towards a **Zero Trust** model. Your rule directly supports this in your own environment.
- **Guideline:** **"Top 10 IT security actions: No. 5 Segment and separate information" (ITSM.10.092)**[**1**](https://www.cyber.gc.ca/en/guidance/top-10-security-actions-no-5-segment-and-separate-information-itsm10092?ref=corelab.tech)
- **What it says:** The CCCS states that segmentation (using VLANs, firewalls, etc.) is a "**foundational**" security action to "reduce your organization's exposure to threats."[2](https://www.cyber.gc.ca/en/guidance/top-10-security-actions-no-5-segment-and-separate-information-itsm10092?ref=corelab.tech) The goal is to separate networks so that a compromise on one (like a Guest or IoT VLAN) cannot spread to critical ones (like your main LAN).
- **How your rule applies:** Your inverted rule *enforces* this separation. By explicitly denying traffic destined for other private `RFC1918` addresses, you are containing the "blast radius." You are ensuring, at the source, that a compromised IoT device cannot even *attempt* to contact your main PC or server.
- **Guideline:** **"Network and Security Strategy" (Canada.ca)**
- **What it says:** This strategy outlines the Canadian government's move to a **Zero Trust Architecture (ZTA)**, which "renounces any implied trust" and assumes the network is hostile.[3](https://www.cyber.gc.ca/en/guidance/zero-trust-approach-security-architecture-itsm10008?ref=corelab.tech)
- **How your rule applies:** Your rule is the *epitome* of Zero Trust. You are not "trusting" your Guest VLAN. Instead of relying on the *destination* VLAN's (e.g., your LAN's) inbound rules to block the traffic, you are explicitly blocking it from ever *leaving* the source VLAN. You are verifying every request and denying by default.
### 2\. NIST🇺🇸 (National Institute of Standards and Technology)
NIST provides the foundational frameworks for much of the Western world's cybersecurity, and your rule is a perfect match for their central concepts.[4](https://nvlpubs.nist.gov/nistpubs/specialpublications/NIST.SP.800-207.pdf?ref=corelab.tech)
- **Framework:** **NIST SP 800-207, "Zero Trust Architecture"**[**5**](https://nvlpubs.nist.gov/nistpubs/specialpublications/NIST.SP.800-207.pdf?ref=corelab.tech)
- **What it says:** ZTA is a set of principles that "assumes there is no implicit trust granted to assets or user accounts based solely on their physical or network location."[6](https://nvlpubs.nist.gov/nistpubs/specialpublications/NIST.SP.800-207.pdf?ref=corelab.tech)
- **How your rule applies:** This is exactly what you are doing. You are treating `VLAN_10` as an untrusted network location. By creating the `!RFC1918` rule, you are enforcing a policy of "least privilege." You are giving the VLAN the *absolute minimum* access it needs to function (internet access) and nothing more.
- **Framework:** **NIST SP 800-41, "Guidelines on Firewalls and Firewall Policy"**
- **What it says:** This guide recommends a "deny-by-default" stance, where you only permit traffic that is explicitly allowed.
- **How your rule applies:** Your inverted rule is a more secure and elegant version of this. Instead of creating a long list of `Block` rules (e.g., `Block to VLAN_20`, `Block to VLAN_30`, etc.), you have one single `Pass` rule that *implicitly denies* all inter-VLAN traffic. It achieves the "deny-by-default" goal for internal access while being easier to manage.
### 3\. NSA🇺🇸 (National Security Agency) / CISA
The NSA and CISA (Cybersecurity and Infrastructure Security Agency) are focused on preventing and mitigating real-world attacks, with a major focus on stopping lateral movement.[7](https://www.nsa.gov/portals/75/documents/what-we-do/cybersecurity/professional-resources/csi-nsas-top10-cybersecurity-mitigation-strategies.pdf?ref=corelab.tech)
- **Guideline:** **CISA's "Layering Network Security Through Segmentation"**
- **What it says:** This guidance explicitly states that segmentation is used to "prevent a malicious actor's attempts to access high-value assets" and "mitigates the lateral spread" of an attack.
- **How your rule applies:** **Lateral movement** is the term for an attacker who breaches one device (like a smart-light) and then "moves laterally" across the network to attack more valuable targets (like a file server). Your rule *shuts this down completely*. By blocking all `RFC1918` destinations, you make it impossible for that attacker to move from the IoT VLAN to the Server VLAN. You have effectively cut off their attack path.
In summary, these rules are a highly effective and standards-compliant method for creating a secure, segmented network. It perfectly implements the modern security principles of **Zero Trust**, **Least Privilege**, and **Defence-in-Depth** that are mandated by the CCCS, NIST, and the NSA/CISA.
---
## Conclusion: Your Fortress is Secure
You've now created & built:\\
- A Cutting Edge Enterprise Grade Stateful Firewall (OPNsense)
- Robust inter-vlan rules & blocklists across WAN & LAN
- An industry driving IDS/IPS - Suricata
- Enterprise grade layer 7 WAF (Zenarmor!)
- Crowd-sourced threat intelligence (CrowdSec!)
- Geoblocking / Geofencing
You now have **critical visibility** into your network's applications and have enabled a solid **baseline of security** by blocking malware, phishing, hackers and botnets.
From here, you can explore the dashboard & Reports tabs to understand your network better. But for now, enjoy the **newfound power and insight**!
[A Practical Cybersecurity Roadmap for HomelabsLearn to protect your data, services and privacy with actionable steps and clear tutorials. So, you’ve built an incredible homelab. You’re spinning up services in Docker, managing your media, and maybe even self-hosting your own website. You are the master of your own data. But with every new service youCore LabCore Lab Joe](https://corelab.tech/cybersecroadmap/)
---
## ❓ Frequently Asked Questions (FAQ)
### What is the difference between Suricata and Zenarmor in OPNsense?
Suricata is a signature-based IDS/IPS focused on blocking known network exploits (Layer 3/4), while Zenarmor is a Next-Gen Firewall (NGFW) that filters traffic based on application signatures and categories (Layer 7).
### Can I run both CrowdSec and GeoIP blocking?
Yes. GeoIP blocking statically drops traffic from entire countries, while CrowdSec dynamically blocks specific malicious IPs attempting to attack your infrastructure based on community threat intelligence.
### Does DNS-over-TLS (DoT) improve network security?
Yes, DoT encrypts your DNS queries to upstream providers (like Cloudflare or Quad9), preventing ISPs or attackers from monitoring or hijacking your web traffic requests.
### Will Zenarmor's free tier slow down my internet speed?
It can, if you have a fast connection. On a 1Gbps symmetrical line or faster, deep packet inspection is demanding — on mid-range hardware (like an Intel N150 or Core i3), you may see a noticeable drop below your full line-rate speed, since the CPU becomes the bottleneck as it inspects every packet. Paid tiers handle this more gracefully at higher throughputs.
### Can I apply different Zenarmor policies to different VLANs on the free tier?
No — the Free Edition gives you only one policy (the "Default" policy), which applies to every interface you select. If you block something like social media, it's blocked everywhere the policy is applied — LAN, IoT, Guest, etc. all get the same rules. Per-interface policies are a paid-tier feature.
### What's the first thing to enable in a new Zenarmor policy?
The "Moderate Control" setting under the Security tab. It's a low-effort, high-value baseline that starts actively blocking known-bad sites immediately, and it's the recommended starting point before touching anything else in the policy.
### Will application filtering break things on my network?
Possibly, especially at first. Blocking application categories works regardless of the website or port used, so it's easy to accidentally block something your household actually uses. Expect some trial and error — block a batch of categories, see what breaks, and adjust rather than trying to get it perfect on the first pass.
### What's the actual payoff for setting all this up?
Visibility. The Zenarmor Dashboard (give it a few hours to start collecting data) shows exactly what's happening on your network — applications in use, sites visited, and threats blocked — in a level of detail that basic Layer 3/4 firewall rules alone can't provide.
#### Join the Core Lab Inner Circle
Networking & security deep-dives, delivered directly.
[Join Now](#/portal/signup)