
Authelia: Centralized MFA for Self-Hosted Services
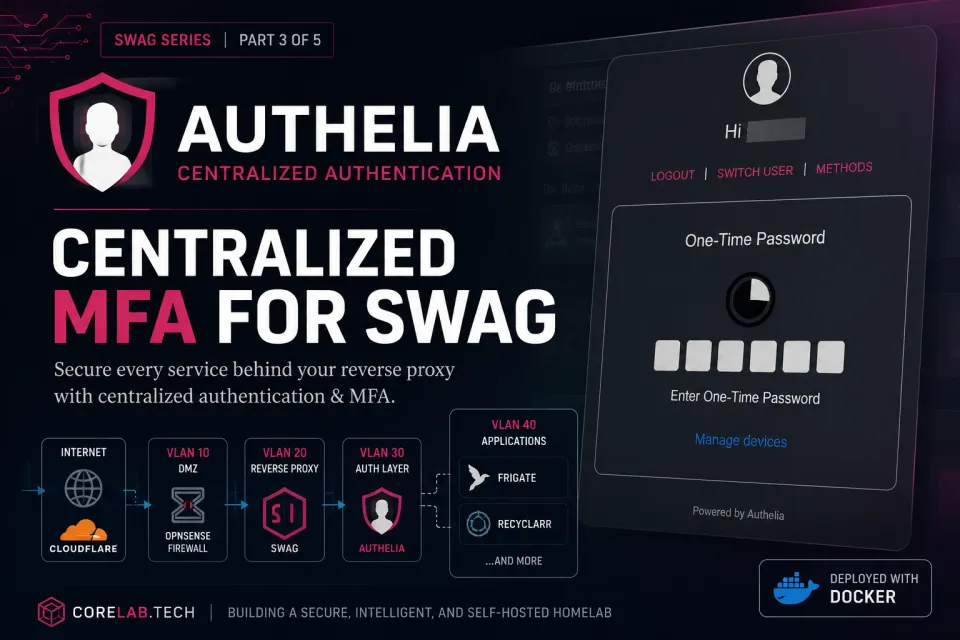
With CrowdSec and Fail2Ban in place from the last post, three of the Digital Castle's four layers are up: the moat (your firewall), the traps (Fail2Ban), and the watchman (CrowdSec). Today we add the fourth: the Gatekeeper.
Authelia sits between SWAG and the apps behind it, intercepting every request and demanding a second factor before anything gets through - even traffic that's already made it past your firewall, Fail2Ban, and CrowdSec. It can be a beast to configure the first time. It's worth it.
Mastering Reverse Proxies with SWAG
Learn the concepts, deploy SWAG, secure your services, understand the request flow, and confidently migrate from other reverse proxy solutions.
Authelia Install & Setup
Prerequisite Steps
This post assumes SWAG is running from Part 2. Part 3's CrowdSec & Fail2Ban setup isn't a hard requirement for Authelia to work, but it's strongly recommended - Authelia protects who gets through the door, Fail2Ban and CrowdSec handle who's even allowed to knock. ✅
Authelia provides a centralized solution for user authentication and authorization, simplifying user management and enhancing security for your Nginx applications.
How Authelia Performs Multi-Factor Authentication
Authelia sits between your reverse proxy (SWAG) and the apps behind it, intercepting requests and performing auth checks before forwarding traffic. This guide uses a simple flat user file rather than LDAP - add this below your SWAG and CrowdSec compose blocks.
👉 I chose to make a simple user file, but you might prefer to use LDAP or another method. Let me know if any of you want to see the LLDAP docker setup & integration with Authelia in the comments!
1. Authelia Docker Compose
# Authelia begin
# to add a user, add directly to `authelia/users_database.yml`
# then get the encrypted password with:
# docker run --rm ghcr.io/authelia/authelia:4.34.6 authelia hash-password yourpassword
  authelia:
    image: ghcr.io/authelia/authelia:latest
    container_name: authelia
    networks:
      backend:
      docker_vlan:
        ipv4_address: X.X.X.X   # only if you're on macvlan per Part 2's networking section
    environment:
      TZ: 'America/Toronto'
      PUID: '1000'
      PGID: '1000'
    volumes:
      - /yourpath/DOCKERS/authelia:/config
    restart: unless-stopped

  KeyDB-Authelia:
    image: eqalpha/keydb:latest
    container_name: keydb-authelia
    restart: unless-stopped
    environment:
      REDIS_ARGS: "--save 60 10"
    networks:
      - backend
    restart: unless-stopped
I use KeyDB instead of Redis because Redis moved to a non-open-source license - KeyDB is a performant, fully open-source (BSD) drop-in replacement.
If you're not hosting email, make a flat file as your user "database": nano /yourpath/authelia/users_database.yml
If you'd like to setup your backend network now, config snippet below.
Multi-network Compose Config
networks:
  your_vlan:
    driver: macvlan
    driver_opts:
      parent: enp37s0f1.7 # Your REAL physical interface
    ipam:
      config:
        - subnet: 10.0.0.0/24
          gateway: 10.0.0.1
  backend:
    name: backend
    driver: bridge
2. users_database.yml
# yamllint disable rule:line-length
---
###############################################################
#                         Users Database                      #
###############################################################

# This file can be used if you do not have an LDAP set up.

users:
  first_user:
    displayname: "myusername"
    password: "crazyargon2_hashed_pw" <--Change this!!!
    email: [email protected]
    groups:
      - admins
      - dev
  second_user:
    displayname: "My Buddy"
    password: "Hiscrazy_encrypted_pw"
    email: [email protected]
    groups: []

...
# yamllint enable rule:line-length
users: at the top has to stay; everything below it declares a user. The placeholder key (first_user) can be anything - a username, a first name, whatever's memorable to you.
How to Generate Hashed Argon2 Passwords 🤫
This is a hashed password you cannot simply just type in. To get the proper hashed password you must run a command, which temporarily runs an instance of authelia, generates the password after you enter it, you COPY THIS HASH and paste it into your already created users_database.yml. As here:
docker run --rm -it authelia/authelia:latest authelia crypto hash generate argon2Type and confirm your password when prompted, copy the resulting $argon2id$v=... string, and paste it into users_database.yml's password: field.
3. Authelia Configuration - Read Carefully‼️
Authelia populates a default configuration.yml once it's first run: nano /yourpath/DOCKERS/authelia/configuration.yml
Note: If you have to make adjustments to the authelia configuration file (and you will!) it won't pickup the config changes until you re-create the entire container. Simply do it with this command docker compose up -d --force-recreate authelia.
---
###############################################################################
#                           Authelia Configuration                            #
###############################################################################
theme: dark

identity_validation:
  reset_password:
    jwt_secret: 'big_string' # change this to at least a 32-character string

server:
#  address: "tcp://:9091/authelia"
  address: 'tcp://0.0.0.0:9091/authelia' # do not change
  buffers:
    read: 4096
    write: 4096

log:
  level: info
  file_path: /config/logs/authelia.log
  keep_stdout: true

totp:
  issuer: authelia.yourdomain.ca # such as auth.yourdomain.com
  period: 30
  skew: 1

authentication_backend:
  password_reset:
    disable: true # change to true if you want to stop users from resetting their passwords
  refresh_interval: 30m # I found that the default of 5 is too short
  file:
    path: /config/users_database.yml # don't change this
    password:
      algorithm: argon2id
      iterations: 1
      key_length: 32
      salt_length: 16
      memory: 1024
      parallelism: 8

access_control:
  default_policy: deny
  rules:
    # 🌟 RULE 1: Local LAN Bypass (Must stay at the top!)
    # This bypasses MFA entirely if you are on your home network.
    - domain:
        - "yourdomain.ca"
        - "*.yourdomain.ca"
      networks:
        - 192.168.1.0/24  # Change to match your home subnet
        - 10.0.0.0/24     # Add any other internal networks/VLANs
      policy: bypass

    # 🔒 RULE 2: External Traffic (The Catch-All)
    # If the traffic didn't originate from the networks above, enforce full MFA.
    - domain:
        - "yourdomain.ca"
        - "*.yourdomain.ca"
      policy: two_factor

session:
  name: authelia_session # do not change
  secret: 'Make your own' # make this a long strong, 26 characters or so
  same_site: 'lax'
  expiration: '1h'
  inactivity: '5m'
  remember_me: '1M'
  cookies:
    - domain: 'yourdomain.ca' # change
      authelia_url: 'https://authelia.yourdomain.ca' # change
      default_redirection_url: 'https://yourdomain.ca'
      name: 'authelia_session'
      same_site: 'lax'
      inactivity: '5m'
      expiration: '1h'
      remember_me: '1d'
  redis:
    host: keydb-authelia # change to your host machine's IP if this doesn't work
    port: 6379 # if you use IP above, make sure this matches the mapped port
    # password: "" # do not change. if this doesn't work, remove the "" and try again
    # database_index: 0
    # maximum_active_connections: 10
    # minimum_idle_connections: 0

regulation:
  max_retries: 3
  find_time: 10m
  ban_time: 2h

storage:
  encryption_key: 'make your own!' # use a 20-character random string
  local:
    path: /config/db.sqlite3

notifier: # you can only use one of smtp or filesystem. uncomment/comment below as necessary to choose which
  filesystem:
    filename: /config/notification.txt
  disable_startup_check: false
  # smtp:
    # username: [email protected]
    # password: "YOUR_EMAIL_PASSWORD"
    # address: smtp.gmail.com:587 # change to match your smtp uri and port
    # sender: [email protected]
    # subject: "[Authelia] {title}"
    # startup_check_address: [email protected]
    # disable_require_tls: false
    # disable_html_emails: false
    # tls:
      # skip_verify: false
      # minimum_version: TLS1.2
This is a basic, bulletproof config - Authelia supports far more (LDAP, granular access rules, LAN bypass) if you want to go deeper.
notifier section is where your one-time TOTP linking key shows up.4. Google Authenticator with Authelia
Yes, you can (and I do) use Google Authenticator with my Authelia. So no, you don't necessarily HAVE to use yet another MFA app on your phone! Please read in detail all you need here: https://www.authelia.com/overview/authentication/one-time-password/
If you have authelia running, as above, and your users_database.yml, all GTG. Proceed!
Configuration Steps:
- LOGIN to Authelia for the first time with your username and password you put in 3.2 the users_database.yml. Yes your normal password, not that crazy hashed password.
- As soon as you login, you have completed the "First Factor" and you will see some options. ▶️Click One-Time Password method and then;
- ➡️Register device. To register your google authenticator, go look at that file I pointed out a few minutes ago "notifier".
nano /yourpath/authelia/config/notification.txtorcat /yourpath/authelia/config/notification.txt - It should spit out a link you can now click or copy and paste into your browser of choice which will then display a QR code. Exciting yes?
5. Enabling Authelia Protection with SWAG
- Create a DNS entry for the subdomain you want protected (e.g.
sonarr.yourdomain.com). - Edit
/yourpath/swag/nginx/proxy-confs/sonarr.subdomain.confand uncomment the two lines marked# enable for Authelia. - Restart SWAG:
docker compose up -d --force-recreate swag, then check logs:docker logs -f swag. - Test from outside your LAN - you should hit the Authelia login first, then your OTP prompt, before ever reaching Sonarr.
Here's what Authelia looks like when you come knocking at an app's door, even one without ANY builtin authentication or security:
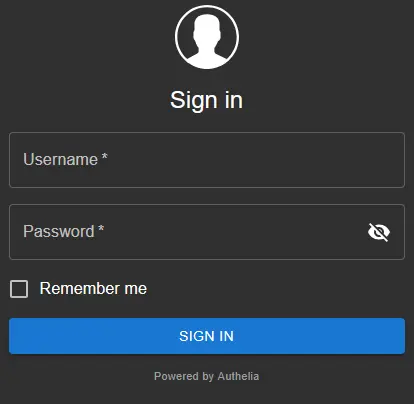
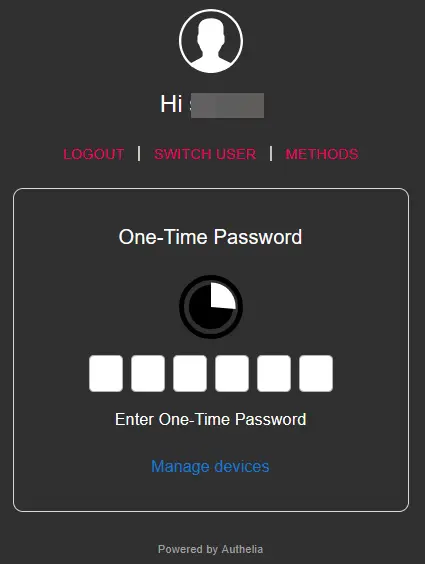
Left side, initial prompt for username/pw, right side, second prompt, time & app based token!
🏁 The Castle Gates Are Closed
With this, every layer of the Digital Castle is up: firewall, Fail2Ban, CrowdSec, and now Authelia. Before you consider this "done," though - one more thing worth doing immediately: back it all up. Deploy Dockhand for automated backups, and/or set up my simple backup script to intelligently back up your entire Docker infrastructure. A hardened castle you can't restore after a disk failure isn't much of a castle.
There's even moar (additional!) Cybersecurity and hardening guides you can follow:
 Core Lab Joe
What's Next
Every layer of defence is in place. Next up: How Cloudflare, DNS & SWAG Work Together - pulling back to see the full request path, from a browser typing your domain through Cloudflare, to SWAG, and finally to your app.
Coming from another reverse proxy? Once you've finished the path, check out Migrating to SWAG from NGINX Proxy Manager, Caddy & Traefik for a dedicated walkthrough.
Frequently Asked Questions❓
If I use Authelia to protect my services, do I still need a home VPN?
Yes. Authelia and a Virtual Private Network (VPN) serve entirely different roles in a defense-in-depth security model. Authelia provides zero-trust application-level security, allowing you to safely publish specific web apps (like Sonarr or Jellyfin) to the public internet using multi-factor authentication. A VPN gives an authorized device a secure network-level tunnel into your entire local LAN. For maximum security, use Authelia for your public-facing web applications, and reserve a self-hosted VPN (like WireGuard) for accessing sensitive backend infrastructure interfaces like OPNsense, Proxmox, or true storage layers.
Why does this deployment configuration use KeyDB instead of Redis?
Redis updated its core licensing structure to a restrictive, non-open-source model. KeyDB is a fully open-source, BSD-licensed, high-performance drop-in alternative. Because Authelia relies on a fast, in-memory key-value database to securely track user sessions, rate limits, and authentication states without wearing out your host storage drive with database writes, KeyDB provides the exact same performance advantages while remaining completely open-source.
Can I migrate this flat-file user configuration to an LDAP server later?
Yes. Authelia’s internal architecture separates the authentication backend from its core policy engine. You can safely deploy this guide using the simple local YAML user database file (users_database.yml) as a quick baseline setup. When your infrastructure scales to the point of needing an identity management framework like LLDAP or OpenLDAP, you can update the authentication_backend section inside your configuration.yml without modifying your application routing definitions or reverse proxy rules.
How does Authelia communicate back to the SWAG reverse proxy?
Authelia leverages NGINX’s native auth_request module. When an external request hits a protected domain on your SWAG reverse proxy, NGINX intercepts the request and passes the session headers to Authelia on port 9091. If Authelia finds a valid authentication session cookie, it returns a 200 OK response to SWAG, which then forwards the traffic to the backend application container. If no valid session is found, Authelia redirects the user to the centralized login portal.
How do I allow automated API traffic (like Radarr or Sonarr hooks) to bypass Authelia?
When you protect an application with Authelia, automated API requests from other self-hosted tools will be blocked by the login wall. To fix this, you must add specific bypass rules to the access_control section of your configuration.yml. By identifying the specific API URL paths (such as /api/*) or checking for explicit API headers, you can configure Authelia to assign a bypass policy to those specific requests while keeping the main user interface locked behind multi-factor authentication.
Can I disable Authelia authentication when I am connected to my home Wi-Fi?
Yes, and this is highly recommended for an optimal user experience. Inside the access_control block of your Authelia configuration.yml, you can define specific network rules. By setting a policy that maps your local LAN subnet (for example, 192.168.1.0/24) to a bypass or single_factor policy, Authelia will seamlessly grant access when you are home, while strictly enforcing full two_factor security the moment a request originates from an external cellular network or public internet connection.
Member discussion