
Self-Hosting SWAG: The Ultimate NGINX Reverse Proxy Guide (2026 Edition)

Setting up a secure gateway for your homelab doesn't have to mean dealing with bulky web GUIs or brittle databases. SWAG (Secure Web Application Gateway) by Linuxserver.io combines NGINX, Let's Encrypt (Certbot), and Fail2ban into a single, pre-hardened Docker container. In this comprehensive SWAG reverse proxy guide, you will learn how to deploy SWAG using Docker Compose, automate wildcard SSL certificates via the Cloudflare DNS-01 challenge, and supercharge your security stack with CrowdSec and a real-time web dashboard!
In part one we covered the basics of vanilla / raw NGINX, it's powers & abilities, setting it up on Debian raw, and why I love NGINX. Now we'll cover my favourite current iteration of it and IMO, presently, the best all-round way to run it. Welcome to part 2!
The Self-Hosting Roadmap
⚠️ The "Too Long; Didn't Read"
If you are just here for the code, grab the 2026 Master Compose File below. It includes the new Dashboard, CrowdSec, and Auto-Reload mods pre-configured.
Is This Guide For You?
Use this guide if you:
✅ Want file-based NGINX configs
✅ Want wildcard cert automation
✅ Prefer transparency over GUI abstraction
✅ Want CrowdSec / Authelia integration
This guide may not be for you if you:
❌ Want point-and-click setup
❌ Need the easiest possible reverse proxy
❌ Don’t want to touch config files
Better alternatives (discussed below):
- Nginx Proxy Manager
- Caddy
- Traefik
What is SWAG Reverse Proxy? (And Why Use It Over NPM or Caddy)
In the battle of Reverse Proxies, here are the major contenders and after this summary, you might decide like me that SWAG is the sweetheart of reverse proxies for you:
1. Nginx Proxy Manager (NPM)
- The Vibe: "I just want it to work now."
- The Reality: Still the king of the GUI. However, in 2026, it still relies on a database (MariaDB/SQLite) for configuration. If that database corrupts, your entire gateway is toast. It lacks native CrowdSec integration, and while the "NPMPlus" fork has gained traction, the base version feels increasingly "thin" compared to modern security-hardened options.
- Best For: Absolute beginners or those who only have 2–3 low-risk services. I also despise the over-complicated compose file for NPMPlus.
2. Traefik (v3/v4)
- The Vibe: "Cloud-native or bust."
- The Reality: Traefik has matured significantly. With the latest versions, it handles HTTP/3 and Tailscale integration out of the box. However, the "Label Mess" is still real. For a simple homelab, your
docker-compose.ymlfiles can quickly become 40% labels and 60% actual configuration. I hhaattteeedd the labels; made a mess of my docker-compose files. If you prefer trying traefik out, here's a fantastic guide from FoxxyMD's blog. - Best For: Large-scale clusters and users who live and breathe Kubernetes or want full on automation or CI/CD programmatic or declarative configuration files.
- Cons: Requires 'sidecar' containers for logging & integration with other tools (Like CrowdSec!)
3. Caddy (The Modern Rival)
- The Vibe: "Magic SSL that just works."
- The Reality: Caddy is SWAG’s biggest competitor in 2026. It uses the Caddyfile, which is arguably the most readable config format ever created. It handles SSL certificates more gracefully than almost anything else. It's honestly a very good proxy.
- Pros: Written in Go (memory safe), native HTTP/3, and incredibly simple syntax.
- Cons: Adding security layers like CrowdSec or custom WAF rules requires more manual "legwork" or specific plugins compared to SWAG's modular approach. And this is why I don't use it.
4. BunkerWeb (The WAF Specialist)
- The Vibe: "Military-grade protection."
- The Reality: A rising star in 2026. It’s Nginx-based but focused entirely on being a Web Application Firewall (WAF). It includes ModSecurity and automatic let's-encrypt out of the box with a slick UI.
- May 2026 Update: BunkerWeb has seen very rapid development so far in 2026, and is now a direct competitor to all of those above, and has me considering a test-run on it instead of using SWAG!
- Best For: People hosting high-value data or public-facing sites that get constant "script kiddie" attention.
Why SWAG Still Wins in 2026 🏆
SWAG isn't just a proxy; it’s a pre-hardened security stack. It’s built on Nginx, but it removes the "blank slate" anxiety. It dumbs down NGINX just enough to make it simple to adopt to, yet also simple to use and does not rely on external databases or cruft.
1. The Power of "Container Mods"
In 2026, SWAG's Modmanager is its secret weapon. Want to add a CrowdSec bouncer? Add one line to your environment variables. Want a dashboard to see who is attacking your site? Add the swag-dashboard mod. It’s modularity without the complexity of rebuilding images nor tags nor piles of extra lines in your docker compose.
2. Standardized Nginx Skillset
Unlike Traefik or Caddy, which use proprietary syntax, SWAG uses standard Nginx .conf files.
- Transferable: The skills you learn troubleshooting SWAG apply to almost every professional web server in the world.
- Templates: SWAG comes with a massive library of pre-configured proxy templates for almost every self-hosted app (Jellyfin, Nextcloud, Immich, etc.). You just rename
app.subdomain.conf.sampletoapp.subdomain.confand it just works.
3. Security by Default
SWAG doesn't just give you a cert; it hardens the connection. It scores an A/A+ on Qualys SSL Labs out of the box because it uses modern, secure ciphers and includes Fail2ban (and easy CrowdSec integration) to automatically ban IPs that try to brute-force your login pages.
Quick Comparison Table: 2026 Edition
| Feature | SWAG | Caddy | Traefik | NPM | BunkerWeb |
| Config Style | Nginx Files (CLI) | Caddyfile (Text) | Labels/YAML | GUI | GUI + YAML |
| SSL Handling | Certbot (Excellent) | Native (Best) | Native (Good) | Certbot (Good) | Native (Good) |
| Security | High (Fail2ban/WAF) | Moderate | Moderate | Basic | Extreme (WAF) |
| Learning Curve | Medium | Low | High | Very Low | Medium |
| Database Req? | No | No | No | Yes | Yes |
The Verdict
I still choose SWAG because it strikes the perfect balance between transparency and automation. I can see exactly what my Nginx configs are doing (no "magic" labels hiding the logic), but I don't have to manually fight with Certbot or worry about basic hardening.
Pro Tip: If you hate the CLI, the 2026 SWAG Dashboard mod provides a beautiful GoAccess-powered interface to view your traffic and security blocks without sacrificing the stability of a file-based configuration. Setting the dashboard mod up is below! 👇
🌐 The Digital Fortress Architecture
Before diving into the YAML configurations, it is vital to understand how traffic flows through your stack. This architectural diagram illustrates how your perimeter firewall hands traffic off to the SWAG container, and how SWAG safely isolates your public-facing apps from your core internal database backends:
flowchart TD
    %% WAN / Firewall
    subgraph Firewall["🛡️ OPNsense Firewall"]
        FW["🛡️ OPNsense / WAN"]
    end

    %% SWAG / Reverse Proxy
    subgraph SWAG["🏰 SWAG / NGINX Reverse Proxy"]
        NGINX["🌐 NGINX Proxy"]
        FW --> NGINX
    end

    %% Backend Services
    subgraph BackendBridge["🌉 Bridge Network Backend"]
        Ghost["👻 Ghost Blog"]
        Jellyseerr["🎬 Jellyseerr"]
        HomeAssistant["🏠 Home Assistant"]
        NGINX --> Ghost
        NGINX --> Jellyseerr
        NGINX --> HomeAssistant
    end

    subgraph BackendMacvlan["🔗 Macvlan / IPVLAN Backend"]
        Radarr["🎞️ Radarr"]
        Sonarr["📺 Sonarr"]
        Radarr --- Sonarr
        NGINX --> Radarr
        NGINX --> Sonarr
    end

    %% Internal Docker-only Network (optional)
    subgraph BackendInternal["🔒 Internal Docker Network"]
        Redis["🟢 Redis DB"]
        Postgres["🐘 Postgres DB"]
        Redis --- Postgres
        Ghost --- Redis
        Jellyseerr --- Postgres
    end

    %% Node Styling
    style FW fill:#f88,stroke:#333,stroke-width:2px,color:#111
    style NGINX fill:#d8b4fe,stroke:#333,stroke-width:2px,color:#111
    style Ghost fill:#93c5fd,stroke:#333,stroke-width:1px,color:#111
    style Jellyseerr fill:#5eead4,stroke:#333,stroke-width:1px,color:#111
    style HomeAssistant fill:#60a5fa,stroke:#333,stroke-width:1px,color:#111
    style Radarr fill:#fcd34d,stroke:#333,stroke-width:1px,color:#111
    style Sonarr fill:#fbbf24,stroke:#333,stroke-width:1px,color:#111
    style Redis fill:#34d399,stroke:#333,stroke-width:1px,color:#111
    style Postgres fill:#3b82f6,stroke:#333,stroke-width:1px,color:#111

    %% Subgraph Styling
    style Firewall fill:transparent,stroke:#888,stroke-width:1px,stroke-dasharray:4 4
    style SWAG fill:transparent,stroke:#888,stroke-width:1px,stroke-dasharray:4 4
    style BackendBridge fill:transparent,stroke:#888,stroke-width:1px,stroke-dasharray:4 4
    style BackendMacvlan fill:transparent,stroke:#888,stroke-width:1px,stroke-dasharray:4 4
    style BackendInternal fill:transparent,stroke:#888,stroke-width:1px,stroke-dasharray:4 4
Bridge Network Mode for mutliple dockers (on that same network) your set $upstream_app 192.168.1.60; for example turns into set $upstream_app jellyfin; as it can use docker's internal DNS resolution, so long as they are on the same network.Installing SWAG
Level 1: The Prerequisites
Before we spin up the container, you need three things.
You need a domain (e.g., corelab.tech) managed by Cloudflare.
- Why Cloudflare? Their API allows us to use DNS-01 Validation. This means you can get a Wildcard SSL Cert (
*.corelab.tech) without opening Port 80 to the internet.
2. The Cloudflare Token
Don't use your global account key. Create a scoped token:
- Go to Cloudflare Dashboard -> My Profile -> API Tokens.
- Create Custom Token -> Name it "SWAG" or something meaningful to you.
- Permissions:
Zone-DNS-EditZone-Zone-Read
- Zone Resources: Include
Specific Zone->yourdomain.com. - Copy that token. You will never see it again.
- If you're not familiar with CloudFlare and their free tier, head on over to this link to have a catchup.
Verify your token includes:
Zone:DNS Edit
Zone:Zone Read
And that it is scoped to the correct zone!
DNS-01 challenge
This challenge asks you to prove that you control the DNS for your domain name by putting a specific token in a TXT record, under that domain. It is slightly harder to configure than HTTP-01, but can work in scenarios that HTTP-01 can’t. It also allows you to issue wildcard certificates.
ref: https://letsencrypt.org/docs/challenge-types/#dns-01-challenge
3. Docker Compose
Don't use your global account key. Create a scoped token:
- Docker Compose:
- You need Docker Compose already ready to go. Setup guide here.
Install CloudFlare API & Creds into SWAG
Jump back into your server and you'll be editing a .ini file in SWAG's config.
Start SWAG to Generate Default Configs
If you have not fired SWAG up yet, run it just to have it download & generate all the default configurations simply by typing docker compose up -d once you've copied the docker compose details below.
Sadly this part is a bit of a back-and-forth!
Once that's done, shut it back down docker compose down swag.
- Now you are ready to edit the file in SWAG. Type
nano /pathto/your/swag/dns-conf/cloudflare.ini- It should look something like:
 Instructions: https://github.com/certbot/certbot/blob/master/certbot-dns-cloudflare/certbot_dns_cloudflare/__init_>
# Replace with your values

# With your CF Global api key:
#dns_cloudflare_email = Youremailaddress
#dns_cloudflare_api_key = yourown_api_key

# With token (Modern, more secure, recommended) (comment out both lines above and uncomment below):
dns_cloudflare_api_token = your_token_here
This is an "either or" situation, you use the API keys OR the token, not both! It's far better to utilize the new token vs the email & API key you. Once done,CTRL-O to save and CTRL-X to exit.
Level 2: SWAG Docker Compose Example (2026)
Here is where we deviate from the old guide. We are going to activate the Docker Mods immediately.
The "Secret Sauce" Mods:
swag-dashboard: A beautiful real-time GUI for NGINX stats (GoAccess).swag-crowdsec: Automatically installs the CrowdSec bouncer.swag-auto-reload: Watches your config folder and reloads NGINX instantly when you save a file (no more restarting containers).
docker-compose.yml
2.0 Setup Docker Compose File for SWAG
services:
  swag:
    image: lscr.io/linuxserver/swag:latest
    container_name: swag
    cap_add:
      - NET_ADMIN # Required for Fail2ban/Crowdsec
# Use Host Networking OR MacVlan if you want real source IPs
# If using Bridge, ensure you setup 'Trusted Proxies' in NGINX
    network_mode: host
    #networks:
    #  docker_vlan42:
    #    ipv4_address: X.X.X.X (A LAN IP you pick)
    environment:
      - PUID=1000
      - PGID=1000
      - TZ=America/Toronto
      - URL=corelab.tech
      - VALIDATION=dns
      - SUBDOMAINS=wildcard
      - DNSPLUGIN=cloudflare
      - [email protected]
      - EXTRA_DOMAINS=blah.tech,personal.blog #optional
# THE POWER UP: Chain mods with a pipe | character
      - DOCKER_MODS=linuxserver/mods:swag-dashboard|linuxserver/mods:swag-crowdsec|linuxserver/mods:swag-auto-reload
    volumes:
      - /yourlocation/swag:/config
    ports:
      - 443:443
      - 80:80    # Optional if using DNS validation, but good for redirects
      - 81:81    # The New Dashboard Port
    restart: unless-stopped
Which Network Mode Should You Use?
| Mode | Best For | Pros | Cons |
|---|---|---|---|
| Bridge | Most users | Simple, isolated | Requires trusted proxy config |
| Host | Easy real-IP access | Simpler logging | Less isolation |
| Macvlan | Advanced homelabs | Dedicated LAN IP | More complexity |
Recommended for most readers or if unsure: Bridge mode
If you do chose to use MAC or IP VLAN networking mode, or a user defined bridge, you need a little more config if you want this docker to receive a random IP you have to set the info as below, specifically, ip_range, I don't recommend this and you should give it a static IP as above, and comment out ip_range below:
networks:
  docker_vlan42:
    driver: macvlan
    driver_opts:
      parent: eth0.42 (Whatever your NIC is listed as in your OS)
    ipam:
      config:
        - subnet: "192.168.42.0/24"
          gateway: "192.168.42.1"
          ip_range: "192.168.42.100/32" #Only use this if you want it serving IP addresses, otherwise comment it (with a #) in front so it doesn't effect anything or deelte the ip_range: line.
What Core Lab's SWAG config actually looks like:
  swag:
    container_name: swag
    image: lscr.io/linuxserver/swag
    restart: unless-stopped
    cap_add:
      - NET_ADMIN # Required for Fail2ban/Crowdsec
    networks:
      dmz_vlan:
        ipv4_address: internal_ip
    ports:
      - "80:80"
      - "81:81"
      - "443:443"
    environment:
      - TZ=America/Toronto
      - PUID=1000
      - PGID=1000
      - URL=corelab.tech
      - SUBDOMAINS=wildcard
      - VALIDATION=dns
      - DNSPLUGIN=cloudflare
#      - EXTRA_DOMAINS=
      - DOCKER_MODS=linuxserver/mods:swag-crowdsec|linuxserver/mods:swag-dashboard|linuxserver/mods:swag-cloudflare-real-ip
      - CROWDSEC_API_KEY=Mykey_getyourown!
      - CROWDSEC_LAPI_URL=http://1_ipaddress_past_swag:8080
    volumes:
      - /opt/DOCKERS/swag:/config

  crowdsec:
    container_name: crowdsec
    image: crowdsecurity/crowdsec:latest
    restart: unless-stopped
    networks:
      vlan7_home:
        ipv4_address: an_ipv4_ip
    security_opt:
      - no-new-privileges=true
    environment:
      - GID=1000
      - PID=1000
      - CUSTOM_HOSTNAME=crowdsec
      - BOUNCER_KEY_SWAG=Bouncer's_key
      - COLLECTIONS=crowdsecurity/nginx crowdsecurity/base-http-scenarios crowdsecurity/appsec-virtual-patching crowdsecurity/a>
    volumes:
      - /opt/DOCKERS/crowdsec/config:/etc/crowdsec
      - /opt/DOCKERS/crowdsec/data:/var/lib/crowdsec/data
      - /opt/DOCKERS/swag/log/nginx:/var/log/swag:ro
🛡️ Tactical Briefing: Host Networking vs. Real IPs: While bridge network is great for isolation, NGINX needs host mode or a properly configured set_real_ip_from block to prevent Fail2ban or CrowdSec from banning your Docker gateway IP instead of the malicious external client!
The "First Boot" Configuration
- Run
docker compose up -d. - Watch the logs:
docker logs -f swag. You can also run them at oncedocker compose up -d && docker logs -f swag - You will see it request a certificate.
dns validation via cloudflare plugin is selected
Certificate exists; parameters unchanged; starting nginx
The cert does not expire within the next day. Letting the cron script handle the renewal attempts overnight (2:08am).
**** Configuring CrowdSec nginx Bouncer ****
**** Applying the SWAG dashboard mod... ****
**** Adding goaccess to package install list ****
**** libmaxminddb already installed, skipping ****
**** Applied the SWAG dashboard mod ****
**** Successfully configured CrowdSec nginx Bouncer  ****
[pkg-install-init] **** Installing all mod packages ****
fetch http://dl-cdn.alpinelinux.org/alpine/v3.22/main/x86_64/APKINDEX.tar.gz
fetch http://dl-cdn.alpinelinux.org/alpine/v3.22/community/x86_64/APKINDEX.tar.gz
(1/17) Installing gettext-envsubst (0.24.1-r0)
(2/17) Installing libgomp (14.2.0-r6)
(3/17) Installing gettext-libs (0.24.1-r0)
(4/17) Installing gettext (0.24.1-r0)
(5/17) Installing goaccess (1.9.4-r0)
(6/17) Installing lua5.1-libs (5.1.5-r13)
(7/17) Installing lua5.1 (5.1.5-r13)
(8/17) Installing lua-resty-http (0.17.2-r0)
(9/17) Installing luajit (2.1_p20240815-r1)
(10/17) Installing lua-resty-lrucache (0.13-r1)
(11/17) Installing lua-resty-core (0.1.31-r0)
(12/17) Installing nginx-mod-http-lua (1.28.0-r3)
(13/17) Installing lua-resty-string (0.15-r0)
(14/17) Installing lua-sec (1.3.2-r0)
(15/17) Installing lua5.1-socket (3.1.0-r1)
(16/17) Installing lua5.1-sec (1.3.2-r0)
(17/17) Installing lua5.1-cjson (2.1.0-r11)
Executing busybox-1.37.0-r19.trigger
OK: 197 MiB in 238 packages
[custom-init] No custom files found, skipping...
[ls.io-init] done.
That line at the bottom means initial setup was successful! DONE! Take a breather, you're doing great here, this is a good spot to be at!
- Reminder of Crucial Step: It will likely pause/fail the first time because it needs your Cloudflare credentials.
- Go to
config/dns-conf/cloudflare.iniand edit it:
dns_cloudflare_api_token = YOUR_LONG_TOKEN_HERE- Restart the container:
docker compose restart swag.
There you have it, the actual docker compose SWAG config that serves (and protects!) this very site! This is missing the CrowdSec variables we'll add later, when we turn your SWAG into a digital fortress.
Level 3: Best SWAG Docker Mods
This is what makes SWAG powerful. Let's break down those mods we enabled.
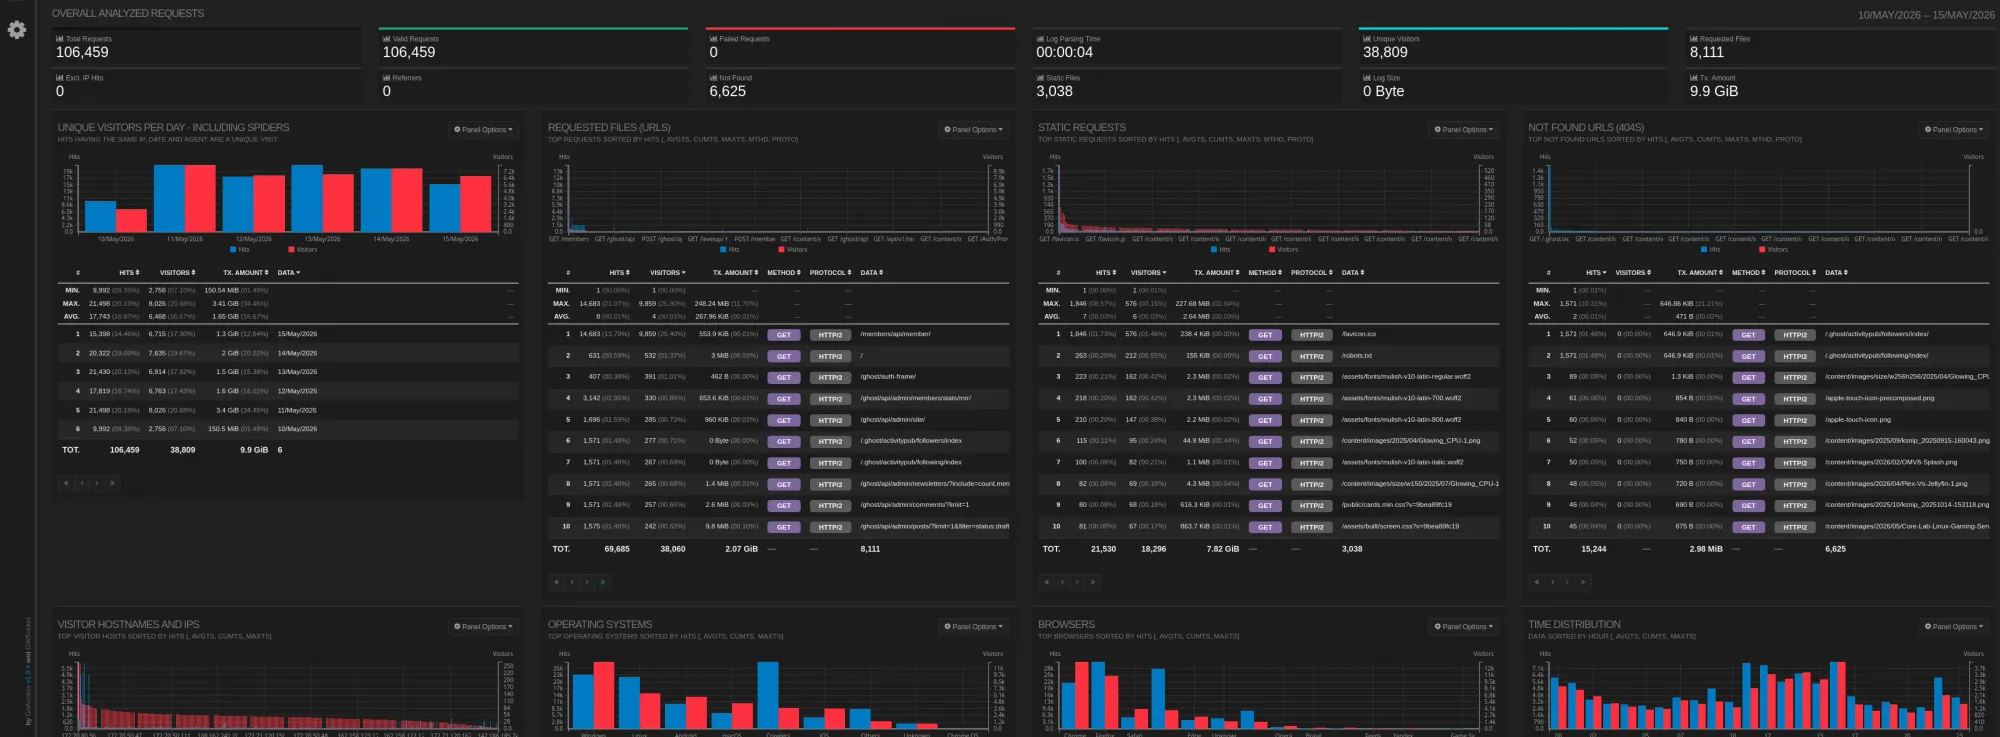
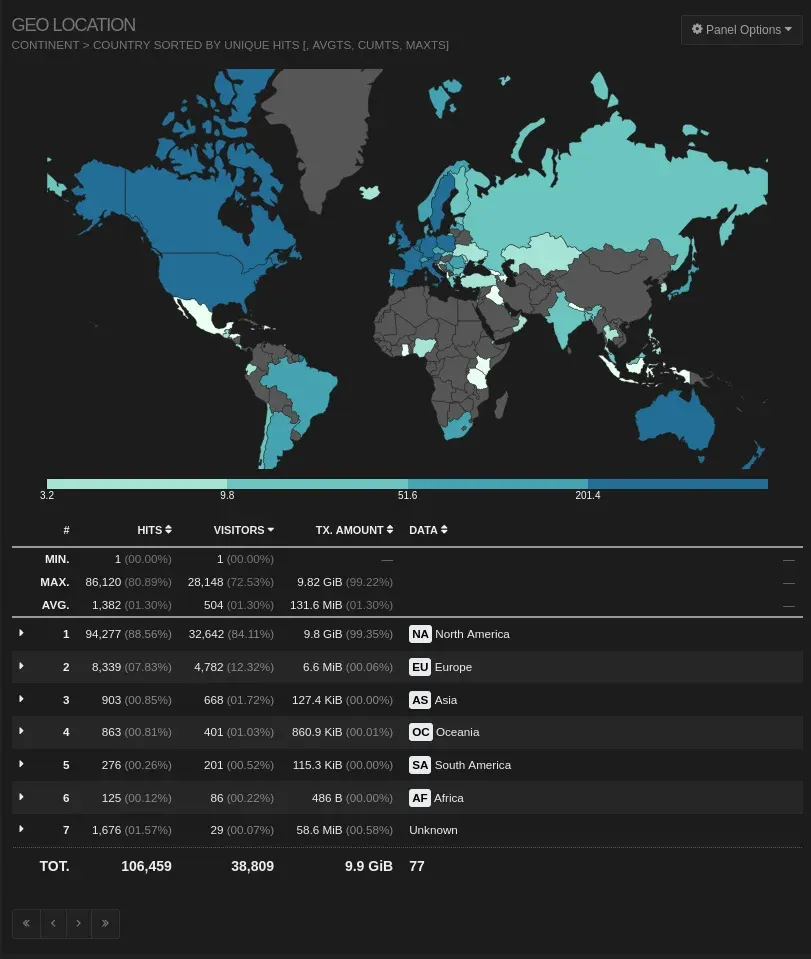
📊 The Dashboard (Port 81)
Go to http://YOUR-SERVER-IP:81. You will see the GoAccess Dashboard. This parses your access logs in real-time.
- What to look for: The "Geo Location" panel. If you see 5,000 requests from a country you don't live in, you know your firewall rules need tightening.
- I look for other stats related to any active bans, referring sites, and most commonly requested/served pages etc...
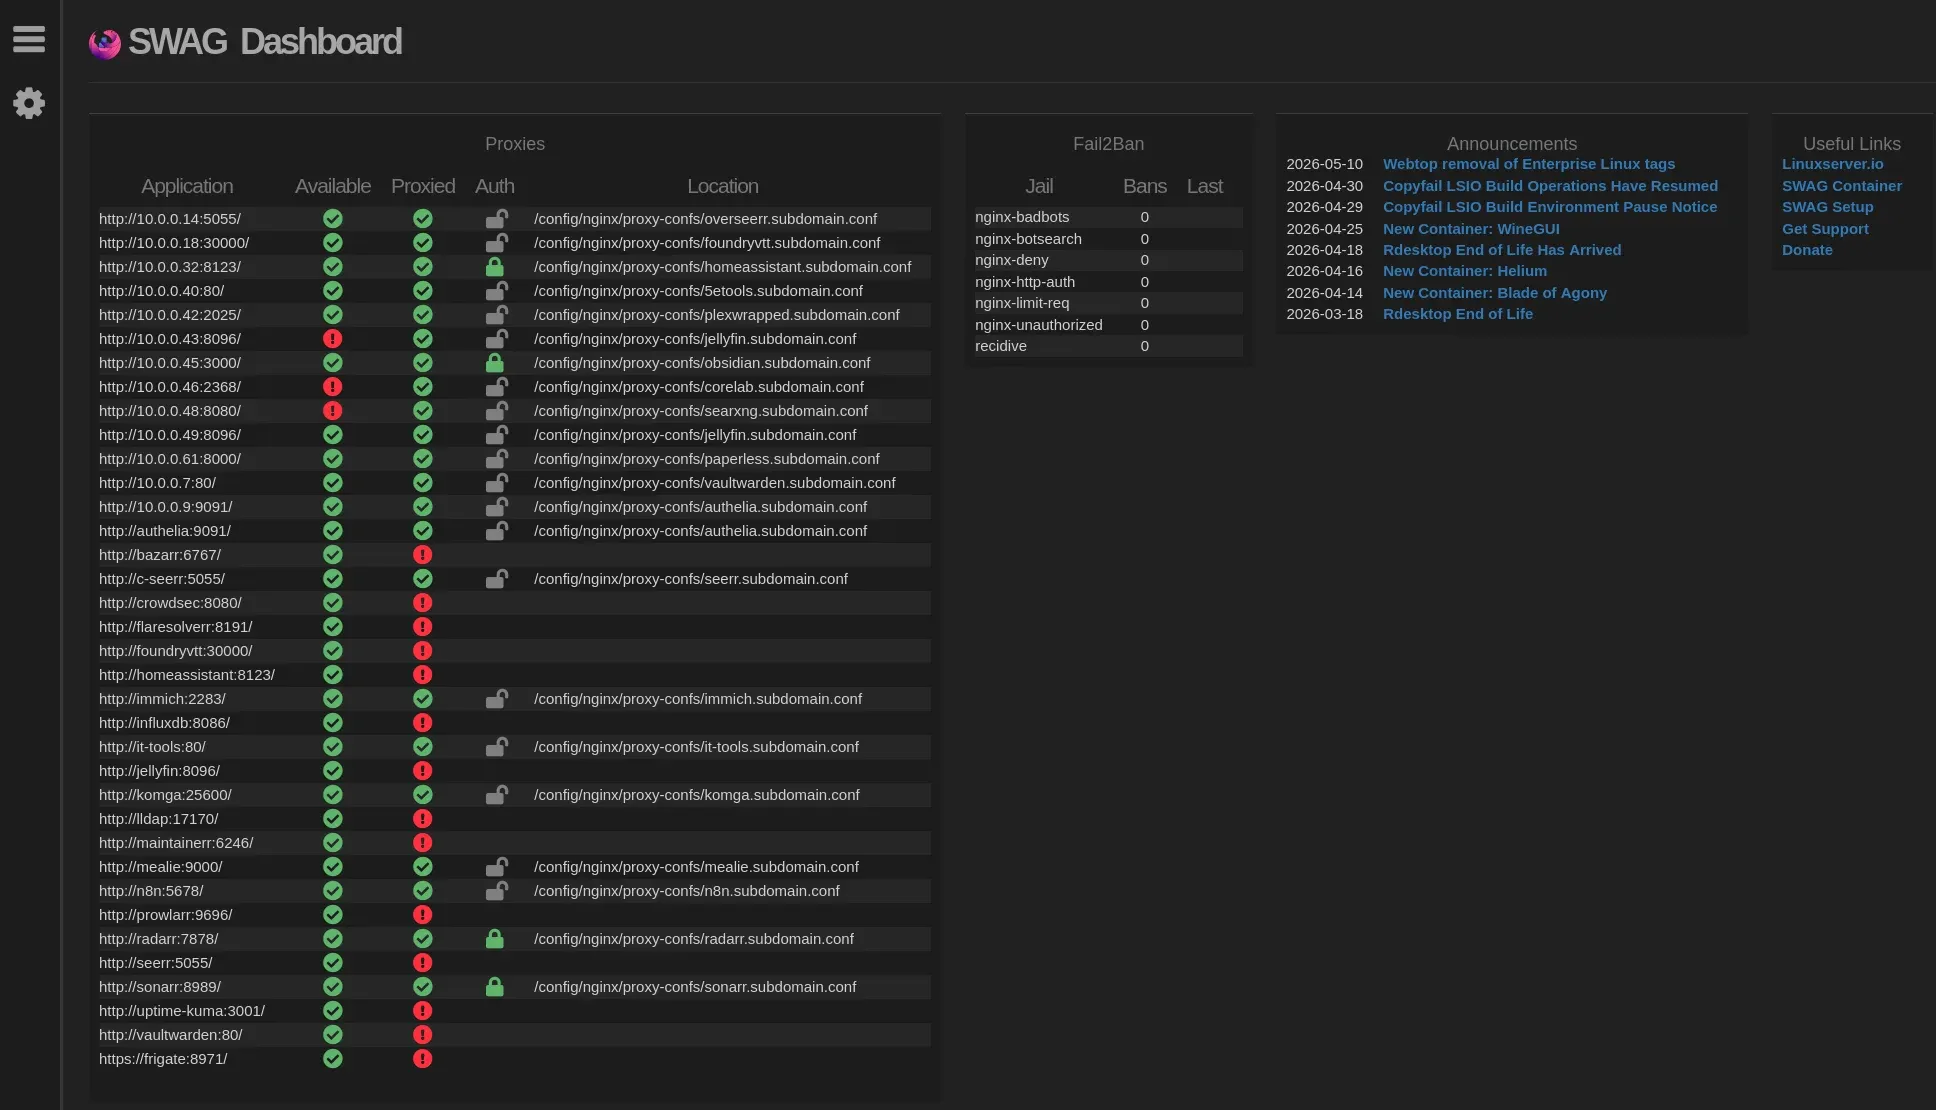
Instant view of any f*ckery - Fail2Ban right there. I wish they integrated CrowdSec here too!
🛡️ CrowdSec Integration
By adding the swag-crowdsec mod, SWAG automatically installs the CrowdSec NGINX Bouncer.
- How it works: If an IP attacks another CrowdSec user anywhere in the world, and that IP tries to hit your server, SWAG drops the connection with a 403 Forbidden before it even touches your application.
- Configuration: You generally don't need to touch this. It works out of the box by reading your
crowdsecAPI key if you run the main CrowdSec agent alongside it (Recommended).
⚡ Auto-Reload
In the old days, every time you added a proxy conf, you had to docker compose restart swag. With swag-auto-reload, you just save the .conf file. The container detects the file change, tests the configuration syntax, and if it passes, reloads NGINX silently. Zero downtime.
Level 4: How to Reverse Proxy Docker Containers with SWAG
SWAG comes with pre-written configurations for almost everything. You don't need to write NGINX code; you just need to rename files.
Example: Enabling Jellyfin
Navigate to your mapped volume: cd /yourlocation/swag/nginx/proxy-confs/
- Find your service sample:
ls | grep jellyfin - Rrename the file:
mv jellyfin.subdomain.conf.sample jellyfin.subdomain.conf - Edit the upstream variable:
nano jellyfin.subdomain.conf(Changeset $upstream_app jellyfin;) if your jellyfin container is NOT named jellyfin. You can point it at an IP address even -$upstream_app 10.0.0.- In detail - If your Jellyfin container is named
jellyfinand is on the same Docker network, you are done. - If Jellyfin is on a different server or network (e.g.,
192.168.1.50), change it to:
- In detail - If your Jellyfin container is named
set $upstream_app 192.168.1.50;
set $upstream_port 8096;
set $upstream_proto http;- Save the file.
- Wait 5 seconds (Auto-reload mod!).
- Visit
https://jellyfin.yourdomain.tech.
Level 5: Hardening (Authelia)
Exposing apps like Radarr or Sonarr to the web is dangerous. They have login forms, but they aren't meant to withstand a brute-force attack. We want to put Authelia in front of them but for now you have Fail2Ban and Crowdsec, which is great, but you'll eventually want to setup Authelia for MFA.
Once you've setup Authelia, now you can enable it!👇
- In your
sonarr.subdomain.conf, find theserverblock. - Uncomment these two lines (they are usually already there, just commented out):
include /config/nginx/authelia-server.conf;
include /config/nginx/authelia-location.conf;- Save.
Now, when you visit sonarr.yourdomain.tech, NGINX pauses the request, asks Authelia "Is this guy cool?", forces you to Multi-Factor Authenticate, and then lets the request through.
Final Thoughts & "Gotchas"
- Macvlan vs. Bridge: I use Host Networking or Macvlan because I want SWAG to see the real Client IP address of visitors. If you use Bridge mode, every visitor looks like
172.18.0.1(the Docker Gateway), which breaks Fail2ban and Geo-blocking. - Geoblocking: If you want to block entire countries, look into the
swag-maxmindmod. It adds a database license key to your compose file and lets you addif ($geoip_country_code != "CA") { return 403; }to your NGINX configs.- I do this upstream with Cloudflare, and another layer at my firewall with geoblocking on OPNsense.
Comparison Table: Reverse Proxy Networking
| Feature | Bridge (Default) | Host Mode | Macvlan (Recommended) |
| Real IP Visibility | ❌ No (Shows Gateway) | ✅ Yes | ✅ Yes |
| Port Conflicts | ❌ High Risk | ❌ Guaranteed | ✅ None (Own IP) |
| Security (F2B/CrowdSec) | ⚠️ Dangerous (Bans self) | ✅ Perfect | ✅ Perfect |
| Ease of Setup | ⭐⭐⭐⭐⭐ | ⭐⭐⭐⭐ | ⭐⭐⭐ |
Should you give SWAG its own IP and MAC?
Yes, if your hardware supports it (Standard Linux/Unraid/Proxmox).
Giving SWAG a dedicated MAC and IP (Macvlan) is the "Pro" move in 2026 for three reasons:
- Clean Routing: Your router sees "SWAG" as a unique device. You can set up port forwarding specifically to that IP without worrying about what else is running on your host.
- Network Isolation: You can put the SWAG IP in a DMZ or a specific VLAN while your Docker host stays on a more trusted management network.
- Fail2ban Precision: When CrowdSec or Fail2ban triggers a block, it interacts with the real networking layer of that specific IP, ensuring only the attacker is silenced.
You now have a self-updating, crowd-protected, auto-renewing SSL gateway. Welcome to the fortress.
Common SWAG Issues
| Problem | Likely Cause | Fix |
|---|---|---|
| Certificate request fails | Bad Cloudflare token | Check DNS permissions |
| 502 Bad Gateway | Wrong upstream container | Verify network name |
| Real client IP missing | Proxy chain issue | Enable trusted proxies |
| Dashboard unreachable | Port 81 conflict | Check compose mapping |
| Config changes ignored | Auto-reload missing | Add mod or reload manually |


Member discussion