
Advanced OPNsense Networking: Cloudflare Bypass, DNS/NTP Hijacking & SQM
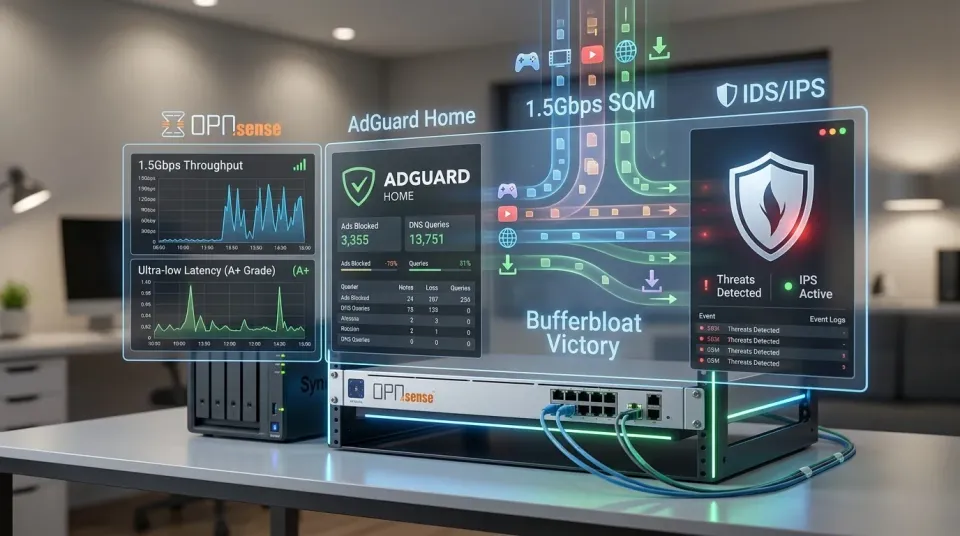
Getting your homelab online was Day 1. Day 2 is about absolute control.
Most "Pro" home networks stop at basic ad-blocking and simple port forwards. To truly master your infrastructure, you need to dictate exactly how traffic enters your network, how internal devices resolve their identity and time, and how your router handles congestion on high-speed connections.
These techniques are commonly used in advanced homelab firewall setups to maintain security, performance, and full control over self-hosted infrastructure.
This guide walks through advanced OPNsense networking techniques including Cloudflare bypass rules, DNS and NTP interception, VLAN isolation, and SQM traffic shaping.
Why do this? This helps further secure your homelab from things like NTP & DNS Flood amplification attacks (low and "slow" DDoS) whilst allowing you to still host services, securely.
Here is your blueprint for a "God-Mode" OPNsense architecture.
Architecture we're aiming for:
flowchart TD

    A[Internet]
    B[Cloudflare Proxy]
    C[OPNsense Firewall]

    D[SWAG Reverse Proxy]

    E[Internal Applications]
    F[Jellyfin Media Server]

    G[AdGuard DNS]
    H[Local NTP Server]

    A --> B
    B --> C

    C -->|HTTPS Apps| D
    D --> E

    C -->|Direct Media Port
Cloudflare Bypass| D
    D --> F

    C -->|Forced DNS| G
    C -->|Forced NTP| H

    %% Groups
    subgraph Edge
        A
        B
    end

    subgraph Network_Perimeter
        C
    end

    subgraph Application_Layer
        D
        E
        F
    end

    subgraph Infrastructure_Services
        G
        H
    end

    %% CoreLab cyberpunk styling
    classDef edge fill:#000000,stroke:#00ff88,color:#00ff88,stroke-width:2px
    classDef firewall fill:#001a12,stroke:#00ff88,color:#00ff88,stroke-width:3px
    classDef apps fill:#001f1a,stroke:#00ffaa,color:#00ffaa
    classDef infra fill:#001a1a,stroke:#00dddd,color:#00dddd

    class A,B edge
    class C firewall
    class D,E,F apps
    class G,H infra

    %% Clickable documentation links
    click C "https://corelab.tech/opnsensept1/" "OPNsense configuration guides"
    click D "https://corelab.tech/swag-reverse-proxy-guide/" "SWAG reverse proxy setup"
    click F "https://corelab.tech/ultimate-media-server-guide/" "Media server architecture"
    click G "https://corelab.tech/cloudflare-protection-free/" "DNS services"
Phase 1: How to Bypass Cloudflare for Jellyfin or Plex in OPNsense
If you are routing your web traffic through Cloudflare tunnels or their proxy (the "Orange Cloud"☁️) and restricting your OPNsense WAN to only accept traffic from Cloudflare IPs, you have a highly secure setup.
When self-hosting behind Cloudflare, many homelab users eventually need to bypass the proxy for specific services such as Jellyfin or Plex. Cloudflare's free tier has strict Terms of Service against heavy video streaming, and their proxy only supports specific ports (80, 443, etc.). If you want to run Jellyfin or Plex with a domain name, you must bypass Cloudflare, or risk getting your account banned, or suffer buffering. No one wants buffering!
The solution is to create a direct NAT rule in OPNsense that allows traffic to reach your reverse proxy or media server without passing through Cloudflare’s proxy network. This preserves the security benefits of Cloudflare for normal web traffic while allowing high-bandwidth media services to connect directly.
Here is how to poke a precise, safe hole through your locked-down WAN. You can do this for multiple services, if needed. Here's what this looks like in Cloudflare DNS records.
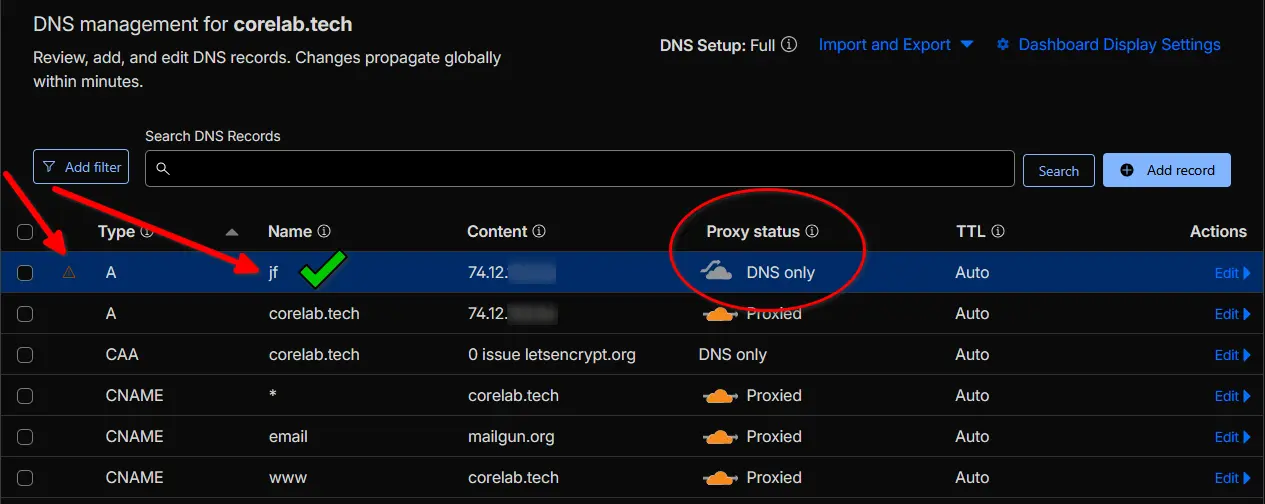
Simply login, hit your DNS settings and create a new A record. I used jf for mine but you could use jellyfin.yourdomain.com if you so chose etc...
The OPNsense Port Forward Config
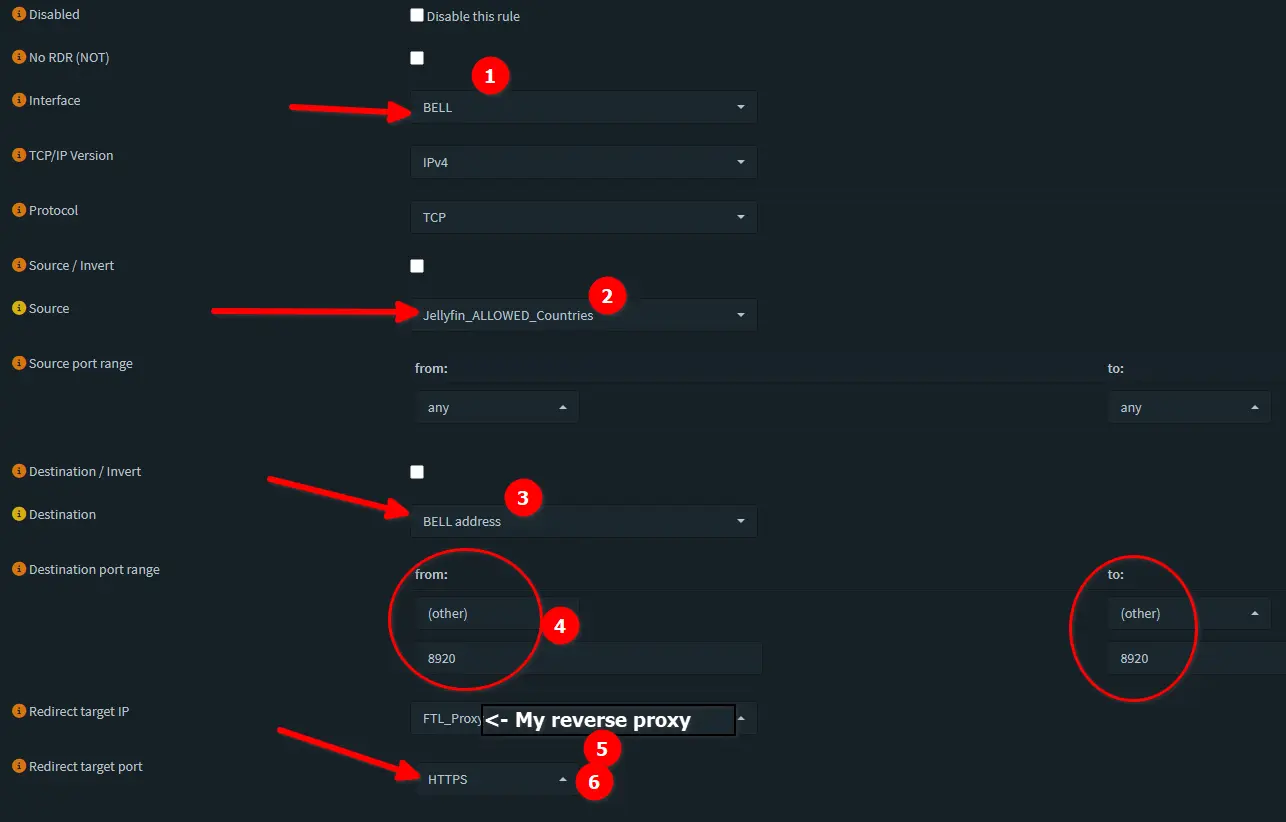
You need a NAT Port Forward that intercepts port 8096 and bypasses your strict Cloudflare-only firewall rules.


- Create an Alias (Optional but Recommended): Go to Firewall -> Aliases and create a GeoIP alias allowing only your home country, or an alias for specific remote IP addresses you trust. Here's what my alias looks like:
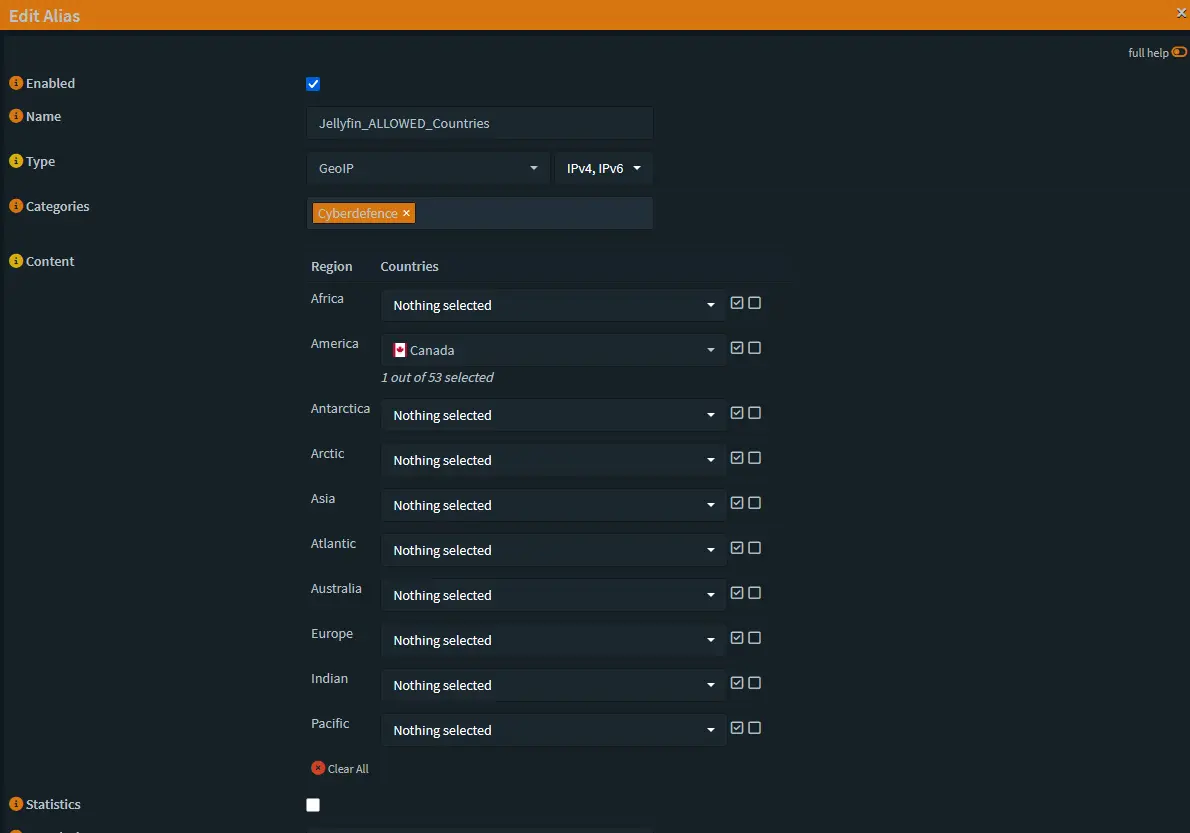
- The NAT Port Forward: Go to Firewall -> NAT -> Port Forward and add:
- Interface: WAN
- TCP/IP Version: IPv4
- Protocol: TCP
- Source: Any (or your custom Alias from Step 1 to restrict who can see the port)
- Destination: WAN Address
- Destination Port Range: 8096 to 8096
- Redirect Target IP:
<Your reverse proxy IP or alias> - Redirect Target Port: 8096
- Filter Rule Association: Add associated filter rule.
- Rule Order is Critical: Go to Firewall -> Rules -> WAN. OPNsense processes rules top-down. You must ensure this new Jellyfin NAT rule sits above your "default deny all" drop rule at the bottom. I have might snuggled directly below my Cloudflare locked down reverse proxy rules:

Rule order placement
Result: Web traffic remains fully shielded by Cloudflare, but your heavy media streams bypass the proxy directly to your server, keeping you compliant and buffer-free.
Phase 2: DNS and NTP Interception for Network Control
In a segmented network, "polite" devices use the DNS and NTP servers you provide via DHCP. "Rude" devices (like IoT gear and Smart TVs) often have hardcoded servers like 8.8.8.8 or pool.ntp.org, bypassing your local security, ad-blocking, and logging entirely.
We fix this by building a Transparent Redirect system. We will "lie" to these devices by intercepting their requests and forcing them into our local stack. Some people call this NAT reflection, industry calls if DNS Hijacking 👇
What is DNS Hijacking in OPNsense?
DNS hijacking in OPNsense refers to intercepting outbound DNS requests and redirecting them to a local resolver such as AdGuard Home or Unbound. This prevents devices from bypassing your network policies by using external DNS services like Google DNS (8.8.8.8) or Cloudflare DNS (1.1.1.1).
Many IoT devices and smart TVs hardcode their own DNS servers, which can bypass ad-blocking, logging, and security filtering. By redirecting DNS traffic at the firewall level, OPNsense ensures all devices resolve domains through your internal DNS infrastructure.
1. The Intercept (NAT Hijacking)
When a device tries to talk to an external DNS or NTP server, OPNsense grabs the packet and answers as if it were the intended destination.
NTP Redirect (Force Local Time) Setup:
The NAT Port Forwards: Go to Firewall -> NAT -> Port Forward and add:
- Interface: HomeRZ, IoT
- Destination / Invert: Checked
- Destination: This Firewall
- Redirect Target IP:
127.0.0.1(Redirects to OPNsense's own NTP service) - Port: 123 (UDP)
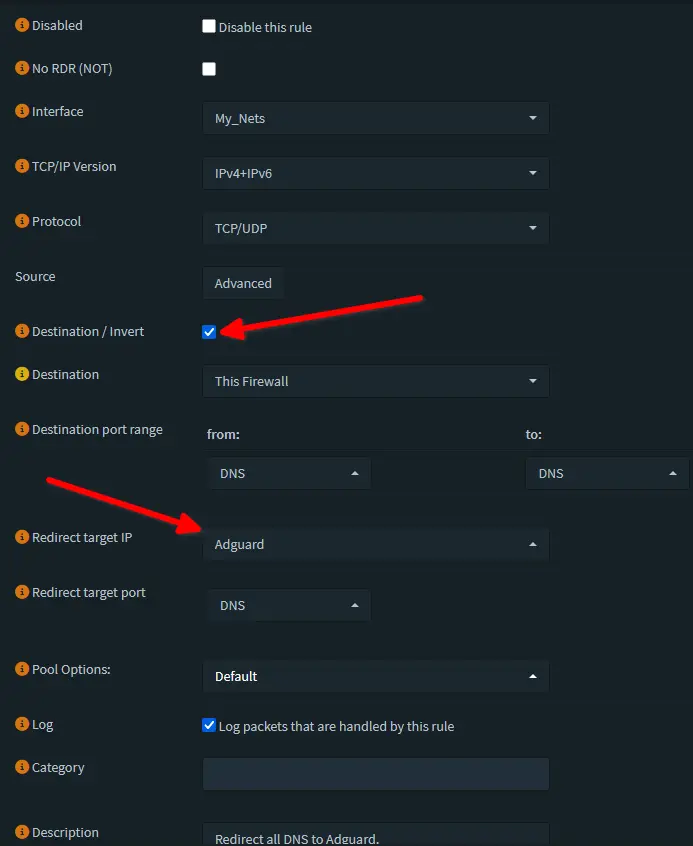
DNS Redirect (Force AdGuard):
- Interface: HomeRZ, IoT
- Destination / Invert: Checked
- Destination: This Firewall
- Redirect Target IP:
10.0.0.110(Your AdGuard macvlan IP) - Port: 53 (TCP/UDP)
2. The Hybrid DNS Handshake
We want AdGuard Home's UI for blocking, but OPNsense Unbound's power for resolving local hostnames (like nas.local).
- OPNsense Unbound: Move Unbound to port
5353and enable DHCP Registration.
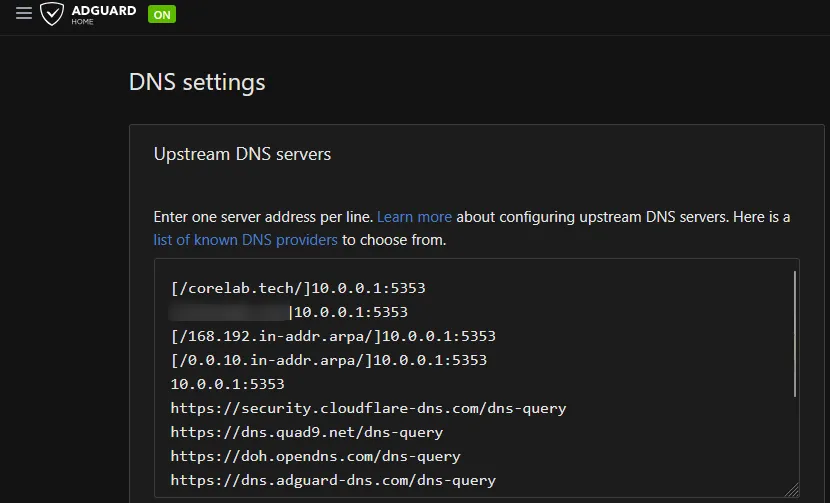
AdGuard Home: In DNS Settings, set your Upstream DNS using conditional syntax:
[/home.arpa/]10.0.0.1:5353
[/168.192.in-addr.arpa/]10.0.0.1:5353
https://dns.cloudflare-dns.com/dns-query
Top lines route local domains to OPNsense. The bottom line sends public queries to an encrypted resolver.
3. Macvlan & The Docker Shim
Running AdGuard on a macvlan network gives it a dedicated IP, but isolates it from the Docker Host. The solution is a bridge shim network. You don't HAVE to do this, but for all my dockers that act as "network appliances" and generally operate properly with their own MAC address (layer 2, broadcast domain etc), I use macvlan. Unifi Network Controller & Adguard use this.
# How to "hot-attach" the shim via CLI to restore host communication
docker network connect --ip 10.0.0.111 omv_shim adguardhome
ip route add 10.0.0.110 omv_shim scope link
4. Floating Rules for NTP Tenant Isolation
If you run a multi-tenant or highly segmented setup, duplicating NTP rules on every VLAN interface gets messy. Use Floating Rules (which evaluate before interface rules when "Quick" is checked) to centralize logic.
| VLAN | Internal NTP | Public NTP | Isolation |
| HomeRZ | Allowed | Blocked | Yes |
| Office | Allowed | Blocked | Yes |
| IoT | Allowed | Blocked (or Redirected) | Yes |
| Tenant | Blocked | Allowed | Fully Isolated |
Phase 3: Eliminating Bufferbloat with FQ-CoDel SQM
High speed doesn't mean high quality. If your latency spikes when you start a massive download, you have Bufferbloat. We solve this using FQ_CoDel (Fair Queuing Controlled Delay) to ensure "small" packets (gaming, SSH, VoIP) aren't crushed by "big" packets (Steam downloads, 4K streams). Run a Bufferbloat test a few times before you start setting this up, so you have a baseline and can see the difference. Waveform Bufferbloat Test.
Comparison of ISP / Consumer Router vs OPNsense with SQM:
| Feature | Default Router | OPNsense with SQM |
|---|---|---|
| Bufferbloat control | None | FQ-CoDel active |
| DNS control | Optional | Forced redirect |
| IoT DNS bypass | Common | Blocked |
| Traffic fairness | Limited | Per-device queueing |
| Latency under load | High | Low |
What IS Bufferbloat?
Bufferbloat is high latency and jitter in packet-switched networks due to buffering itself. Think of it like a traffic jam but in this case, it's packets. It becomes especially bad when your downloading a large file from the internet and your inbound LAN can't quite keep up. You would think this doesn't happen if you have say, 1 Gbps internet service, and you have a 1Gbps switch connected to it.
But it's the little things. Maybe there's a lot of congestion on that switch because multiple people are doing things. So it starts to buffer your packets. This shows up as latency, suddenly your latency goes from 21ms to 80ms, or 120ms, or higher!
Hardware Requirements for OPNsense Traffic Shaping
Running FQ-CoDel traffic shaping on OPNsense is one of the most effective ways to eliminate bufferbloat and maintain low latency under load. However, because shaping occurs in software within the firewall path, it introduces measurable CPU overhead. The hardware requirements therefore depend primarily on the target throughput and number of queues being processed.
At sub-gigabit speeds (≤500 Mbps), almost any modern x86 CPU can run FQ-CoDel with minimal overhead. But once shaping approaches true gigabit or multi-gigabit WAN speeds, CPU performance becomes significantly more important. This is because FQ-CoDel operates per-packet and maintains multiple flow queues, which increases interrupt load and scheduling work in the network stack.
For sustained gigabit shaping (≈900–950 Mbps), a modern multi-core processor with high single-thread performance is recommended. In practical terms, this typically means at least a contemporary Intel Core i3/i5, AMD Ryzen-class CPU, or similar server-grade Xeon/Epyc processor running above ~3 GHz. Lower-power CPUs commonly found in embedded firewall appliances (Atom, Celeron, older AMD Jaguar cores) may struggle to maintain line-rate shaping once traffic becomes highly concurrent or packet sizes decrease.
Additional factors also influence performance:
- NIC driver efficiency (Intel NICs typically perform best with FreeBSD-based systems like OPNsense)
- Interrupt handling and RSS configuration
- Number of active flows and packet size distribution
- Whether IDS/IPS or other packet inspection features are running concurrently
In real-world deployments, many homelab users report stable gigabit FQ-CoDel shaping with <20–30% CPU utilization on mid-range desktop CPUs, while compact firewall appliances often cap out closer to 600–800 Mbps when shaping is enabled.
As a general rule of thumb: if your firewall hardware can already route 2–3× your WAN bandwidth without shaping enabled, it will typically have enough headroom to run FQ-CoDel traffic shaping at full line rate.
The Three-Layer Shaper Cake:
You'll find these settings in Firewall -> Shaper.
- Pipes: Create a "Speed Ceiling" at ~90-95% of your actual line speed (e.g., 1350 Mbps for a 1.5Gbps line). This forces the bottleneck into OPNsense where your CPU can manage it, rather than at your ISP's unmanaged node.
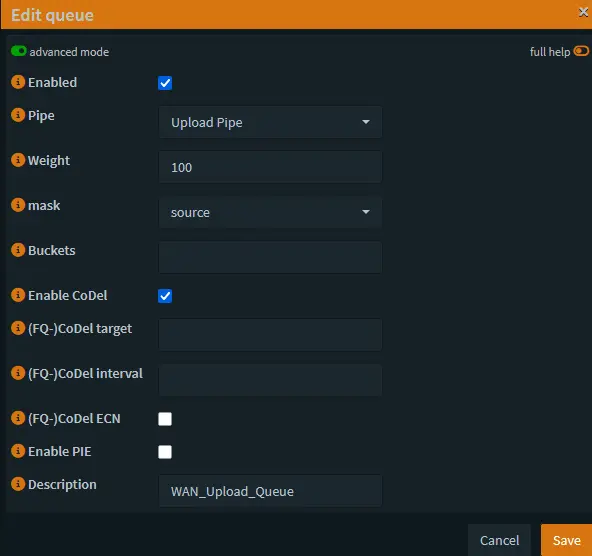
- Queues: Use Source/Destination Masks to ensure bandwidth is shared fairly between all devices on the network.
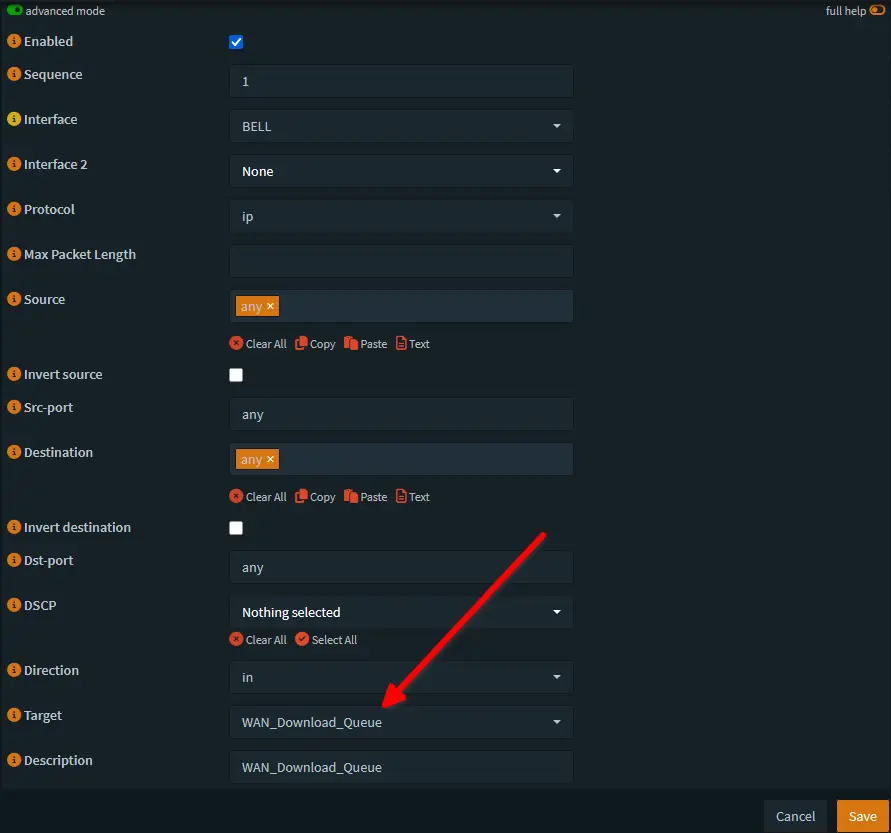
- Rules: Set WAN In (Download Queue) and WAN Out (Upload Queue) rules to capture all traffic and sort it into your FQ_CoDel queues.
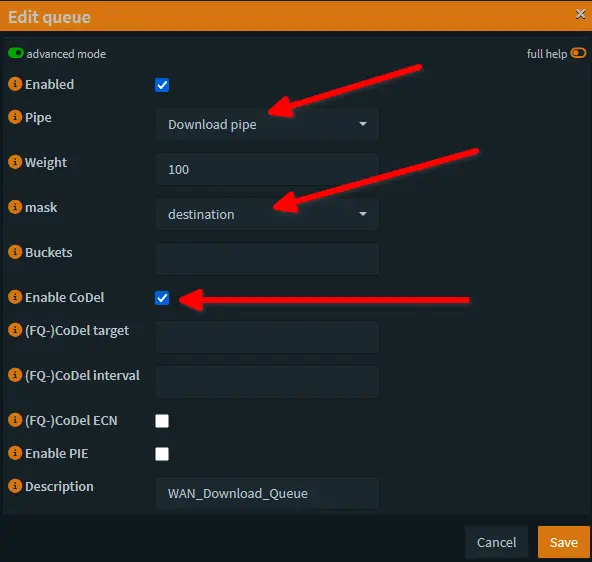
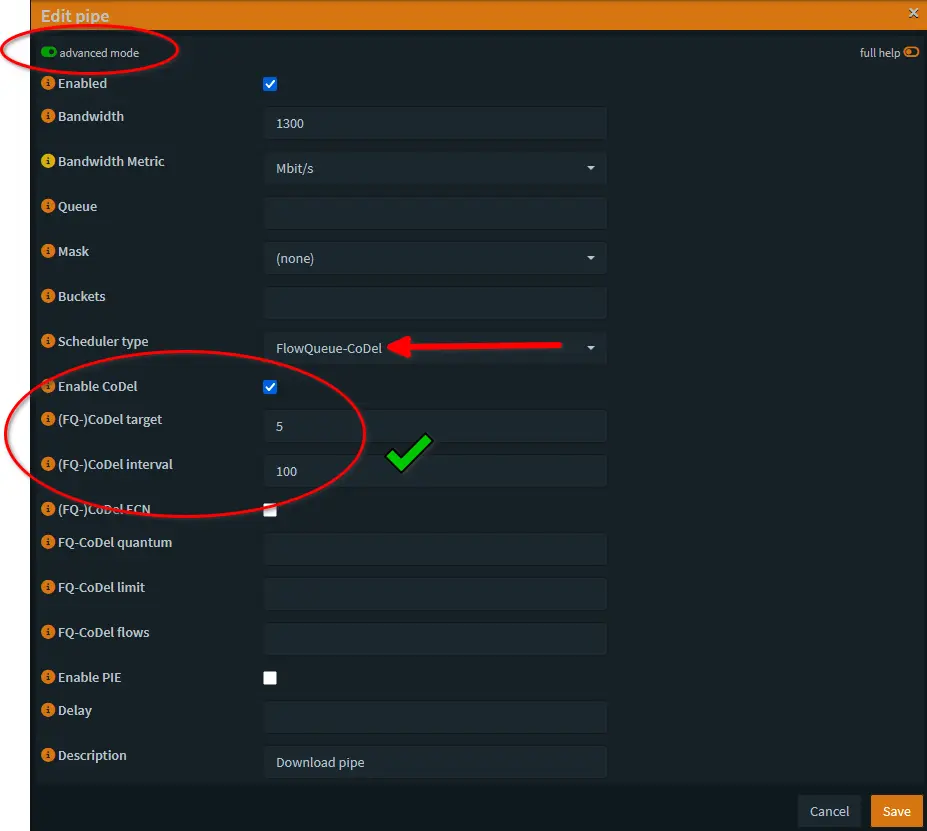
Bufferbloat Before and After (Results)
Here's the before results picture
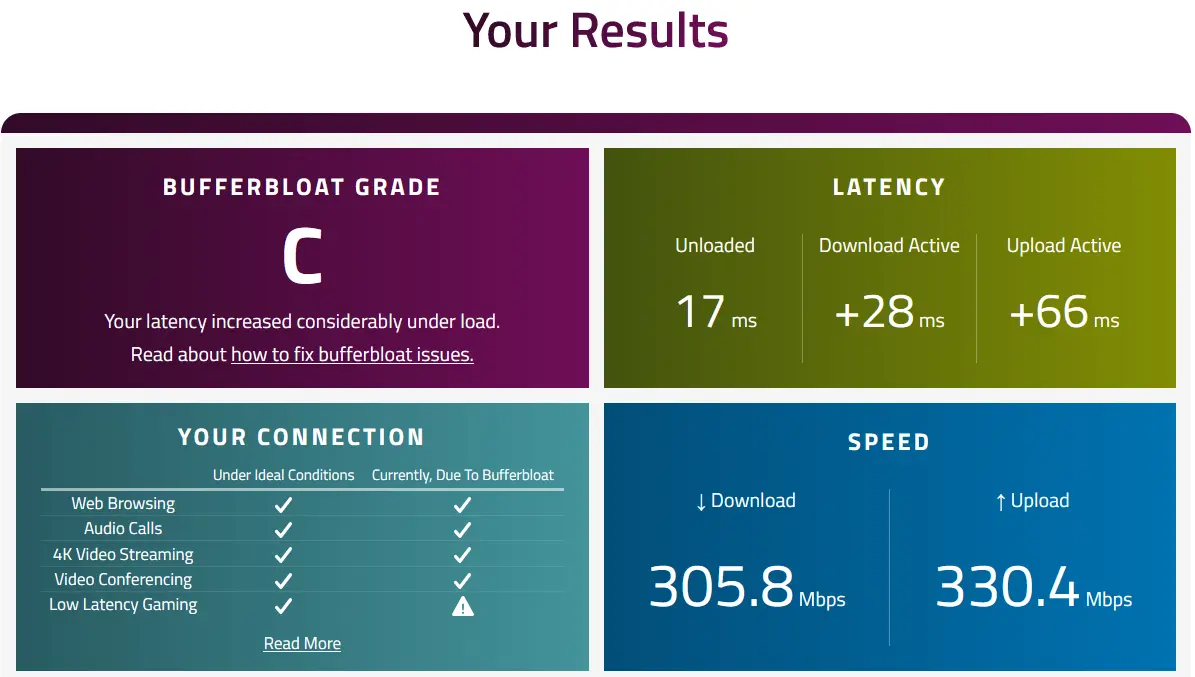
Here's the link to that result (Sadness!)
Now here's the result AFTER I configured my SQM & Queues properly:
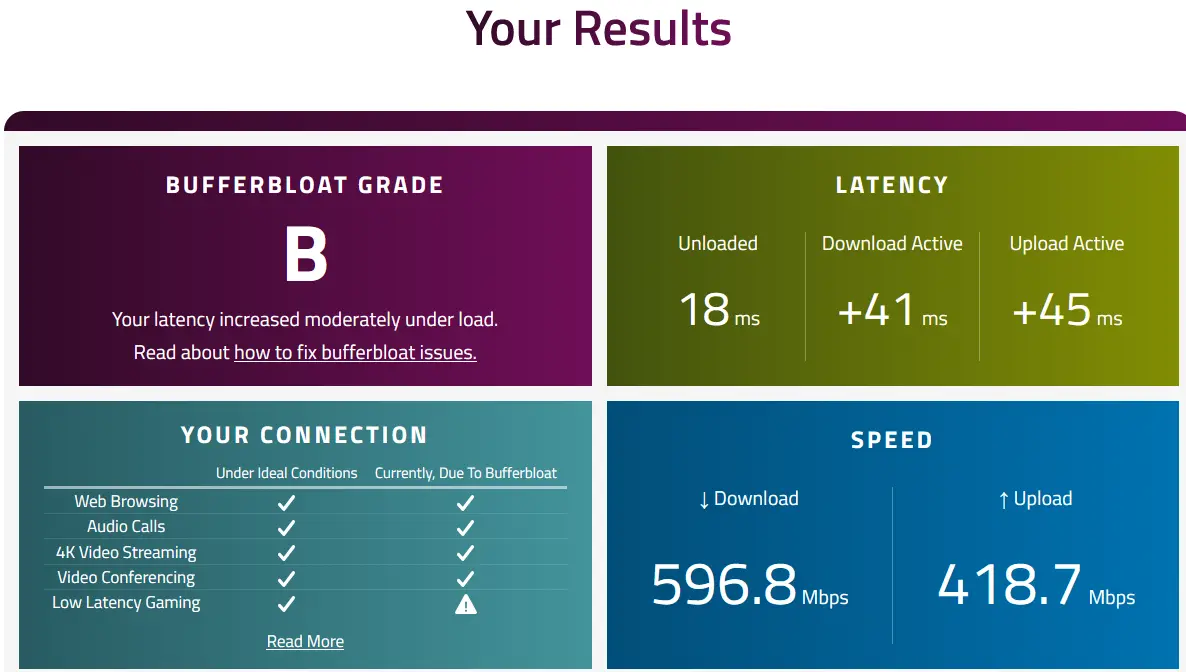
Here's the link to this result (Less sad!)
Result: Gaming, SSH, and VoIP remain responsive even during large downloads.
Go ahead, make fun of me in the comments below, or better yet, give me some tuning tips 😉
The Hardware Secret: Static Port NAT
OPNsense uses "Asymmetric NAT" by default, which can break game voice chats or Plex remote access. Go to Firewall -> NAT -> Outbound and enable Static Port rules if you have to, for your gaming/media devices. This keeps your internal ports mapped 1:1 to the outside world, ensuring an "Open NAT" status.
The other option (less popular, WAY less secure, but very easy) is to enable UPNP IGD & PCP in your OPNsense. 😱🙀This is your classic convenience / ease of use vs security.
The other train of thought is, if you have an infected device or malicious hacker in one of your LANs already, they will get outbound to siphon data out or laterally attack other devices / users anyway. You've already lost. This is why for Core Lab guides, I recommend segmenting your traffic across multiple VLANs!
Can read a lot more opinions on it in this Reddit thread.
If you go this route, ensure you select Default Deny in the bottom 1/2 of the setup, and setup the ACLs. Here's how you setup ACL's for Playstation 5:
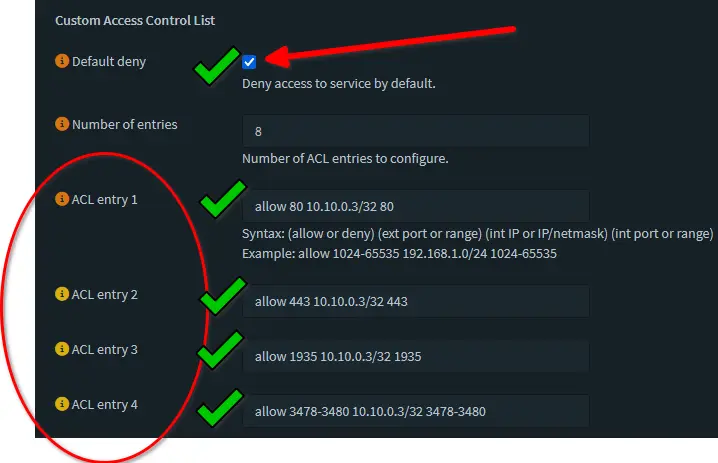
Gaming Connectivity Reference Table
| System / Launcher | Goal | Primary Ports (Inbound Forwarding) | OPNsense "Static Port" Recommendation |
| Epic Games / Fortnite | Stable Matchmaking | TCP: 443, 5222, 5795-5847 UDP: 3478-3479, 5060, 5062, 6250, 12000-65000 | Recommended. Essential for P2P matchmaking and avoiding "Strict NAT" in Fortnite and Rocket League. |
| GOG Galaxy | P2P Connectivity | UDP: 23243-23262 (Game specific, e.g., BG3) | Recommended. Most GOG multiplayer is P2P-based; source port preservation prevents "Direct Connection Failed" errors. |
| EA App (Origin) | Lobby Stability | TCP: 80, 443, 9988, 17502, 42120 UDP: 3659, 14000-14016 | Optional. Mostly helps with hosting lobbies in older Battlefield or FIFA titles. |
| Ubisoft Connect | Open NAT status | TCP: 80, 443, 13000, 14000, 14008 UDP: 3074, 6015 | Recommended. Rainbow Six Siege and For Honor are notorious for "NAT Type" issues without it. |
| Nintendo Switch | NAT Type A | UDP: 1-65535 (Official) or 45000-65535 | Critical. Matchmaking simply fails or lags out without source port preservation. |
| Xbox (Series/One) | Open NAT | UDP: 88, 500, 3074, 3544, 4500 | Highly Recommended. The "gold standard" for Xbox Live stability. |
| PlayStation 5/4 | Type 2 (Open) | UDP: 3074, 3478-3479 TCP: 3478-3480 |
Pro-Tip:
You can simplify your OPNsense outbound NAT setup, by creating an Alias called Gaming_Devices that contains the static IPs of the consoles and the gaming PC. Then, you only need one Outbound NAT rule at the top of your list to apply the "Static Port" fix to everything in that Alias at once!
Troubleshooting and Verification Tests: The "Trust but Verify" Guide
Once you’ve applied these rules, use these tests to confirm your "God-Mode" network is operational.
- The DNS "Hijack" Test: Open a terminal and run
nslookup secret-test.com 8.8.8.8. Check your AdGuard Home Query Log. Even though you asked Google, AdGuard should have intercepted and logged the request. - The NTP "Force" Test: In OPNsense, go to Firewall -> Diagnostics -> States and search for
:123. Look for a device trying to reach an external IP; the NAT column should show it being seamlessly rewritten to127.0.0.1. - The Bufferbloat Audit: Run the Waveform Bufferbloat Test. Watch Firewall -> Shaper -> Statistics in real-time. You should see Drops or Marks climb as OPNsense actively manages the queue to maintain your A+ latency grade.
Summary & Next Steps
You're doing fantastic if you're at this stage!
Now you can self-host just about anything, you're really cooking with 🔥
Got a stubborn IoT device that still won't obey your DNS rules? Drop a comment below and let's troubleshoot the logs together!
Another option is to keep securing your stack and take my homelab security checkup test, towards the bottom of my Practical Cybersecurity Roadmap for Homelabs.
 Core Lab Joe
FAQ
What is an OPNsense Cloudflare bypass rule?
A Cloudflare bypass rule allows specific services such as Jellyfin or Plex to accept direct WAN traffic instead of passing through Cloudflare’s proxy. This is necessary because Cloudflare’s free tier restricts video streaming and non-standard ports.
Why redirect DNS requests on OPNsense?
Redirecting DNS traffic ensures all devices use your internal resolver such as AdGuard Home. Many IoT devices attempt to bypass local DNS settings by hardcoding external resolvers like 8.8.8.8.
What is SQM traffic shaping in OPNsense?
SQM (Smart Queue Management) using algorithms like FQ-CoDel reduces bufferbloat by prioritizing latency-sensitive traffic such as gaming, SSH, and VoIP over large downloads.


Does traffic shaping require powerful hardware?
Yes. Because shaping occurs in software, high-speed connections require stronger CPUs. For gigabit shaping, modern Intel Core, Ryzen, or Xeon-class processors are recommended.
Can OPNsense force devices to use local NTP servers?
Yes. Using NAT redirect rules, OPNsense can intercept NTP requests and force devices to use the firewall’s internal time server instead of public NTP pools.
Member discussion