
How to Access Plex and Jellyfin Behind CGNAT: A 2026 Guide

By Core Lab Joe - IT & Cybersecurity (20+ years)
What is CGNAT (and Why is it Breaking Your Media Server?)
If your ISP uses CG-NAT, exposing Plex or Jellyfin via standard port forwarding is impossible. No amount of router rebooting will fix a network architecture designed to block you and not provide direct internet access.
Carrier grade Network Address Translation - CG-NAT - is a method of saving IPV4 network space for an entire ISP. If you're not aware, we've been running short (we being the world at large) on IPV4 addresses for quite some time now and one of the intelligent work arounds for this, is your ISP puts all it's customers behind basically, an internal LAN they run. It's actually a very simple & effective method to help mitigate this issue until IPV6 fully takes over, or whatever will subsume the WAN links across the internet.
How to Tell if You’re Behind CG-NAT?
Best bet, use my network auditing script! It checks for double-NAT, CGNAT IP ranges, and DNS health.
Run this one-liner in your terminal to see your topology and 'Green Light' status:
curl -sL https://corelab.tech/audit.sh | bashWindows user? Use the PowerShell version:
irm https://raw.githubusercontent.com/corelabjoe/corelab-tools/main/diagnostics/network-auditor.ps1 | iexWant to audit the code first? I don't blame you. Check out the full source and documentation on my GitHub Repository. These simple scripts are easily read & completely free, and open-source!
The Old Fashioned Way to Check:
Open a terminal and run a traceroute to your WAN IP (or look at your router's WAN interface).
- The Smoking Gun: If your WAN IP is in the 100.64.0.0/10 range (100.64.0.0 to 100.127.255.255), you are 100% behind CG-NAT.
- The Multi-Hop Test: If you see multiple private hops before reaching the open internet, your ISP is "double-NATing" you.
This guide provides two production-grade ways to make Plex or Jellyfin reachable - without hosting media on a VPS, without UPnP, and without the 2Mbps throttle of Plex Relay.
Pro-Tip: Before starting, ensure your VPS itself is hardened. Check out my guide: How to Secure Your VPS in 10 Minutes.

Architecture Overview
The Strategy
- Encapsulation: Your home server creates an outbound encrypted tunnel to a VPS. Since it’s outbound, CG-NAT cannot block it.
- Public Presence: The VPS acts as a "Public Front Porch." It has the Public IPv4 and handles the traffic handoff.
- End-to-End Flow:
User→VPS Reverse Proxy→https://media.yourdomain.com→Encrypted Tunnel→Home Server.
Final Top Down Architecture:
User → https://media.yourdomain.com
      ↓
VPS reverse proxy
      ↓
100.64.x.x (home server tailnet IP)
      ↓
Plex/Jellyfin
What This Guide Does Not Do
- ❌ Host media on the VPS (expensive and slow).
- ❌ Bind Plex to
0.0.0.0(unsafe). - ❌ Rely on "Plex Relay" (capped at 1-2 Mbps).
- ❌ No inbound ports on your home router
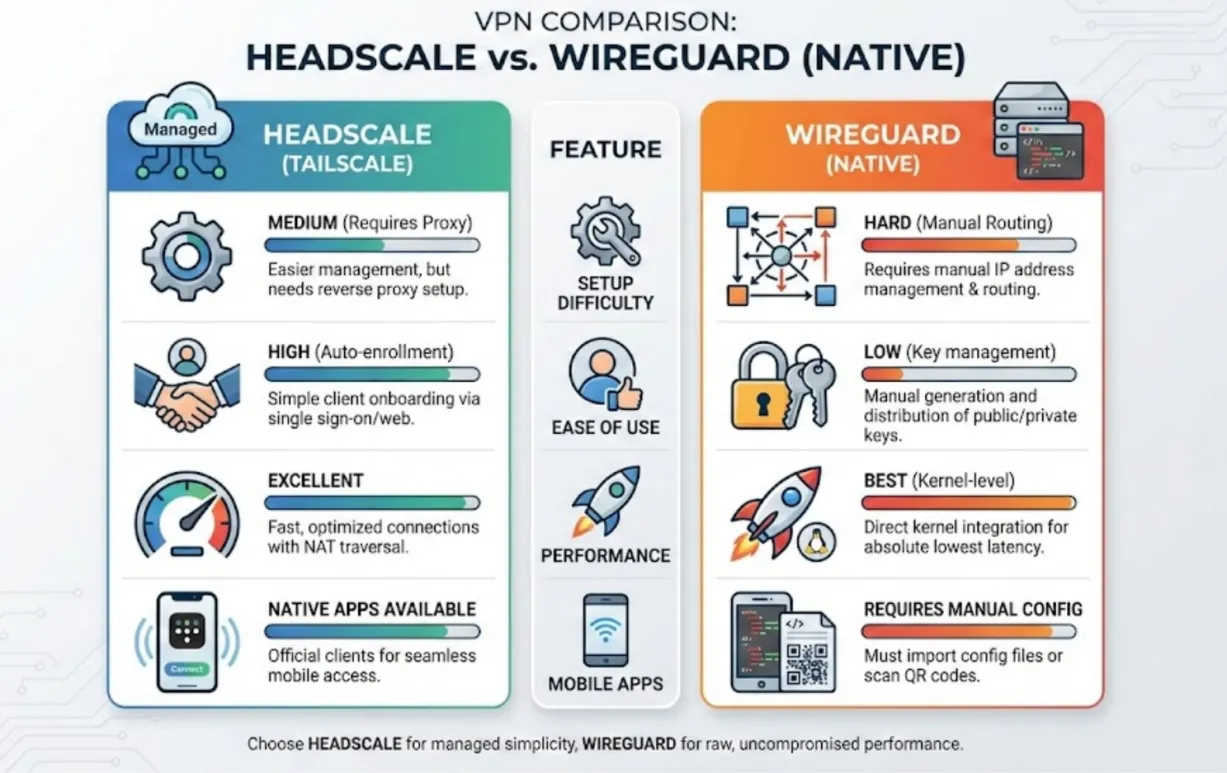
Two Ways to Bypass CGNAT for Plex & Jellyfin
Method 1: Tailscale / Headscale (The "It Just Works" Solution)
Best for:
- Multiple devices
- Future expansion
- “Just works” NAT traversal
Components
- VPS with public IPv4
- Headscale (self-hosted Tailscale control plane)
- SWAG for HTTPS
- Plex joins as a `client`
- VPS advertises routes
Method 2: WireGuard Site-to-Site (Advanced)
Best for:
- One VPS ↔ one home
- No roaming clients
- Absolute simplicity
- Uncompromising performance (As fast as it gets!)
There are some other ways to achieve this that this guide does not cover, as I have not tested them myself, one example:
- Cloudflare Tunnels (Best for Jellyfin + Custom Domains)
Important:
This is pure site-to-site only.
No mobile peers. No laptops. No dynamic enrollment.
(For peer/road-warrior WireGuard, see my dedicated guide.)
Security & Encryption: Why HTTPS Matters
When you're doing some awesome dark IT magic like this, security & encryption matters even more than normal. CG-NAT customers are not business class customers, and it's very likely against your ISP's terms of service to 'stream' or 'serve' data/content/media from your home.
Tough cookies - you paid for the internet! They probably want you to sign up for business class internet, if that's even available in your area. Ensuring your path through CG-NAT is encrypted prevents your ISP and more importantly - hackers, from knowing your passwords, what is even transiting the path, and prevents you from being an easy target.
I wrote a complete breakdown of how to secure Jellyfin with HTTPS via a reverse proxy.
 Core Lab Joe
Prerequisites (Both Options)
- VPS (1 vCPU / 1 GB RAM is enough to start)
- Ubuntu 22.04+/Debian 12+
- Docker + Docker Compose
- Domain name (e.g.
vpn.yourdomain.com) - Plex and/or Jellyfin already working locally (at home)
Method 1: Headscale / Tailscale Mesh (Recommended)
Best for: Multiple devices, roaming users (phones/laptops), and "it just works" NAT traversal.
1. VPS Firewall & Forwarding
You need to allow your VPS to do IP forwarding so that it knows how to forward packets into/out of the tunnel. Basically this turns a routing function on inside your VPS that's builtin to the kernel itself.
# Add to /etc/sysctl.conf
net.ipv4.ip_forward=1
# Apply
sudo sysctl -p
Set UFW rules:
sudo ufw allow 80,443/tcp     # Reverse Proxy
sudo ufw allow 41641/udp      # Tailscale DERP
sudo ufw allow 3478/udp       # STUN
2. Deploy Headscale (Docker)
Headscale is the open-source, self-hosted version of the Tailscale control plane. Note: Ensure you create the proxy network first via docker network create proxy. You can also name this network whatever makes sense to you, like vpn or headscale etc...
Step 2.1: First, prep the folders & grab the default config:
# Create DIRs
mkdir -p /opt/dockers/headscale/{config,lib,run}

#Download config to modify
wget -O /opt/dockers/headscale/config/config.yaml https://raw.githubusercontent.com/juanfont/headscale/v0.26.0/config-example.yaml

# Change to that DIR
cd /opt/dockers/headscale
Step 2.2: Critical Headscale Config (headscale.yaml)
In your /opt/dockers/headscale/headscale.yml, ensure these fields match your domain:
server_url: https://headscale.yourdomain.comorhs.yourdomain.caetc...listen_addr: 0.0.0.0:8080ip_prefixesthis sets the subnet for point to point communication of your tailnet!derp.server.enabled: truederpconfigured as a meaningful name for you.yourdomainworks.
server_url: https://headscale.yourdomain.com
listen_addr: 0.0.0.0:8080
ip_prefixes:
  - 100.64.0.0/10
derp:
  server:
    enabled: true
    region_id: 999
    region_code: corelab
Critical Clarification!
ip_prefixes does NOT:
- Open ports
- Do routing by itself
- Bypass CGNAT magically
It only defines the address pool for your tailnet. The CGNAT bypass happens because:
- Your home server initiates an outbound connection
- WireGuard keeps it alive
- The VPS can then route traffic back through that tunnel
How does this get around CGNAT⁉️
This is the CGNAT range that Tailscale uses by default. It uses CGNAT internally as well but if you find this confusing you can also just use any class C address space, just make sure it does NOT conflict with your own LAN subnet!
Every device that joins your Headscale server will get an IP from this range:
- VPS might get →
100.64.0.1 - Home server →
100.64.0.2 - Laptop →
100.64.0.3 - Phone →
100.64.0.4
These are virtual overlay IPs, not public or LAN IPs. Why this matters for bypassing CGNAT -
When your home server connects out to the VPS:
- It establishes an outbound WireGuard session
- Headscale assigns it an IP from
ip_prefixes - Now the VPS and home server can talk via that virtual IP
So instead of:
Public IP → (blocked by CGNAT) → Home
You get:
VPS (100.64.0.1)
↕
Home Server (100.64.0.2)
No port forwarding required at home.
Optionally: You can also run your server_url: ip_address:8080 if you want too.
server_url: to https. If you skip SWAG or don't use a reverse proxy or certs, you will have to use http. Definitely not as secure, not recommended!Step 2.3: The actual docker compose files
Default first for 'vanilla' reference, Core Lab (working) example below that.
services:
  headscale:
    image: headscale/headscale:latest
    container_name: headscale
    volumes:
      - ./config:/etc/headscale
      - ./data:/var/lib/headscale
    command: headscale serve
    networks:
      - proxy
    restart: unless-stopped

networks:
  proxy:
    external: true
Default "out of the box" config from headscale - official.
  headscale:
    image: headscale/headscale:latest
    restart: unless-stopped
    container_name: headscale
    ports:
      - "0.0.0.0:8080:8080"
    volumes:
      - /opt/dockers/headscale/config:/etc/headscale
      - /opt/dockers/headscale/lib:/var/lib/headscale
    # Optional, not needed for 95% of setups
#      - /opt/dockers/headscale/run:/var/run/headscale
    command: headscale serve
    healthcheck:
        test: ["CMD", "headscale", "health"]
Core Lab's functioning & optimized headscale.
Core Labs Tweaks:
- ports - these are if you want to expose / port forward on those ports without SSL / SWAG.
- volumes - I use normal bind mounts, not hidden volumes.
- healthcheck: always nice to have.
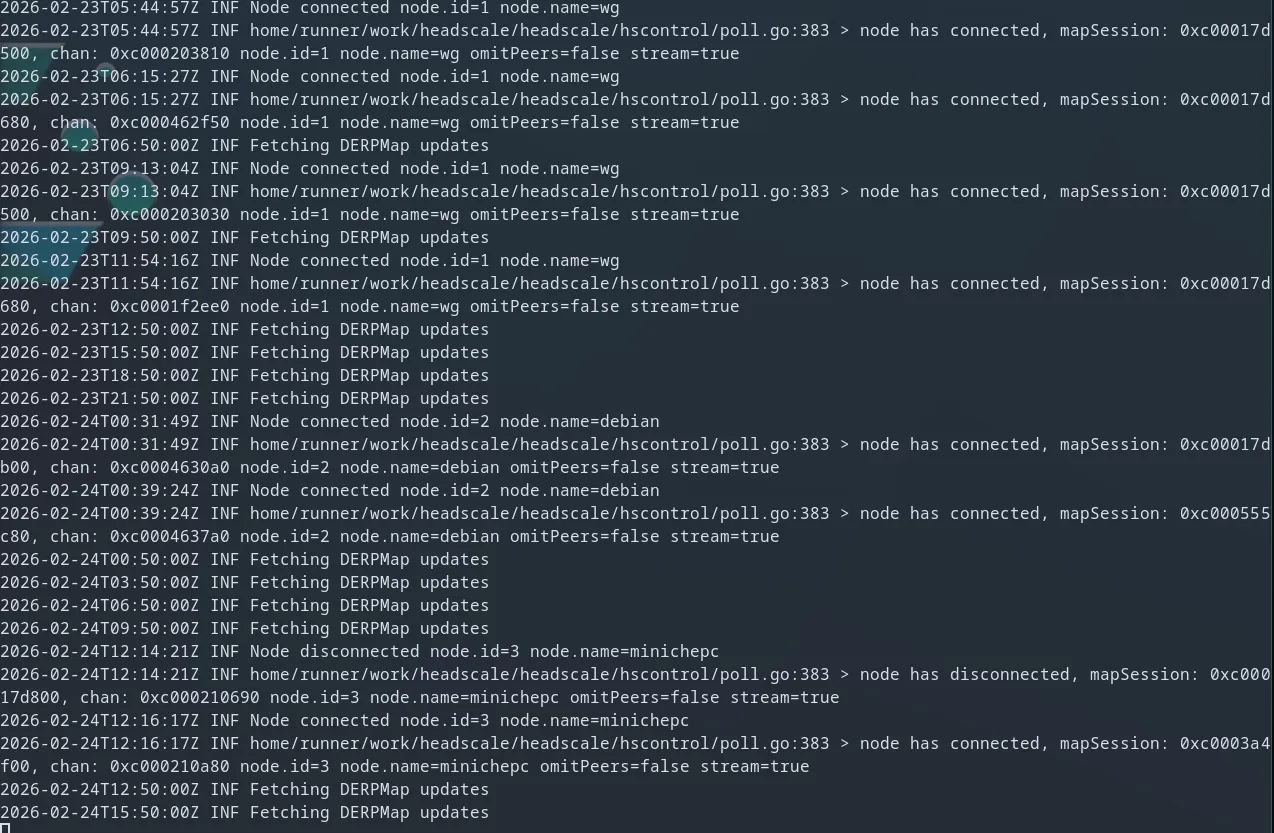
Fire up the headscale container by typing: docker compose up -d and check it runs properly: docker logs -f headscale it'll look something like this:
Finalizing Headscale Config & Prep Your Tailscale User
✅ 1️⃣ Create a user
docker exec -it headscale headscale users create myfirstuserYou will see something like:
ID | Name
1  | myfirstuser
You can name your first user home, plex, jellyfin, whatever makes sense to you.
⚠️ Important: The ID is numeric and is what you use for preauth keys (unless using newer versions that accept username).
Listing users: docker exec -it headscale headscale users list
root@corelab-vps:/home/corelabjoe# docker exec -it headscale headscale users list
ID | Name | Username | Email | Created
1  |      | joe      |       | 2025-11-29 18:37:44
2  |      | user1    |       | 2025-11-29 23:38:58
3  |      | user2    |       | 2025-11-30 01:20:22
5  |      | jim      |       | 2025-11-30 21:29:19
6  |      | bob      |       | 2025-12-01 17:35:39
7  |      | imran    |       | 2025-12-03 21:31:54
4. Reverse Proxy (SWAG/Nginx)
✅ 2️⃣ Create a preauth key:
docker exec -it headscale headscale preauthkeys create \
  --user 1 \
  --reusable \
  --expiration 100y
Expiry of 100y so you don't have to renew it anytime soon.
⚠️3️⃣ Approving routes:
You can only approve a route that has already been advertised so this shows up after you connect your home / plex / jellyfin tailscale client.
docker exec -it headscale headscale nodes approve-routes --identifier 1 --routes 192.168.0.0/24On newer versions of Headscale, the command syntax changed a bit:
# List nodes to find your ID
docker exec headscale headscale nodes list
# Approve the home LAN subnet
docker exec headscale headscale routes enable -r 192.168.1.0/24 -n <NODE_ID>
So this means 👉 The route must already appear in:
docker exec -it headscale headscale nodes list-routesIt'll look like:

If it doesn’t show up there☝️, approval will fail. If yours is brand new it will show up available under your tailscale instance (prob ID 1) but not under Approved.
How to find NODE_ID properly
docker exec -it headscale headscale nodes list
Now you can approve the route and bi-directional traffic will begin:
docker exec -it headscale headscale nodes approve-routes --identifier 1 --routes 192.168.0.0/24Summary of Headscale & Tailscale CLI Commands
How to create a user
docker exec -it headscale headscale users create myfirstuser
create the key for the user { use the ID } this will give an output to use in the tailscale command below on the client
docker exec -it headscale headscale preauthkeys create --user 1 --reusable --expiration 24h / 100y
List all users:
docker exec -it headscale headscale users list
Approving the routes:
docker exec -it headscale headscale nodes approve-routes --identifier <NODE_ID> --routes 10.13.0.0/16
docker exec -it headscale headscale nodes approve-routes --identifier 2 --routes 10.22.83.0/24
Useful Commands / Troubleshooting
docker exec -it headscale headscale nodes list-routes
docker exec -it headscale headscale nodes list
CLIENT Setup
Install:
https://tailscale.com/kb/1626/install-debian-trixie
enable ip forward : net.ipv4.ip_forward=1
server need static ip
create route on Firewall based on list-route command above
Commands to connect client to headscale:
tailscale up --advertise-routes=10.13.0.0/16 --auth-key=77b9954760adc3fd958709a32a7d4dfada49a32e1f355615 --login-server=https://media.yourdomain.ca --accept-routes
5️⃣Reverse Proxy (SWAG/Nginx)
Headscale needs clean HTTPS. Point your headscale.yourdomain.com CNAME to your VPS IP. Or whatever you created the DNS record as, maybe you used hs.yourdomain.ca etc...
server {
    listen 443 ssl;
    server_name headscale.yourdomain.com;
    include /config/nginx/ssl.conf;

    location / {
        proxy_pass http://headscale:8080;
        include /config/nginx/proxy.conf;
        proxy_set_header Upgrade $http_upgrade;
        proxy_set_header Connection "upgrade";
    }
}
6️⃣VPS Firewall (UFW)
sudo ufw allow 80,443/tcp     # Reverse Proxy / Headscale Control Plane
sudo ufw allow 41641/udp      # Tailscale DERP (Fast connection fallback)
sudo ufw allow 3478/udp       # STUN (NAT discovery)
7️⃣Join the Home Server (Client Side)
On your home Plex/Jellyfin host, install the Tailscale agent first:
curl -fsSL https://tailscale.com/install.sh | shThen you run it:
tailscale up \
  --login-server=https://headscale.yourdomain.ca \
  --auth-key=YOURKEY \
  --advertise-routes=192.168.0.0/26 \
  --accept-routes
Important notes:
--accept-routes essentially means you are turning this into a subnet node router, and allowing everything in your LAN to reach it. You don't have to but it can be convenient sometimes!
--accept-routesis only needed if you want THIS node to accept routes from others. As in, you want the VPS to be able to fully route and mesh with your home LAN.- If this is your home gateway, you likely want it.
- If this is just a server advertising routes, not required.
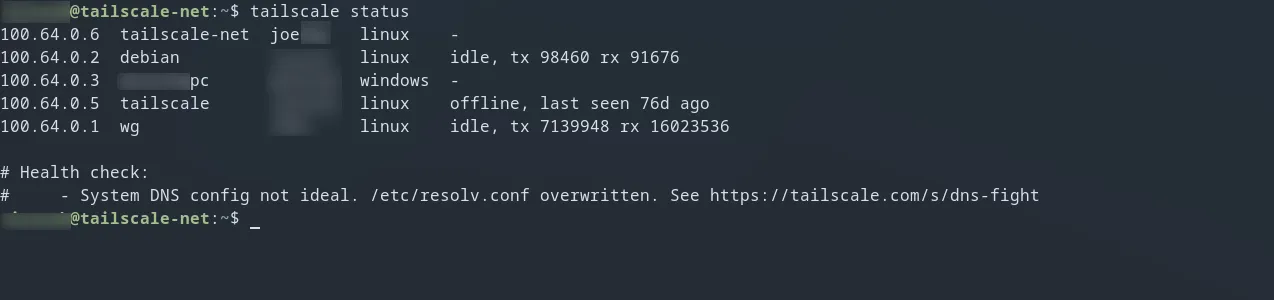
Check if it is connected and showing up:
tailscale statusYou'll see your client connected to headscale, and any others that are part of the tailscale network:
Register the node back on the VPS:
docker exec -it headscale headscale nodes list-routes
# Then
docker exec -it headscale headscale nodes approve-routes \
  --identifier NODE_ID \
  --routes 192.168.1.0/24
Another good check to see if you can get a direct connection, run this on your tailscale (Plex or Jellyfin) server:
tailscale netcheckIt'll output something like this, the important part is to see that it says UDP: true This means you can direct connect!
2026/02/25 12:09:23 portmap: monitor: gateway and self IP changed: gw=10.0.0.1 self=10.0.0.229
2026/02/25 12:09:23 portmap: [v1] Got PMP response; IP: REDACTED, epoch: 4365453
2026/02/25 12:09:23 portmap: [v1] Got PCP response: epoch: 4365453
2026/02/25 12:09:23 portmap: [v1] UPnP reply {Location:http://REDACTED/rootDesc.xml Server:FreeBSD/14.3-RELEASE-p7 UPnP/1.1 MiniUPnPd/2.3.9 USN:uuid:d41d8cd9-f00b-204e-9800-998ecf8427e::urn:schemas-upnp-org:device:InternetGatewayDevice:1}, "HTTP/1.1 200 OK\r\nCACHE-CONTROL: max-age=1800\r\nST: urn:schemas-upnp-org:device:InternetGatewayDevice:1\r\nUSN: uuid:d41d8cd9-f00b-204e-9800-998ecf8427e::urn:schemas-upnp-org:device:InternetGatewayDevice:1\r\nEXT:\r\nSERVER: FreeBSD/14.3-RELEASE-p7 UPnP/1.1 MiniUPnPd/2.3.9\r\nLOCATION: http://REDACTED/rootDesc.xml\r\nOPT: \"http://schemas.upnp.org/upnp/1/0/\"; ns=01\r\n01-NLS: 1767673909\r\nBOOTID.UPNP.ORG: 1767673909\r\nCONFIGID.UPNP.ORG: 1337\r\n\r\n"
2026/02/25 12:09:23 portmap: UPnP meta changed: [{Location:http://REDACTED/rootDesc.xml Server:FreeBSD/14.3-RELEASE-p7 UPnP/1.1 MiniUPnPd/2.3.9 USN:uuid:d41d8cd9-f00b-204e-9800-998ecf8427e::urn:schemas-upnp-org:device:InternetGatewayDevice:1}]

Report:
	* Time: 2026-02-25T17:09:23.746713537Z
	* UDP: true
	* IPv4: yes, REDACTED_WANIP:redacted_port
	* IPv6: no, but OS has support
	* MappingVariesByDestIP: true
	* PortMapping: UPnP, NAT-PMP, PCP
	* CaptivePortal: false
	* Nearest DERP: Toronto
	* DERP latency:
		- tor: 8.1ms   (Toronto)
		- ord: 17.3ms  (Chicago)
		- sea: 74.9ms  (Seattle)
		- iad: 74.9ms  (Ashburn)
		- nyc: 75.7ms  (New York City)
		- mia: 75.8ms  (Miami)
		- den: 75.9ms  (Denver)
		- dfw: 76.1ms  (Dallas)
		- lax: 81.2ms  (Los Angeles)
		- sfo: 115.1ms (San Francisco)
		- hnl: 134.3ms (Honolulu)
		- waw: 134.5ms (Warsaw)
		- par: 134.5ms (Paris)
		- nue: 135ms   (Nuremberg)
		- fra: 135.2ms (Frankfurt)
		- lhr: 135.4ms (London)
		- ams: 135.5ms (Amsterdam)
		- mad: 135.7ms (Madrid)
		- hel: 139.5ms (Helsinki)
		- sao: 147ms   (São Paulo)
		- dbi: 203.4ms (Dubai)
		- hkg: 227.6ms (Hong Kong)
		- tok: 244.9ms (Tokyo)
		- nai: 249.4ms (Nairobi)
		- sin: 253.2ms (Singapore)
		- blr: 253.9ms (Bengaluru)
		- jnb: 260.8ms (Johannesburg)
		- syd: 268.8ms (Sydney)
Option B - WireGuard Site-to-Site (The "Static Pipe")
Best for: A dedicated, high-performance tunnel between your VPS and Home Server.
- One VPS ↔ one home
- Home initiates tunnel outbound (CG-NAT safe)
- No roaming peers needed / involved
1. VPS Side: UFW & IP Forwarding
- Edit
sudo nano /etc/sysctl.conf→ setnet.ipv4.ip_forward=1. - Edit
sudo nano /etc/default/ufw→ setDEFAULT_FORWARD_POLICY="ACCEPT". - The VPS "NAT Secret": For WireGuard, we use UFW’s
before.rulesto handle the heavy lifting. Editsudo nano /etc/ufw/before.rulesand add this to the top of the file:
*nat
:PREROUTING ACCEPT [0:0]
:POSTROUTING ACCEPT [0:0]
-A PREROUTING -p tcp --dport 32400 -j DNAT --to-destination 10.10.0.2:32400
-A POSTROUTING -d 10.10.0.2 -p tcp --dport 32400 -j MASQUERADE
COMMIT
sudo ufw allow 51820/udp && sudo ufw allow 32400/tcp
2. Home Side: Docker & Config
docker-compose.yml
services:
  wg-home:
    image: lscr.io/linuxserver/wireguard:latest
    container_name: wg-home
    cap_add:
      - NET_ADMIN
    volumes:
      - ./config:/config
      - /lib/modules:/lib/modules
    sysctls:
      - net.ipv4.conf.all.src_valid_mark=1
    restart: unless-stopped
config/wg0.conf (Client side)
[Interface]
PrivateKey = <HOME_PRIVATE_KEY>
Address = 10.10.0.2/32

[Peer]
PublicKey = <VPS_PUBLIC_KEY>
Endpoint = <VPS_IP>:51820
AllowedIPs = 10.10.0.0/24 # Whatever your LAN is, 192.168.1.0/24 etc...
PersistentKeepalive = 25 # Crucial for CG-NAT
The PersistentKeepalive is what keeps the CG-NAT hole open.
Plex / Jellyfin Performance Optimization & Configuration (The "Secret Sauce")
Regardless of the option you chose above, you must tell Plex/Jellyfin how to handle these new "Local" IPs. This is where 90% of setups fail. You must tell your media server that the tunnel IPs are "Local."
| Setting | Action |
| LAN Networks | Add 100.64.0.0/10,10.10.0.0/24. This prevents forced transcoding. |
| Enable Relay | Uncheck this. You don't want the slow 2Mbps fallback. |
| Custom Access URL | http://[VPS_PUBLIC_IP]:32400 or https://media.yourdomain.com:443 |

Step 1: Define LAN Networks
Go to Settings → Network. In LAN Networks, add your tunnel range: 100.64.0.0/10,10.10.0.0/24 This prevents Plex / Jellyfin from treating your tunnel traffic as "Remote" (which often triggers transcoding) almost automatically.
Step 2: Disable Plex Relay
Scroll down and Uncheck "Enable Relay".
Why? Plex Relay is a trap. It caps you at 1Mbps (or 2Mbps for Pass users). If your tunnel is set up correctly, you don't need this crutch. Ever.
Step 3: Custom Server Access URLs
Add your VPS WAN IP to your Plex config: http://your-vps-ip:32400
https://plex.yourdomain.com:443 insteadStep 4: List of IP Addresses and Networks that are allowed without Auth
This is optional but saves you from having to "sign in" for your home network.
Once done, this should look something like:
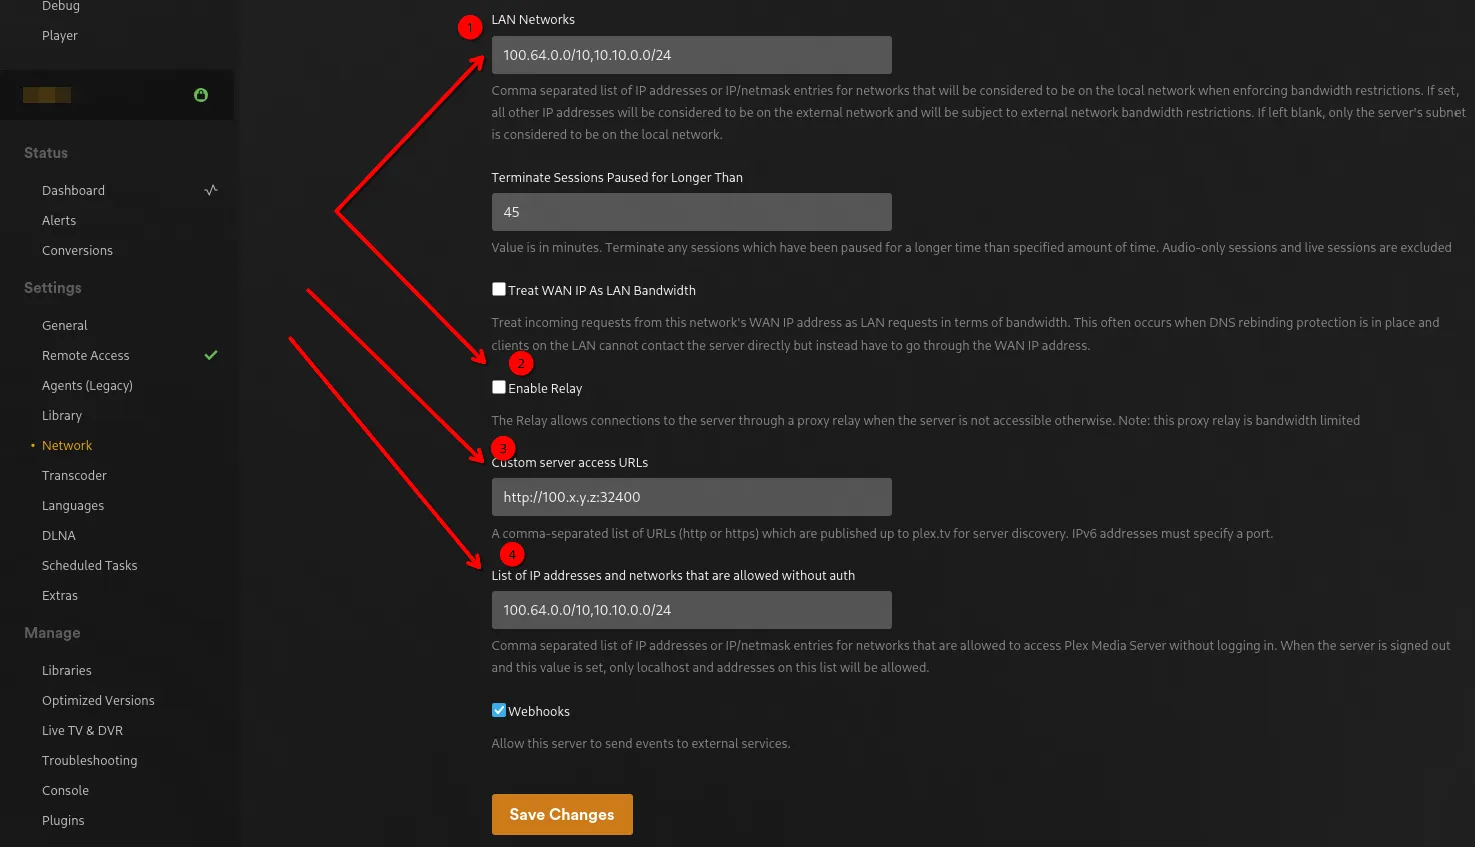
Notes:
- For #1 & #4 - Only put your actual LAN at home and tailscale network, if you'd like as you can consider that 'inside the wire'.
- For #2 - Uncheck Enable Relay, you don't want that. It's VERY slow!
- For #3 - Slap your VPS public IP address here.
http://your-vps-ip:32400
The Connection Flow (How it works)
- The Broadcast: Your Plex server (at home) talks to the Plex.tv "mothership." It says: "Hey, I'm Joe's server. Tell anyone looking for me that my address is
http://[VPS_PUBLIC_IP]:32400." - The Discovery: Your friend logs into the Plex app in a hotel. The app asks Plex.tv: "Where is Joe's server?" Plex.tv hands them your VPS Public IP.
- The Handshake: The app sends a request to your VPS.
- The Relay: Your VPS (thanks to those UFW
before.rules) sees the request on port 32400 and shoves it down the WireGuard tunnel to your home. #Winning! - The Direct Connection: Because the VPS is just "passing the pipe," the app thinks it has a direct, high-speed connection.
Security Non-Negotiable Logic
- Firewall: Ensure the VPS only allows ports 80, 443 (reverse proxy), 32400 (Plex) or 8096 (Jellyfin).
- Encryption: Never use
httpover the public web; always keep it inside the tunnel. Port 80 is referenced in his guide for the reverse proxy as a redirect only. 80->443. - Rotation: Update your WireGuard keys or Headscale API keys every 12 months. Or set them to never expire! (Homework for you, if you want to go that route).
Beyond Media: Gaming Behind CGNAT (The "Strict NAT" Curse)
If you have successfully bypassed CGNAT for your media server but find that your gaming console or PC is still throwing "Strict NAT" or "Moderate NAT" errors, you aren't alone. In the gaming world, CGNAT is the ultimate gatekeeper.
In games like Call of Duty, Halo, or Destiny, the system often relies on Peer-to-Peer (P2P) connections to host lobbies or sync player data. When you are behind CGNAT, your ISP’s firewall blocks the unsolicited inbound traffic, or there's simply no way for someone else's console to 'route' to you directly, which is required to establish these connections.
The result? You can’t host games, voice chat is buggy, and matchmaking takes forever if it even works.
The "Scrap Lab" Fix for Gaming
While Cloudflare Tunnels are excellent for web-based services like Jellyfin, they are generally unsuitable for gaming because they don't support the low-latency UDP traffic most games require. Here is how to fix your NAT type:
- Tailscale (The Easiest Route): If you are gaming on a PC, running Tailscale on both your machine and a friend's machine (or a remote exit node) can create a virtual "LAN" that ignores CGNAT entirely!
- The VPS Relay (The Pro Move): If you are on a console (Xbox/PS5), you can't install Tailscale. The solution is to use a cheap $5/month VPS (Web Hosting Canada or Green Geeks) as a VPN gateway. By connecting your router to that VPS via WireGuard, you essentially "borrow" the VPS’s public IP, giving you a permanent "Open NAT" status.
- UPnP is Not the Answer: In a CGNAT environment, enabling UPnP on your local router does absolutely nothing because the "real" router (the one at the ISP) will still ignore the request. Save yourself the security risk and keep it disabled.
Final Thoughts & Next Steps
CG-NAT is a roadblock, not a dead end. By moving the "Edge" of your network to a cheap/affordable VPS, you regain the control your ISP took away.
Now you can continue on your merry way to the rest of your media stack and adventures 😉
 Core Lab Joe
Or continue to secure and lock down your self-hosted environment with the Practical Cybersecurity Roadmap for Homelabs!
 Core Lab Joe
Additional links & references:
 Headscale authors

Troubleshooting & FAQ: Bypassing the CGNAT Wall
- Why can't I just use port forwarding if I'm behind CGNAT? CGNAT (Carrier-Grade NAT) means your ISP shares one public IP address among hundreds of customers. Since you don't "own" that public IP, your router cannot "listen" for incoming requests from the internet. The only way "in" is to create an outbound tunnel to a VPS with a dedicated public IP that acts as your front door.
- Is Headscale better than WireGuard for a Plex relay? Headscale (self-hosted Tailscale) is generally better for most users because it handles NAT traversal automatically and allows you to easily add roaming clients like your phone or laptop. WireGuard is faster and simpler for a dedicated "static pipe" between one home and one VPS, but it requires more manual configuration.
- Will using a VPS relay slow down my 4K streaming? If configured correctly, no. Unlike the "Plex Relay" (capped at 2Mbps), a VPS relay uses the full bandwidth of your VPS and home connection. To ensure maximum speed, we recommend setting your MTU to 1280 to prevent packet fragmentation—the #1 cause of buffering in tunneled setups.
- Does this expose my entire home network to the internet? No. By using a Reverse Proxy (like SWAG or Nginx) on the VPS, you only expose specific ports (like 32400 for Plex) to the public web. Your internal home traffic remains encrypted inside the tunnel and is not accessible to the public unless you specifically route it.
- What happens if my VPS goes down? If the VPS goes down, the tunnel collapses and your media server will only be accessible via your local home network. However, because you are using a VPS, you benefit from "Data Center Uptime," which is typically much higher than residential internet.
Troubleshooting: When the Tunnel Hits a Wall
Even with a perfect config, networking has a way of humbling you. If you’re staring at a spinning circle, use this table to find the bottleneck.
| Symptom | Probable Cause | The "Core Lab" Fix |
|---|---|---|
| Plex is slow or "hangs" on start. | MTU Fragmentation. Tunnel overhead makes packets too large for the ISP's CGNAT. | Set MTU = 1280 in your WireGuard/Tailscale config. |
wg show shows no handshake. | UDP Port 51820 Blocked. | Ensure UDP 51820 is open in your VPS Provider's Web Console, not just UFW. |
| Ping VPS from Home, but not VPS to Home. | CGNAT closed the "hole." | Add PersistentKeepalive = 25 to your Home Server’s config to keep the session alive. |
| Plex says "Indirect Connection." | Plex Relay is fighting you. | Uncheck "Enable Relay" in Plex and set Custom Access URL to http://[VPS_IP]:32400. |
| UFW is active, but NAT isn't working. | before.rules syntax error. | Ensure your NAT block is at the absolute top of /etc/ufw/before.rules, before the *filter line. |
| Headscale: "Node not found" on join. | Preauth Key Mismatch. | Ensure you used the numeric User ID (e.g., 1) and not the username for the preauth key. |
💡 Pro-Tip: The MTU "Acid Test" If you suspect MTU issues (common on 4G/5G or Starlink), try to ping your VPS from home with a fixed packet size:
ping -M do -s 1472 [VPS_TUNNEL_IP]
If it fails but a regular ping works, your packets are being fragmented. Lowering the MTU to 1280 will solve 99% of "it connects but it's slow" problems.
Member discussion