

CrowdSec & Fail2Ban: Real-Time Threat Defense for SWAG
Stop brute-force attacks and secure your self-hosted apps. Learn to deploy harden SWAG with CrowdSec for an A+ security rating and Zero Trust access.

Throughout my 20+ years in IT, I've consistently advocated for a layered and dynamic security approach – a strategy where defences are built in parallel and depth, creating a robust and resilient system. Think of your public IP address as the drawbridge to your digital castle. It's the link to the outside world and as such, needs to be keenly protected.
In Part 2, we got a bare SWAG container running: valid certs, one app proxied, nothing fancy. That's a working reverse proxy, but it's not yet a secure one. Today we fix that: harden the TLS and header configuration to earn an A+ SSL Labs score, arm Fail2Ban's bot traps properly, and bring CrowdSec online as real-time, crowd-sourced threat intelligence.
🔹 Hardening TL;DR
- SWAG = entry point (done, Part 2)
- Fail2Ban & CrowdSec = threat blocking (today)
- Authelia = identity (next post)
We aren't just opening ports; we're building a siege-ready fortress.
Mastering Reverse Proxies with SWAG
Deploy SWAG in Docker, configure Let's Encrypt certificates, integrate centralized Authelia MFA, and enforce Layer 7 CrowdSec AppSec (WAF) defense.
🏰 What is the "Digital Castle" Architecture?
We are moving beyond simple "Firewalls." We are building Defence in Depth.
- Layer 1 (The Moat): Your Router/Firewall (OPNsense/Unifi) blocking all ports except 443. Already in place. If not, see my complete OPNsense deployment series!
- Layer 2 (The Traps): Fail2Ban (Integrated into SWAG). The classic "Three strikes and you're out" defender. Today.
- Layer 3 (The Watchman): CrowdSec reads the logs. If an IP acts suspicious, it's banned instantly - and shared with the global community. Today.
- Layer 4 (The Gatekeeper): Authelia intercepts valid traffic and demands your 2FA token. Next post.
Part 1: Implementing CrowdSec for Real-Time Threat Intelligence🛡️
Prerequisite Steps - Building on your existing part 2 Deployment
This post assumes you've completed Part 2: Installing SWAG & Publishing Your First Service - a working SWAG container with a valid wildcard certificate and at least one app proxied. Everything below extends that same compose file. ✅
We're not reinstalling anything, we're extending the same docker-compose.yml with one new service, CrowdSec. Fail2Ban needs no new container at all; it's already built into SWAG, we're just switching on and tuning its additional jails.
New Folder for CrowdSec
You already have a swag/ folder from Part 2. Add one more alongside it:
your-existing-project/
├── docker-compose.yml   <- the same file from Part 2, we're extending it
├── .env                 <- new — for secrets like your CrowdSec API key
├── swag/                <- already exists from Part 2
└── crowdsec/            <- new
👉 Don't forget to set permissions on the new folder, with whatever user you decided to run crowdsec container with. Same one was SWAG maybe? chown -R 1000:1000 /yourpath/to/crowdsec and chmod 644 /yourpath/to/crowdsec as well.
Adding CrowdSec to Your Compose File
Add these lines to your existing swag service's environment: block:
      - DOCKER_MODS=linuxserver/mods:swag-crowdsec  # append with a | if you already have other mods, e.g. linuxserver/mods:swag-dashboard|linuxserver/mods:swag-crowdsec
      - CROWDSEC_API_KEY=${CROWDSEC_API_KEY}
      - CROWDSEC_LAPI_URL=http://crowdsec:8080
Then add the new crowdsec service alongside it:
crowdsec:
    container_name: crowdsec
    image: crowdsecurity/crowdsec:latest
    depends_on:
      - swag
    environment:
      - COLLECTIONS=crowdsecurity/nginx crowdsecurity/base-http-scenarios crowdsecurity/appsec-virtual-patching crowdsecurity/whitelist-good-actors
      - CUSTOM_HOSTNAME=crowdsec
      - PID=1000
      - GID=1000
      - BOUNCER_KEY_SWAG=${CROWDSEC_API_KEY}
    volumes:
      - /yourpath/DOCKERS/swag/log/nginx:/var/log/swag:ro
      - /yourpath/DOCKERS/crowdsec/data:/var/lib/crowdsec/data:rw
      - /yourpath/DOCKERS/crowdsec/config:/etc/crowdsec:rw
      - /var/log:/var/log/host:ro
    security_opt:
      - no-new-privileges=true
    restart: unless-stopped
CROWDSEC_API_KEY is a variable, not a literal value - it's pulled from a .env file, not hardcoded into the compose file. We generate the actual key further down.
Starting CrowdSec Up
- Start the stack once -
docker compose up -d- just to let CrowdSec generate its default folders, thendocker compose down. - Edit
acquis.yamlto add the proper log sources (shown below).
CrowdSec Bouncer Setup / Bouncer API Key
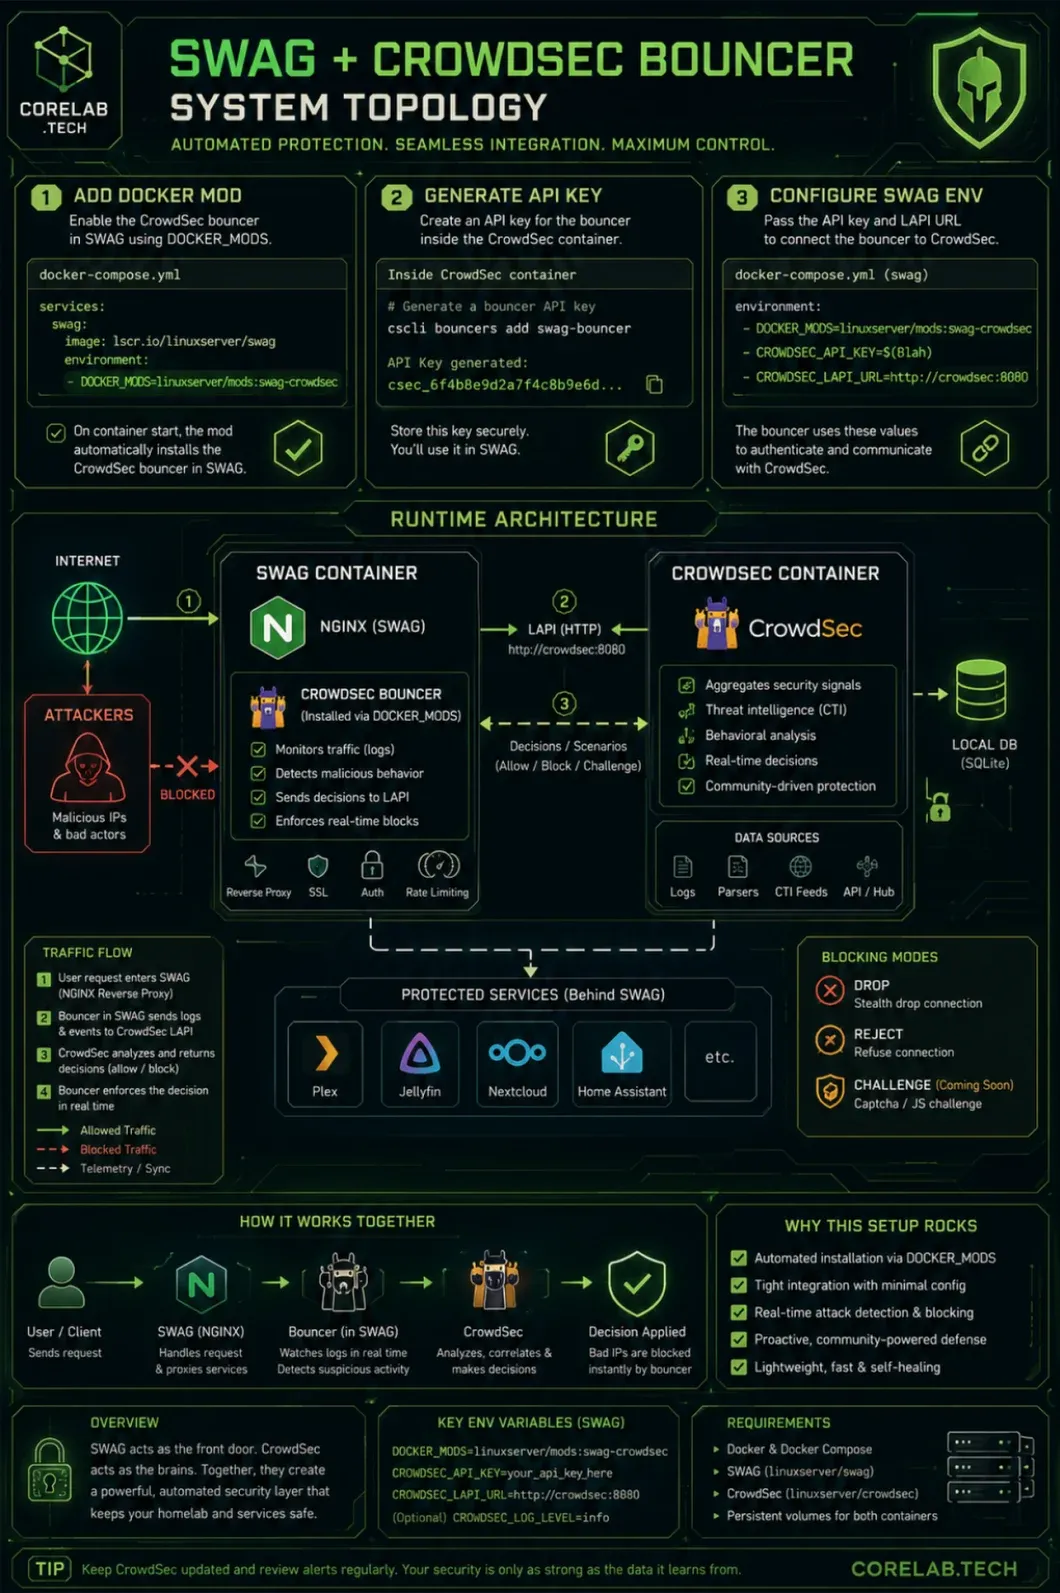
This key is what lets SWAG (the bouncer) actually execute the bans CrowdSec (the brain) decides on:
docker compose up -d
docker exec -t crowdsec cscli bouncers add swag.env file# .env
CROWDSEC_API_KEY=the_key_you_just_copiedThis is why the compose file references ${CROWDSEC_API_KEY} instead of a literal string - Docker Compose pulls it from .env automatically, keeping the secret out of a file you might paste into a support forum or commit to git by accident.
Telling CrowdSec What to Read
Edit crowdsec/acquis.yaml which is buried wherever you put crowdsec, nano /opt/DOCKERS/crowdsec/acquis.yml as an example:
filenames:
  - /var/log/swag/*
labels:
  type: nginx
---
filenames:
  - /var/log/auth.log*
  - /var/log/syslog
labels:
  type: syslog
The type: nginx label matters more than it looks - without it, CrowdSec has no idea which parser to apply to those logs, and it'll sit there technically running while catching nothing.
Confirmation & Testing CrowdSec Function
Now you can drop yourself into the crowdsec docker to check things out quickly. Type: docker exec -it crowdsec /bin/sh
You'll get dropped into the crowdsec's shell. This means the container is running and alive. You can try cscli metrics and will see some output. This is good. Type exit until it drops you back to normal console/command prompt on your host again.
Now check their logs one at a time, CTRL-C to drop out.
docker logs -f swag or docker logs -f crowdsec and then CTRL-C to cancel.
Now you check to see if the bouncer is live, talking to the CrowdSec LAPI and all is ok!
docker exec -t crowdsec cscli bouncers listYou're looking for your SWAG entry with a checkmark and a recent timestamp under "Last API pull":
docker exec -t crowdsec cscli bouncers list
───────────────────────────────────────────────────────────────────────────────────────────
 Name  IP Address  Valid  Last API pull         Type                    Version  Auth Type
───────────────────────────────────────────────────────────────────────────────────────────
 SWAG  10.0.0.4    ✔️     2026-04-12T03:06:26Z  crowdsec-nginx-bouncer  v1.1.3   api-key
───────────────────────────────────────────────────────────────────────────────────────────
So long as you see there's a DTG in the "Last API pull" and a check mark, you're GTG! ✅
Output of docker exec -t crowdsec cscli metrics
╭─────────────────────────────────────────────────────────────────────────────────────────────────────────────────────────╮
│ Acquisition Metrics │
├───────────────────────────────┬────────────┬──────────────┬────────────────┬────────────────────────┬───────────────────┤
│ Source │ Lines read │ Lines parsed │ Lines unparsed │ Lines poured to bucket │ Lines whitelisted │
├───────────────────────────────┼────────────┼──────────────┼────────────────┼────────────────────────┼───────────────────┤
│ : │ - │ - │ - │ - │ 202 │
│ file:/var/log/swag/access.log │ 67.98k │ 67.98k │ - │ 41.17k │ 6.75k │
│ file:/var/log/swag/error.log │ 24 │ 24 │ - │ 13 │ - │
╰───────────────────────────────┴────────────┴──────────────┴────────────────┴────────────────────────┴───────────────────╯
╭──────────────────────────────────────────────╮
│ Local API Alerts │
├──────────────────────────────────────┬───────┤
│ Reason │ Count │
├──────────────────────────────────────┼───────┤
│ LePresidente/http-generic-401-bf │ 1 │
│ LePresidente/http-generic-403-bf │ 7 │
│ crowdsecurity/http-crawl-non_statics │ 1 │
╰──────────────────────────────────────┴───────╯
╭───────────────────────────────────────────╮
│ Local API Decisions │
├─────────────────┬────────┬────────┬───────┤
│ Reason │ Origin │ Action │ Count │
├─────────────────┼────────┼────────┼───────┤
│ http:bruteforce │ CAPI │ ban │ 24809 │
│ http:crawl │ CAPI │ ban │ 2554 │
╰─────────────────┴────────┴────────┴───────╯
╭─────────────────────────────────────╮
│ Local API Metrics │
├────────────────────┬────────┬───────┤
│ Route │ Method │ Hits │
├────────────────────┼────────┼───────┤
│ /v1/decisions │ GET │ 56288 │
│ /v1/heartbeat │ GET │ 5497 │
│ /v1/usage-metrics │ POST │ 550 │
│ /v1/watchers/login │ POST │ 94 │
╰────────────────────┴────────┴───────╯
╭──────────────────────────────────────────╮
│ Local API Bouncers Metrics │
├─────────┬───────────────┬────────┬───────┤
│ Bouncer │ Route │ Method │ Hits │
├─────────┼───────────────┼────────┼───────┤
│ SWAG │ /v1/decisions │ GET │ 56287 │
╰─────────┴───────────────┴────────┴───────╯
╭─────────────────────────────────────────────╮
│ Local API Bouncers Decisions │
├─────────┬───────────────┬───────────────────┤
│ Bouncer │ Empty answers │ Non-empty answers │
├─────────┼───────────────┼───────────────────┤
│ SWAG │ 56287 │ 0 │
╰─────────┴───────────────┴───────────────────╯
╭──────────────────────────────────────────╮
│ Local API Machines Metrics │
├──────────┬───────────────┬────────┬──────┤
│ Machine │ Route │ Method │ Hits │
├──────────┼───────────────┼────────┼──────┤
│ crowdsec │ /v1/heartbeat │ GET │ 5497 │
╰──────────┴───────────────┴────────┴──────╯
╭───────────────────────────────────────────────────────────────────╮
│ Parser Metrics │
├────────────────────────────────────┬─────────┬─────────┬──────────┤
│ Parsers │ Hits │ Parsed │ Unparsed │
├────────────────────────────────────┼─────────┼─────────┼──────────┤
│ child-crowdsecurity/http-logs │ 204.01k │ 141.45k │ 62.55k │
│ child-crowdsecurity/nginx-logs │ 68.03k │ 68.00k │ 24 │
│ crowdsecurity/cdn-whitelist │ 202 │ 202 │ - │
│ crowdsecurity/dateparse-enrich │ 68.00k │ 68.00k │ - │
│ crowdsecurity/geoip-enrich │ 61.25k │ 61.25k │ - │
│ crowdsecurity/http-logs │ 68.00k │ 68.00k │ - │
│ crowdsecurity/nginx-logs │ 68.00k │ 68.00k │ - │
│ crowdsecurity/non-syslog │ 68.00k │ 68.00k │ - │
│ crowdsecurity/overseerr-whitelist │ 68.00k │ 68.00k │ - │
│ crowdsecurity/public-dns-allowlist │ 68.00k │ 68.00k │ - │
│ crowdsecurity/rdns │ 202 │ 202 │ - │
│ crowdsecurity/seo-bots-whitelist │ 202 │ 202 │ - │
│ crowdsecurity/whitelists │ 68.00k │ 68.00k │ - │
╰────────────────────────────────────┴─────────┴─────────┴──────────╯
╭──────────────────────────────────────────────────────────────────────────────────────────────────────────╮
│ Scenario Metrics │
├────────────────────────────────────────────┬───────────────┬───────────┬──────────────┬────────┬─────────┤
│ Scenario │ Current Count │ Overflows │ Instantiated │ Poured │ Expired │
├────────────────────────────────────────────┼───────────────┼───────────┼──────────────┼────────┼─────────┤
│ LePresidente/http-generic-401-bf │ - │ - │ 12 │ 12 │ 12 │
│ LePresidente/http-generic-403-bf │ - │ - │ 6 │ 6 │ 6 │
│ crowdsecurity/http-admin-interface-probing │ - │ 45 │ 407 │ 554 │ 362 │
│ crowdsecurity/http-backdoors-attempts │ - │ 11 │ 98 │ 109 │ 87 │
│ crowdsecurity/http-bad-user-agent │ - │ - │ 86 │ 86 │ 86 │
│ crowdsecurity/http-crawl-non_statics │ 2 │ - │ 24.79k │ 29.63k │ 24.79k │
│ crowdsecurity/http-path-traversal-probing │ - │ - │ 7 │ 8 │ 7 │
│ crowdsecurity/http-probing │ - │ 161 │ 4.53k │ 9.82k │ 4.37k │
│ crowdsecurity/http-sensitive-files │ - │ - │ 276 │ 288 │ 276 │
│ crowdsecurity/http-wordpress-scan │ - │ 95 │ 333 │ 675 │ 238 │
╰────────────────────────────────────────────┴───────────────┴───────────┴──────────────┴────────┴─────────╯
╭───────────────────────────────────────────────────────────────────────────────────────────────╮
│ Whitelist Metrics │
├────────────────────────────────────┬────────────────────────────────────┬───────┬─────────────┤
│ Whitelist │ Reason │ Hits │ Whitelisted │
├────────────────────────────────────┼────────────────────────────────────┼───────┼─────────────┤
│ crowdsecurity/cdn-whitelist │ CDN provider │ 202 │ 202 │
│ crowdsecurity/overseerr-whitelist │ Overseerr whitelist │ 68002 │ - │
│ crowdsecurity/public-dns-allowlist │ public DNS server │ 68002 │ - │
│ crowdsecurity/seo-bots-whitelist │ good bots (search engine crawlers) │ 202 │ - │
│ crowdsecurity/whitelists │ private ipv4/ipv6 ip/ranges │ 68002 │ 6752 │
╰────────────────────────────────────┴────────────────────────────────────┴───────┴─────────────╯
There's another post you can dig through once you've finished with this series, to really dig in👉 and see if CrowdSec is blocking actively for you.
Why CrowdSec Beats Fail2Ban Alone
Fail2Ban blocks based on your own logs. CrowdSec shares and receives ban intelligence with every other CrowdSec user - if an IP got flagged attacking someone else's server an hour ago, it can be blocked on yours before it tries anything. This is crowd-sourced threat intelligence - the kind enterprise security hardware charges real money for.
Here's my complete SWAG & CrowdSec Compose for reference:
📄 View Full YAML Configuration (Click to Expand)
networks:
  vlan7_home:
    driver: macvlan
    driver_opts:
      parent: enp40s0f1 # Use your actual parent interface
    ipam:
      config:
        - subnet: 10.0.0.0/24 # Any class C / RFC1918 range
          gateway: 10.0.0.1 # Gateway of this subnet/vlan/network
  backend:
    name: dockernet
    driver: bridge

### SWAG config begin
  swag:
    image: lscr.io/linuxserver/swag
    container_name: swag
    networks:
      docker_vlan:
        ipv4_address: X.X.X.X
    cap_add:
      - NET_ADMIN
    environment:
      - PUID=1000
      - PGID=1000
      - TZ=America/Toronto
      - URL=corelab.tech
      - VALIDATION=dns #can be http or dns
      - SUBDOMAINS=wildcard #optional
#      - CERTPROVIDER= #optional
      - DNSPLUGIN=cloudflare
      - DOCKER_MODS=linuxserver/mods:swag-crowdsec|linuxserver/mods:swag-dashboard|linuxserver/mods:swag-cloudflare-real-ip
#      - PROPAGATION= #optional
#      - EMAIL= #optional
      - ONLY_SUBDOMAINS=false #optional, set as false will have swag fetch certs for my extra domains as well!
      - EXTRA_DOMAINS=corelab.tech #optional
#      - STAGING=false #optional
#      - DISABLE_F2B= #optional
#      - SWAG_AUTORELOAD= #optional
#      - SWAG_AUTORELOAD_WATCHLIST= #optional
      - CROWDSEC_API_KEY=${CROWDSEC_API_KEY} | OR put your API key here directly
      - CROWDSEC_LAPI_URL=http://crowdsec:8080 <--- Can be IP or name of your crowdsec below
    volumes:
      - /brain/DOCKERS/swag:/config
    ports:
      - 443:443 # Mandatory, required for functioning
      - 80:80 # Optional
      - 81:81 # If you enabled the dashboard mod above
    restart: unless-stopped

  crowdsec:
    container_name: crowdsec
    image: crowdsecurity/crowdsec:latest
    depends_on:
      - swag
    networks:
      docker_vlan:
        ipv4_address: X.X.X.X
    environment:
      - COLLECTIONS=crowdsecurity/nginx crowdsecurity/base-http-scenarios crowdsecurity/appsec-virtual-patching crowdsecurity/whitelist-good-actors
      - CUSTOM_HOSTNAME=crowdsec
      - PID=1000
      - GID=1000
      - BOUNCER_KEY_SWAG=${CROWDSEC_API_KEY} | Or API key
    volumes:
      - /yourpath/DOCKERS/swag/log/nginx:/var/log/swag:ro
      - /yourpath/DOCKERS/crowdsec/data:/var/lib/crowdsec/data:rw
      - /yourpath/DOCKERS/crowdsec/config:/etc/crowdsec:rw
      - /var/log:/var/log/host:ro
    security_opt:
      - no-new-privileges=true
    restart: unless-stopped

Part 2: SWAG Security Hardening - HSTS, Headers, and TLS 1.3
🎯 The Goal: HSTS & The A+ Rating
A Word of Caution Before You Touch HSTS
HSTS (HTTP Strict Transport Security) tells browsers "never talk to me over plain HTTP again, HTTPS only, period." That's exactly what you want - right up until your certificate fails to renew for some reason, at which point HSTS will lock you (and everyone else) out of your own domain until it's fixed.
The Reward: It stops "Protocol Downgrade Attacks" dead in their tracks.
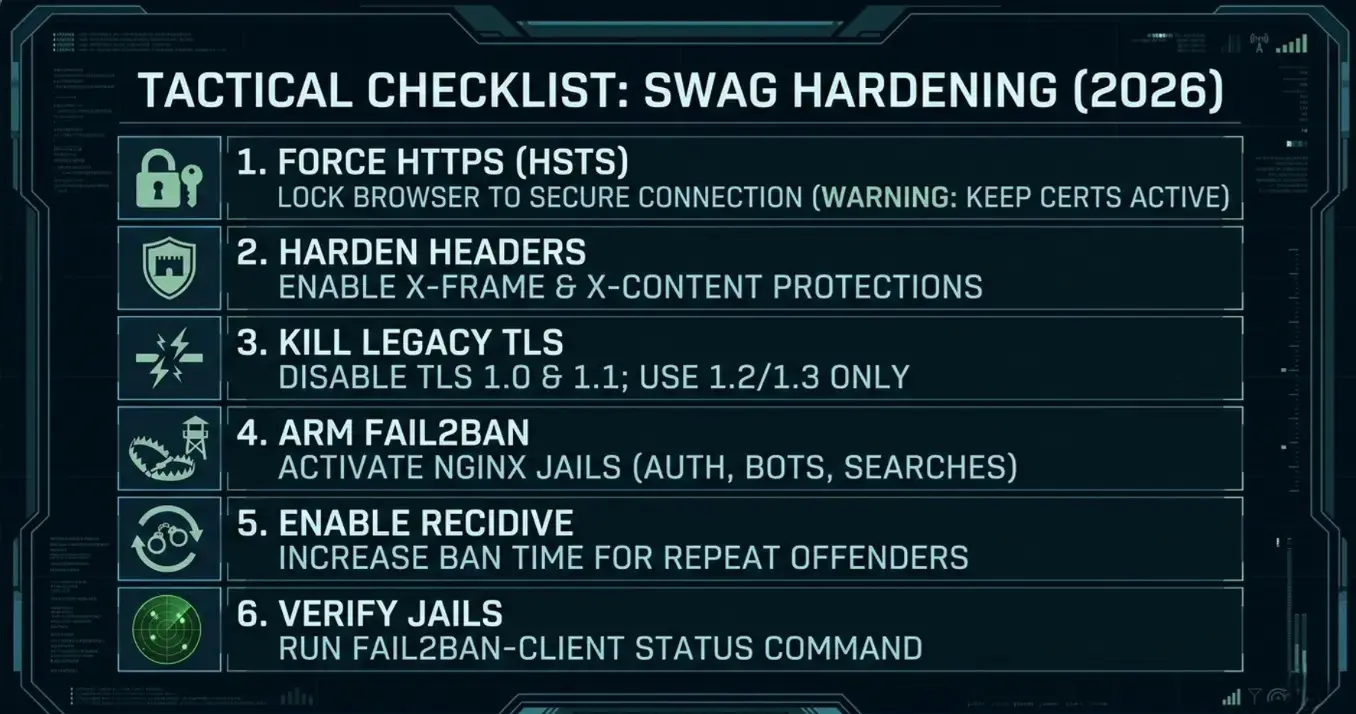
Step 1: Enable HSTS
Open /swag/config/nginx/ssl.conf. LinuxServer.io ships this commented out by default specifically to protect people from locking themselves out. Find the HSTS line and uncomment it:
add_header Strict-Transport-Security "max-age=63072000; includeSubDomains; preload" always;max-age=63072000 is two years in seconds. Qualys SSL Labs only requires about six months (roughly 15.7 million seconds) for an A+, so this is comfortably over the bar.
Step 2: Harden the Response Headers
Still in ssl.conf, make sure these are active:
# Stop other sites from embedding yours (clickjacking protection)
add_header X-Frame-Options "SAMEORIGIN" always;

# Stop the browser from guessing MIME types
add_header X-Content-Type-Options "nosniff" always;

# Browser's built-in XSS filter
add_header X-XSS-Protection "1; mode=block" always;

# Referrer privacy
add_header Referrer-Policy "strict-origin-when-cross-origin" always;
None of these are exotic - they're the standard baseline any public-facing site should have, and SWAG makes them a one-line uncomment away instead of something you'd have to write from scratch. It seems over time what is enabled by default here has changed so you may have to uncomment or not!
Step 3: Drop Legacy TLS Versions
Still in the same file, find ssl_protocols and restrict it:
ssl_protocols TLSv1.2 TLSv1.3;TLS 1.0 and 1.1 are old enough that keeping them enabled mainly just widens your attack surface for negligible compatibility benefit. TLS 1.2 is still considered secure by Qualys, so this is the safe default - if you know every device hitting your services supports 1.3, you can go further and drop 1.2 too, but that's a "know your audience" call, not a default recommendation. I believe all up to date browsers support TLS 1.3, but even still, this site supports TLS1.2 as well.
Step 4: Restart and Verify
docker compose up -d --force-recreate swag && docker logs -f swagThis re-creates the container and shows you a live running log of the startup so you can ensure everything fires back up ok. CTRL-C to cancel out.
Then run your domain through Qualys SSL Labs. With HSTS, the hardened headers, and legacy TLS disabled, you should land at A or A+.
Part 3: Arming Fail2Ban (The Bot Traps)
By default, Fail2Ban might only watch for SSH attempts. For a web server, attacks come via HTTP - password guessing, bots scanning for wp-login.php, and so on. SWAG ships pre-written jails for Nginx, but they're often disabled.
- Open your jail config:
/swag/fail2ban/jail.local. - Enable the core 5:
[nginx-http-auth]
enabled  = true
filter   = nginx-http-auth
port     = http,https
logpath  = /config/log/nginx/error.log

[nginx-badbots]
enabled  = true
filter   = nginx-badbots
port     = http,https
logpath  = /config/log/nginx/access.log

[nginx-botsearch]
enabled  = true
filter   = nginx-botsearch
port     = http,https
logpath  = /config/log/nginx/access.log

[nginx-deny]
enabled  = true
filter   = nginx-deny
port     = http,https
logpath  = /config/log/nginx/error.log

[nginx-unauthorized]
enabled  = true
filter   = nginx-unauthorized
port     = http,https
logpath  = /config/log/nginx/error.log
Full jail.local reference:
[DEFAULT]
ignoreip = 10.0.0.0/8
           192.168.0.0/16
           172.16.0.0/12
banaction = iptables-allports
bantime  = 1800
findtime  = 600
maxretry = 3

[ssh]
enabled = false

[nginx-http-auth]
enabled  = true
filter   = nginx-http-auth
port     = http,https
logpath  = /config/log/nginx/error.log

[nginx-badbots]
enabled  = true
port     = http,https
filter   = nginx-badbots
bantime  = 12h
logpath  = /config/log/nginx/access.log
maxretry = 2

[nginx-botsearch]
enabled  = true
port     = http,https
filter   = nginx-botsearch
logpath  = /config/log/nginx/access.log

[nginx-deny]
enabled  = true
port     = http,https
filter   = nginx-deny
logpath  = /config/log/nginx/error.log

[nginx-unauthorized]
enabled  = true
port     = http,https
filter   = nginx-unauthorized
logpath  = /config/log/nginx/access.log
maxretry = 6

[nginx-limit-req]
enabled = true
port    = http,https
filter  = nginx-limit-req
logpath = /config/log/nginx/error.log
bantime = 7200- Restart SWAG:
docker restart swag
🧠 Deep Dive: What Are These Traps Actually Catching?
nginx-http-auth— brute-force protection for HTTP Basic Auth popupsnginx-badbots— blocks known malicious scraper user agentsnginx-botsearch— the most active jail, catching scans for/phpmyadmin,/wp-login.php,/setup.cgi, and similarnginx-unauthorized— bans IPs repeatedly triggering 401s
The "Perma-Ban" (Recidive Jail)
Standard bans are temporary — smart bots wait it out. Recidive stops that cycle:
[recidive]
enabled  = true
logpath  = /config/log/fail2ban/fail2ban.log
banaction = iptables-allports
bantime  = 1w
findtime = 1d
maxretry = 3
Restart: docker compose up -d --force-recreate swag
Verification & The "Ban-Hammer"
docker exec -it swag fail2ban-client statusExpected:
Status
|- Number of jail:	6
`- Jail list:	nginx-badbots, nginx-botsearch, nginx-deny, nginx-http-auth, nginx-limit-req, nginx-unauthorized
"Number of jail: 0" means a jail.local syntax error. Check specific catches with:
docker exec -it swag fail2ban-client status nginx-botsearchFail2Ban isn't set-and-forget - review logs regularly, watch for false positives, and remember it's one layer among several, not a silver bullet.
Monitoring and Fine-Tuning
A robust Fail2ban configuration isn't a set-and-forget solution. Continuous monitoring and fine-tuning are essential. Regularly review your Fail2ban logs to identify false positives and adjust your filters accordingly. Pay attention to the number of bans triggered by each jail and investigate any unusual activity. Consider implementing a centralized logging system to aggregate Fail2ban logs for easier analysis.
Commands for Monitoring:
docker exec -it swag /bin/bashfail2ban-client status: Shows the status of all jails.fail2ban-client status <jail_name>: Shows the status of a specific jail.fail2ban-client set <jail_name> <parameter> <value>: Changes a jail's parameters dynamically (live, on the fly).
Important Notes and Cautions
- Testing is Crucial: Always test your configuration changes in a non-production (if possible/available) environment before deploying them to production. Incorrectly configured filters can lead to legitimate users being blocked.
- Regular Updates: Keep your Fail2ban software and filters up to date to protect against new attack vectors.
- Understand Your Logs: Familiarize yourself with your web server and system logs to write effective filters.
- Fail2ban is a Defence Layer: Fail2ban is a valuable security tool, but it’s not a silver bullet. It should be part of a comprehensive security strategy along with CrowdSec and a reverse proxy, plus a firewall. See how many layers we're talking about here and we haven't even gotten into IDS/IPS nor WAF yet!
The Ultimate Defense-in-Depth: Why You Need Both Fail2Ban and CrowdSec
A common question when securing a homelab is: "If I have CrowdSec, do I still need Fail2Ban?" The answer is absolutely yes!
Modern attackers know how Fail2Ban works; they use distributed botnets to rotate IP addresses or execute "low and slow" attacks, waiting just long enough between requests to bypass local Fail2Ban limits. Because Fail2Ban operates strictly in isolation, it is blind to an IP address until it attacks your specific server multiple times. This is why a Defense-in-Depth architecture is mandatory. CrowdSec acts as your global shield at the application layer (Nginx). If a botnet is rotating IPs, CrowdSec already knows about them through global community threat intelligence and drops the connection instantly.
Meanwhile, Fail2Ban acts as your local sledgehammer at the network layer (IPTables). If a highly targeted attacker manages to fly under CrowdSec's global radar, your local Fail2Ban recidive jail acts as the final safety net, permanently banning them the moment they get too aggressive.
By running both, you cover the blind spots of each system.
This is exactly what happened in August '26 for me, when someone was poking and proding with a 'low and slow' set of attempted logins, and snuck by CrowdSec, but then hit my recidive jail and got banned! It happens...
If you want to see exactly what this looks like when a botnet attacks you, read my CrowdSec Log Forensics Guide to see how to trace the malicious IPs.
Part 4: Mapping Defence in Depth to the OSI Model & Your Homelab (Sidebar!)
Infrastructure & Network Segmentation (layering)
Let's reinforce the core concept: layered security. It’s not about relying on a single solution. It’s about creating a defence-in-depth strategy. Remember the OSI model from my networking series? Here's how it ties into security with multiple layers:
flowchart TB
    subgraph L7 ["🖥️ L7 Application"]
        direction TB
        L7a["🛡️ WAF - C/I"]
        L7b["💻 Secure coding - I"]
        L7c["🔐 Auth & MFA - C/I"]
        L7d["🛡️ EDR - C/I"]
    end
    subgraph L6 ["🎨 L6 Presentation"]
        direction TB
        L6a["🔐 TLS - C/I"]
        L6b["📝 Encoding & sanitization - I"]
        L6c["🔑 Masking & tokenization - C/I"]
    end
    subgraph L5 ["🤝 L5 Session"]
        direction TB
        L5a["⏳ Timeouts - C"]
        L5b["🔑 Tokens - C/I"]
        L5c["🛡️ VPN / ZTNA - C"]
    end
    subgraph L4 ["📦 L4 Transport"]
        direction TB
        L4a["🔐 TLS / SSH - C/I"]
        L4b["🚪 Port filtering ACLs - C"]
        L4c["⚡ Rate limiting / DoS - A"]
    end
    subgraph L3 ["🛰️ L3 Network"]
        direction TB
        L3a["🔥 Firewall - C/A"]
        L3b["🕵️ IDS/IPS - C/I"]
        L3c["🧱 Segmentation VLANs - C"]
        L3d["🔐 IPsec tunnels - C/I"]
    end
    subgraph L2 ["🔗 L2 Data Link"]
        direction TB
        L2a["🔒 802.1X NAC - C"]
        L2b["🏷️ MAC filtering - C"]
        L2c["📜 ARP/DHCP checks - I"]
        L2d["📶 WiFi WPA3 - C"]
    end
    subgraph L1 ["⚡ L1 Physical"]
        direction TB
        L1a["🔐 Locks - C"]
        L1b["🎥 CCTV - C/I"]
        L1c["⚡ Power/HVAC/Fire - A"]
        L1d["🗑️ Media sanitization - C/I"]
    end
    L7 --> L6 --> L5 --> L4 --> L3 --> L2 --> L1
    classDef conf fill:#00ffff,stroke:#00ffff,stroke-width:2px,color:#111,font-weight:bold;
    classDef integ fill:#ff00ff,stroke:#ff33ff,stroke-width:2px,color:#111,font-weight:bold;
    classDef avail fill:#ff8c00,stroke:#ffaa33,stroke-width:2px,color:#111,font-weight:bold;
    class L7a,L7c,L7d,L6a,L6c,L5a,L5b,L5c,L4a,L4b,L3a,L3b,L3c,L3d,L2a,L2b,L2d,L1a,L1b,L1d conf;
    class L7a,L7b,L7c,L7d,L6a,L6b,L6c,L5b,L4a,L3b,L3d,L2c,L1b,L1d integ;
    class L4c,L3a,L1c avail;
Confidentiality (C)
Integrity (I)
Availability (A)
Obviously in a home network you likely won't have all of this, but it's to illustrate that you should kinda be aiming for it. Just having "a firewall" isn't enough. That's like, the moat around your castle only!
Network Segmentation (VLANs)
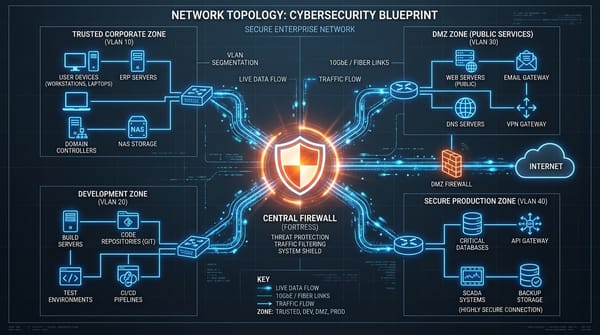
If you followed my networking series and setup your VLANs properly, you can now have something like this! Head over to the OPNsense setup guide, if you don't have an effective firewall or want one that SLAPS.
🛡️ Optional: Contributing to the Global Shield (AbuseIPDB)
If you want to give back, report repeat offenders to AbuseIPDB:
- Create an account at AbuseIPDB.
- Generate an API key.
- Add to the bottom of
jail.local's[DEFAULT]section:
action = %(action_)s
         %(action_abuseipdb)s[abuseipdb_apikey="YOUR_API_KEY_HERE", abuseipdb_category="5,14,15,18,19,21"]
Reload Fail2Ban: docker exec -it swag /bin/bash, then fail2ban-client reload.
Troubleshooting Pro-Tip: if CrowdSec says "bouncer connected" but isn't banning anything, check docker logs crowdsec. "File not found" errors almost always mean acquis.yaml's path doesn't match the container's internal path (/var/log/swag), not your host path.
Frequently Asked Questions
Will enabling HSTS lock me out of local network access? No — HSTS is domain-specific. Local IP access (192.168.x.x) is unaffected.
Why run both Fail2Ban and CrowdSec? Isn't that redundant? Fail2Ban is your fast, local reactive agent. CrowdSec is your proactive watchman using community threat intelligence. Together: speed and global awareness.
fail2ban-client status shows 0 jails — what happened? Almost always a jail.local syntax error.
Is TLS 1.2 still safe in 2026? Yes, with strong ciphers — kept enabled alongside 1.3 mainly for older smart TVs and IoT devices.
Can I get an A+ rating without a reverse proxy? Very difficult — individual apps generally aren't built to manage their own TLS and headers the way SWAG does.
What if I get banned by my own Fail2Ban or CrowdSec? Switch networks (phone LTE) to reach your terminal. Fail2Ban: fail2ban-client set <jail-name> unbanip <your-ip>. CrowdSec: cscli decisions delete --ip <your-ip>.
What's Next
Layers 1 through 3 of the Digital Castle are up: the moat, the traps, and the watchman. Next: Authelia - Centralized MFA for Self-Hosted Services, the Gatekeeper that demands a second factor even from traffic that makes it past everything above.
Written by
On this page
What's Next?