
CrowdSec Installed but Showing No Decisions? Here's Why That's Normal

When I first fired up CrowdSec, I thought to myself, "Amzing! Job's done! No one gettin' in here now!".... I spent an hour last week staring at an empty log file, convinced I had broken my server somehow while working on something else!
Like me, if you installed CrowdSec, and ran:
cscli decisions list …and got: No active decisions
Naturally, your first thought is: Did CrowdSec fail? In most cases, no. This usually means CrowdSec is working exactly as intended!
Unlike Fail2Ban, CrowdSec blocks many attackers preemptively using community intelligence, so your local decision list may stay empty even while your server is actively protected.
In this guide, you'll learn how to verify CrowdSec is functioning correctly by checking:
- downloaded community decisions
- active metrics
- blocked attack attempts
- alert history
- whitelist configuration
By the end, you'll know exactly how to prove your CrowdSec deployment is doing its job.
This is part of the my Homelab Observability Series:
Homelab Observability
Logging & Threat Maps
Part 1: Building a Homelab Mini-SIEM with Grafana, Loki & Promtail
Network Visualization
Part 2: Mapping Your Network Topology with Homelable
Security Auditing
Part 3: Auditing the Castle - Scan & Pen-Test Your Homelab
Active Defense Forensics
Part 4: Verifying CrowdSec - Logs, Alerts & the Web UI
Diagram A: The SWAG & CrowdSec Workflow
This diagram visualizes exactly what happened in my logs: The "Bouncer" inside Nginx stopped the request before it hit my backend, based on intel from the Agent.
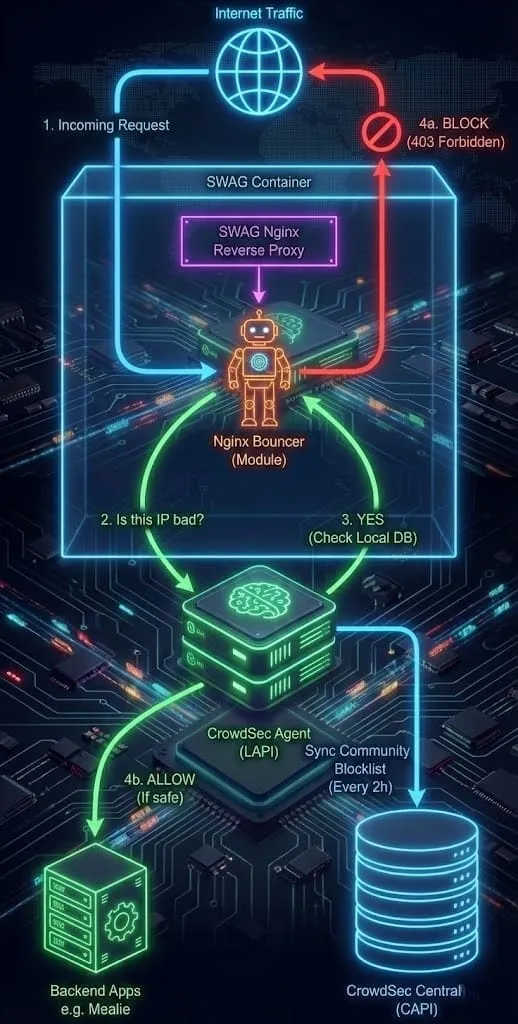
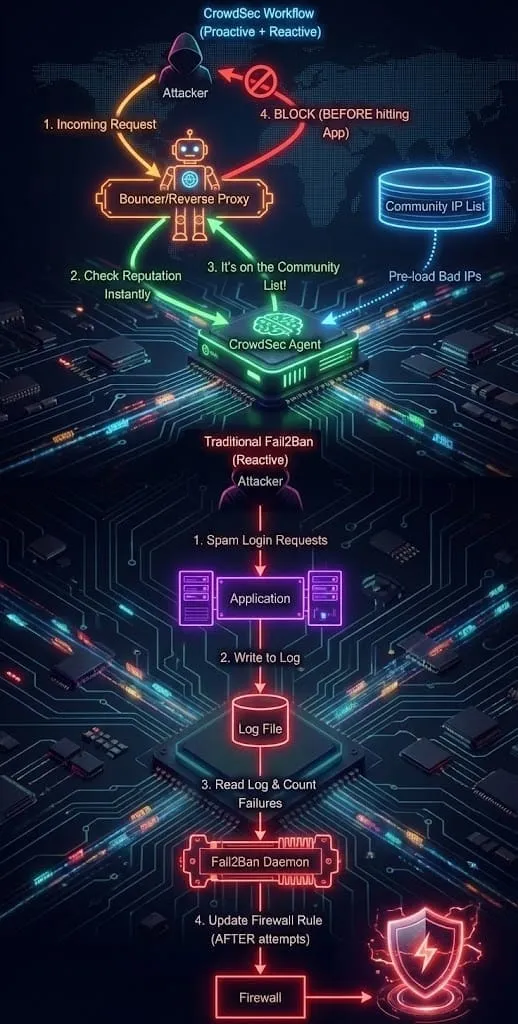
Diagram B: Architectural Shift - Fail2Ban vs. CrowdSec
Fail2Ban is reactive (waits for failure), while CrowdSec is proactive (uses community data to block at the door).
Part 1: Why CrowdSec Shows “No Active Decisions”
The most common point of confusion for new CrowdSec users is the difference between Community Decisions and Local Decisions.
When you run this command:
docker exec -it swag cscli decisions list
You might see No active decisions. This doesn't mean you aren't protected. It just means no one new has attacked you successfully yet.
CrowdSec operates like a massive neighborhood watch. When you install it, you automatically download the Community Blocklist. Your instance blocks these IPs preemptively.1 They don’t get a "strike one" on your server; they are banned at the door.
- Fail2Ban Approach: Wait for someone to punch you in the face 5 times, then block them.
- CrowdSec Approach: Get a photo of the guy who punched your neighbor, and lock the door before he walks down your driveway.
Part 2A: How to Verify CrowdSec Is Working (The Metrics & Logs)
If you want to see the Community Blocklist in action, you need to check the metrics. This confirms that your server isn't just sitting idle- it's actively armed with intelligence from the network. Run this command inside your container:
cscli metrics
Here is the output from my server. Look closely at the Local API Decisions table:
╭────────────────────────────────────────╮
│ Local API Decisions                    │
├──────────────┬────────┬────────┬───────┤
│ Reason       │ Origin │ Action │ Count │
├──────────────┼────────┼────────┼───────┤
│ http:scan    │ CAPI   │ ban    │ 25315 │
│ http:crawl   │ CAPI   │ ban    │ 99    │
│ http:exploit │ CAPI   │ ban    │ 501   │
╰──────────────┴────────┴────────┴───────╯
The Tell-Tail Sign: That 25,315 count under CAPI (Central API) means my server has downloaded over 25,000 known bad IPs from the community. These are the "invisible bans" that block attackers before they even touch my apps or stack.
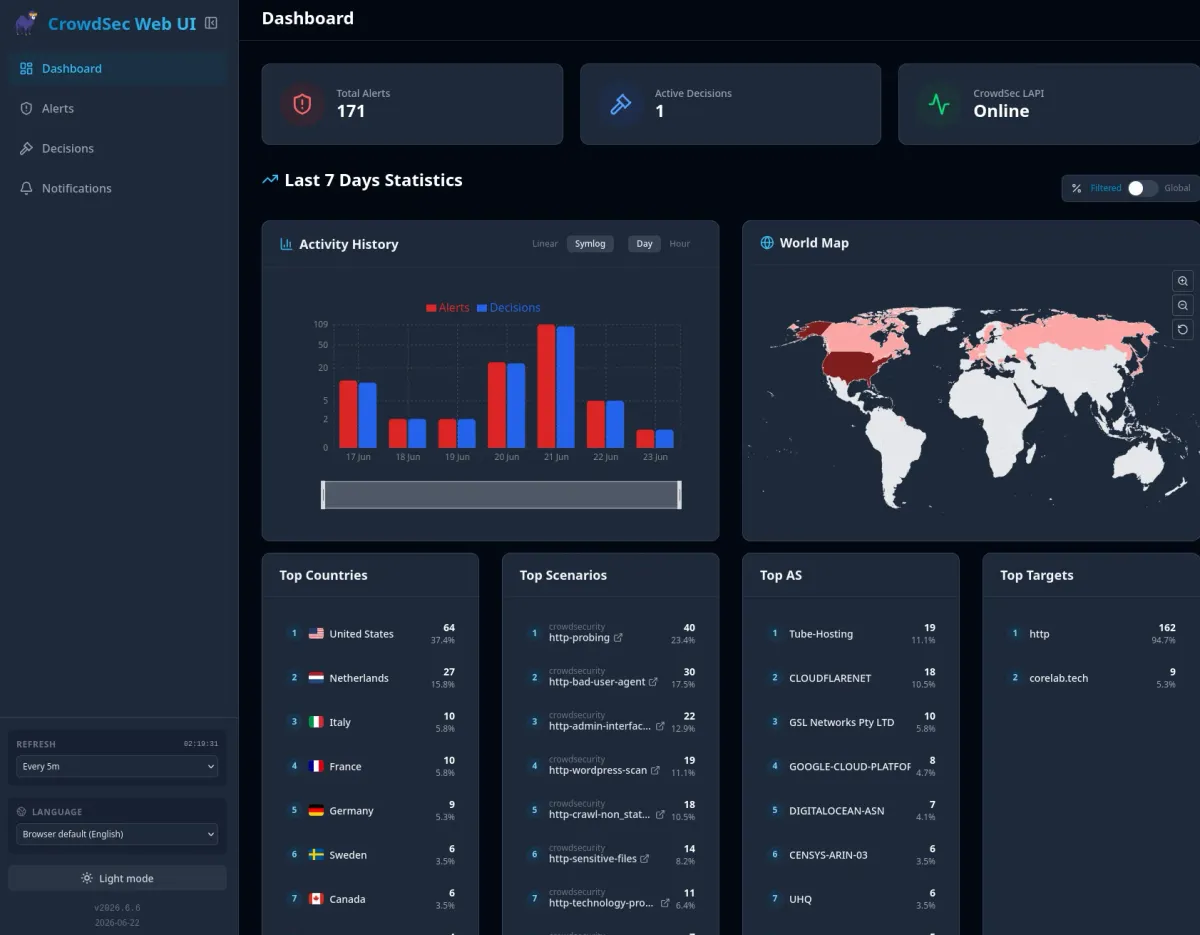
Part 2B: Verify CrowdSec Visually with CrowdSec Web UI!
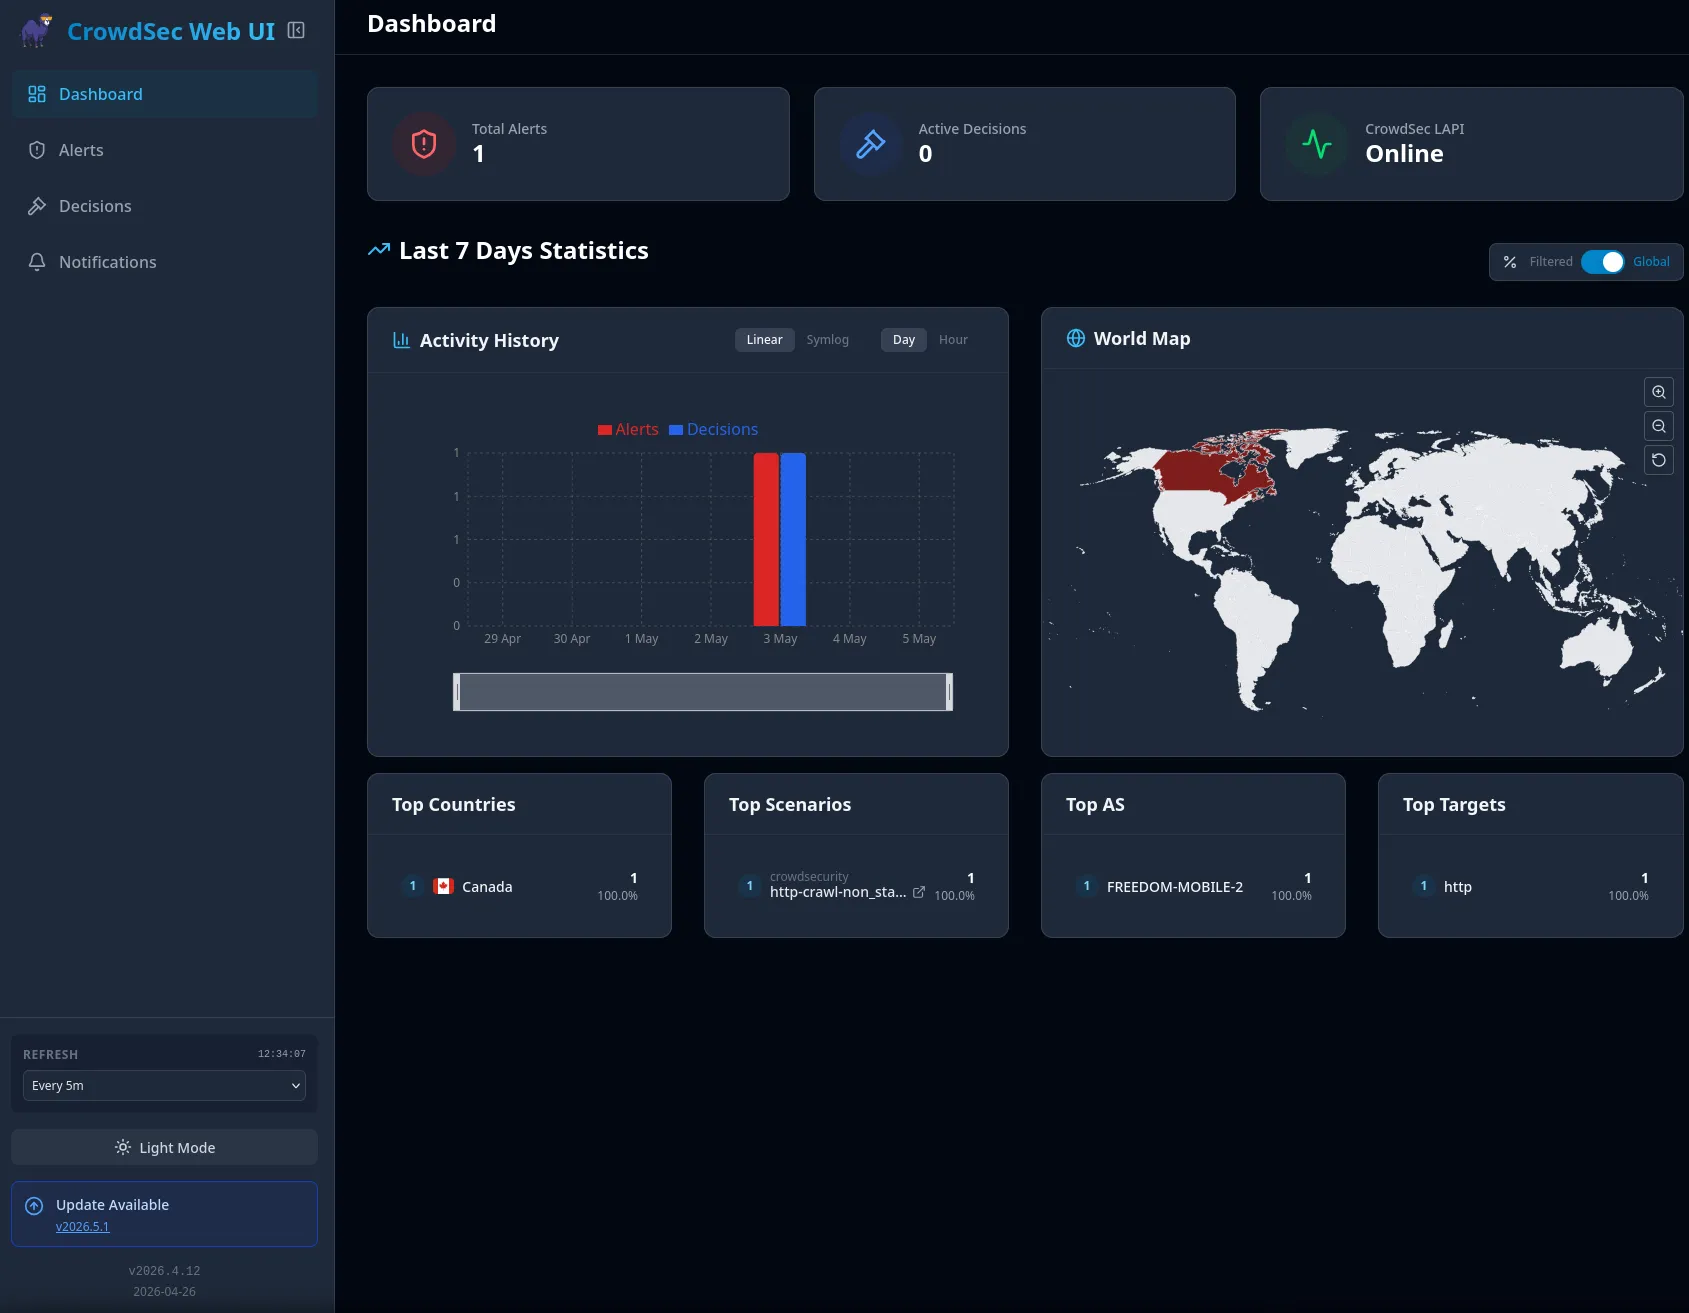
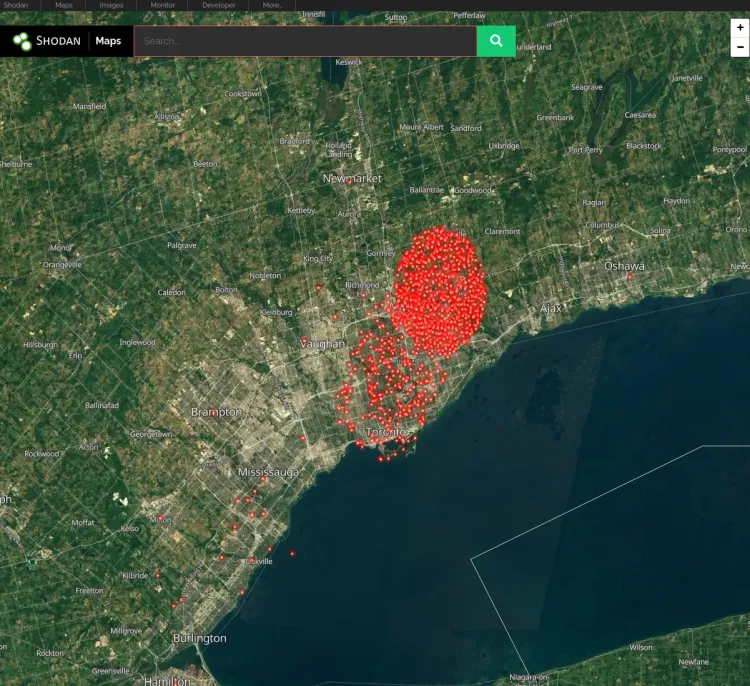
Thanks to TheDuffman85, a CrowdSec global picture speaks one thousand words. If you can SEE CrowdSec in action, then it really forces what may seem abstract home. CrowdSec WebUI gives you immediate visual confirmation that your instance is ingesting logs, correlating events and enforcing decisions.
Check out my full CrowdSec Web UI walkthrough on setting it up!
Part 3: How to Inspect Blocked Attack Attempts (Catching the Scanners)
Since those 25,000 IPs are already banned, what does it look like when they actually try to connect? They get slammed instantly.
Checking my Nginx logs (/log/nginx/error.log), I found this gem:
2026/01/20 14:22:55 [alert] ... [Crowdsec] denied '193.19.109.220' with 'ban' (by bouncer)... request: "GET /wp-admin/txets.php HTTP/2.0"
Analysis:
- The Request:
GET /wp-admin/txets.php— A known vulnerability scanner looking for WordPress exploits. - The Result:
denied ... with 'ban'. - The Key: My server didn't need to count 10 failed attempts. Because this IP was on the list I verified in Part 2, it was blocked on the very first request.
Part 4: The Forensics (Who is attacking me?)
While decisions list shows current bans, cscli alerts list shows your history - the "Police Blotter" of everyone your server has ever caught.
When I ran this on my logs, I noticed a suspicious pattern:
╭──────┬───────────────────┬────────────────────────────────────┬─────────┬──────────────────────╮
│  ID  │       value       │               reason               │ country │          as          │
├──────┼───────────────────┼────────────────────────────────────┼─────────┼──────────────────────┤
│ 6639 │ Ip:185.177.72.12  │ crowdsecurity/http-sensitive-files │ FR      │ 211590 Bucklog SARL  │
│ 6637 │ Ip:185.177.72.16  │ crowdsecurity/http-probing         │ FR      │ 211590 Bucklog SARL  │
│ 6635 │ Ip:185.177.72.62  │ crowdsecurity/http-sensitive-files │ FR      │ 211590 Bucklog SARL  │
╰──────┴───────────────────┴────────────────────────────────────┴─────────┴──────────────────────╯
You can clearly see a coordinated attack here. An entity in France (Bucklog SARL) was rotating through different IPs (.12, .16, .62) to try and evade bans. CrowdSec detected the behavior across all of them and banned them one by one.
Deep Dive Inspection
We can go even deeper. What were they actually looking for? I picked a recent alert ID (6669) and inspected it:
cscli alerts inspect 6669
The output gave me the exact paths the bot was hunting for:
"target_uri": "/admin/assets/global/plugins/jquery-file-upload/server/php/"
"target_uri": "/js/tinymce/plugins/filemanager/dialog.php"
The Verdict: This wasn't a targeted genius hacker. It was a "script kiddie" bot scanning millions of servers for a specific vulnerability in an ancient jQuery file upload plugin (CVE-2018-9206). They were hoping to find an unsecured upload button to drop a PHP shell.
CrowdSec saw them try 20 different paths in seconds, flagged the behavior as http-probing, and slammed the door shut.
Part 5: How to Whitelist Trusted IPs (Friends & Known Good)
Sometimes, CrowdSec is a little too diligent.
You might be tweaking your dashboard, hitting F5 repeatedly because a container is stuck. CrowdSec doesn't know you are the admin; it just sees an IP hammering the server with requests and thinks, "This looks like a brute force attack."
Boom. You are banned.
Or perhaps you have a friend connecting to your game server, but their ISP assigns them an IP that was previously used by a bot. CrowdSec sees the bad reputation and locks the door.
The Quick Fix (Unban)
If you (or your friend) are currently staring at a 403 Forbidden screen, you can lift the ban instantly via the CLI:
# Check if they are actually banned
cscli decisions list

# Unban them
cscli decisions delete --ip 1.2.3.4
The Permanent Fix (Allowlist)
Unbanning is temporary. If you want to ensure your Home IP, your office, or your best friend never gets blocked, you need to add them to a Whitelist.
In your CrowdSec configuration (for SWAG users, this is usually mapped to /config/crowdsec/), navigate to parsers/s02-enrich/.
Create a new file called my-whitelist.yaml and paste this in:
name: my/custom-whitelist
description: "Whitelist for trusted IPs"
whitelist:
  reason: "My Home IP and Friends"
  ip:
    - "1.2.3.4"       # My Home IP
    - "5.6.7.8"       # Dave's House
  cidr:
    - "192.168.1.0/24" # Local Network (just in case)
Save the file and restart CrowdSec (or run cscli parsers reload).
What this does:
This tells CrowdSec to completely ignore these IPs at the Parser level. Their logs won't even be poured into the "suspicious buckets." They have a diplomatic immunity pass to scan, probe, or hammer your server as much as they want.
Conclusion
CrowdSec is often a "set it and forget it" tool, but taking the time to read the metrics gives you peace of mind.
- Zero active decisions is usually a good thing (the community list is doing the heavy lifting).
- Metrics prove your logs are being read.
- Alerts let you see exactly who tried to break in, and what they wanted.
You aren't just protecting your own homelab; every time your local instance bans a new attacker, you send that "Signal" upstream, protecting the rest of us, too! 🛡️


Member discussion