
The Speed of Light: OPNsense WireGuard Setup Guide

Merry Christmas everyone! A little Christmas "treat" for all...
You’ve built the fortress (OPNsense). Now you need a secure, invisible tunnel to get back inside when you’re on the road, travelling for work or on vacation!
For many years, OpenVPN was the standard. But it’s slow, bloated, and drains your battery. To be fair, it can be optimized/shaped up to be a little more performant than it used to be, however... I switched to wireguard back in 2017 and never looked back!
Enter WireGuard. It is modern, lean (4,000 lines of code vs OpenVPN’s 100,000+), and incredibly fast. It roams seamlessly between Wi-Fi and LTE without dropping the connection.
In this guide, we will build a production-ready WireGuard server on OPNsense. We will cover the cryptography basics, the "Orange Cloud" trap, and the precise firewall rules needed to make it work.
🔑 The Concept: Understanding the Keys (Read This First!)
The Ghostbusters Analogy
In the movie, you have two entities that must meet to open the inter-dimensional portal (the VPN tunnel).
Think of WireGuard keys like the end of Ghostbusters. Your Phone is the Keymaster (Private Key)—it holds the secret code and travels around with you. Your OPNsense server is the Gatekeeper (Public Key)—it sits at home waiting for the Keymaster to arrive.

You must copy the 'Gatekeeper' (Public Key) onto your phone so it knows who to look for, and you must copy the 'Keymaster's Identity' (Public Key of the phone) onto the server so it knows who to let in.
When they meet? The tunnel opens.
Technical Details
WireGuard doesn't use usernames and passwords. It uses Cryptographic Key Pairs. This confuses people, so let’s break it down.
Every device has Two Keys:
- Private Key: The "Secret." NEVER share this. It stays on the device that created it.
- Public Key: The "Lock." You MUST share this with the other device.
Think of it like a mailbox. You give the Public Key (the mailbox address) to your server so it can send you mail. But only you have the Private Key (the mailbox key) to open it.
🛡️ The "Who Gets What" Cheat Sheet
This table saves lives. Refer to it during setup.
| Key Type | Generated On... | Goes Into... | Status |
| Server Private Key | OPNsense | OPNsense (Instance Config) | SECRET 🛑 |
| Server Public Key | OPNsense | Your Phone/Laptop (Client Config) | SHARE ✅ |
| Phone Private Key | Your Phone | Your Phone App | SECRET 🛑 |
| Phone Public Key | Your Phone | OPNsense (Peer Config) | SHARE ✅ |
| Pre-Shared Key (PSK) | OPNsense | BOTH OPNsense & Phone | SHARE ✅ |
What is a Pre-Shared Key (PSK)?
It is an optional (but highly recommended) second password. It adds a layer of symmetric encryption to protect against future quantum-computing attacks. If you use it, both sides need the exact same PSK.
Using a Pre-Shared Key (PSK) in WireGuard provides a specific and powerful layer of protection against future quantum computing attacks.
Here is the breakdown of how that works and exactly what happens to your encryption when you enable it.
1. How does a PSK stop a Quantum Computer?
Quantum computers are theoretically terrifying because they are exceptionally good at specific types of math—specifically, the math used in Asymmetric Encryption (Public/Private keys).
- The Threat (Shor's Algorithm): Standard WireGuard uses the Curve25519 elliptic curve for its handshake. A sufficiently powerful quantum computer could run Shor's Algorithm to derive your Private Key just by looking at your Public Key.
- The Consequence: If an adversary (like a nation-state) is recording your encrypted traffic today ("Harvest Now"), they could store it for 10 years until they have a quantum computer, crack your Private Key, and then decrypt all that old traffic ("Decrypt Later").
Enter the PSK.
A Pre-Shared Key is Symmetric Encryption. It is just a 256-bit string of random noise.
- The Defense: Quantum computers are not magical. They are bad at breaking symmetric keys (guessing passwords). The best algorithm they have for this (Grover's Algorithm) essentially just halves the effective bit-strength.
- The Math: If you have a 256-bit PSK, a quantum computer attacks it as if it were a 128-bit key. 128-bit keys are still considered unbreakable.
So, the logic is: Even if the Quantum Computer breaks the complex Elliptic Curve math (Asymmetric) and steals your keys, it still cannot decrypt the traffic because it doesn't know the PSK (Symmetric). Since the PSK was never sent over the wire (it was pre-shared), the computer cannot derive the final session key.
2. Does this change WireGuard to "Symmetric Encryption"?
No. It creates a Hybrid.
WireGuard always uses Symmetric Encryption (ChaCha20-Poly1305) to transfer your actual file data because it is fast.6 The question is: How do two devices agree on the symmetric key to use for that session?
- Scenario A: No PSK (Standard)
- Handshake: Asymmetric (Curve25519). I use my Private Key and your Public Key to mathematically agree on a session key.
- Vulnerability: If my Private Key is cracked (by Quantum), the session key is revealed.
- Scenario B: With PSK (Hybrid)
- Handshake: Asymmetric (Curve25519) + Symmetric (PSK).
- The Process: WireGuard performs the standard math to generate a key, but then it mixes the PSK into that calculation using a hashing function (Blake2s).
- The Result:
Final Session Key = Math(Public/Private Keys) + PSK. - Security: To find the Session Key, an attacker needs BOTH the Private Key (Vulnerable to Quantum) AND the PSK (Resistant to Quantum). Missing either one results in garbage data.
Recommendation: For a homelab setup, enabling PSK is "free" security. Since you control both the server (OPNsense) and the client (your phone), there is no downside to adding that extra layer of quantum armour.
| Feature | Without PSK | With PSK |
| Handshake Encryption | Asymmetric Only (Curve25519) | Hybrid (Curve25519 + Symmetric PSK) |
| Data Transport | Symmetric (ChaCha20) | Symmetric (ChaCha20) |
| Quantum Threat | Vulnerable (Traffic recorded today can be decrypted in the future) | Resistant (Traffic recorded today remains secure) |
| Key Management | Easier (Just exchange Public Keys) | Harder (Must securely share the secret PSK out-of-band) |
🚧 Step 0: The Cloudflare "Orange Cloud" Trap
If you use Cloudflare for your DNS, you likely have the "Orange Cloud" (Proxy) turned on.
This kills WireGuard. Cloudflare's free proxy only handles HTTP/HTTPS (Web traffic). It drops WireGuard's UDP traffic instantly.
The Fix:
- Go to your Cloudflare Dashboard -> DNS.
- Create a new A-Record specifically for your VPN (e.g.,
vpn.corelab.tech). - Point it to your homelab/target IP.
- Turn OFF the Proxy (Click the Orange Cloud so it turns Grey / "DNS Only").

Now, when you configure your WireGuard clients later, you will use vpn.corelab.tech as the Endpoint, not your main root domain.
If on v25.x, you need to install the plugin for wireguard. If you're on v26.x, skip!
🛠️ Step 1: Install the Plugin
- Log in to OPNsense.
- Go to System > Firmware > Plugins.
- Search for
os-wireguard. - Click Install (+ button).
- Refresh the page. You will now see VPN > WireGuard in the menu.
⚙️ Step 2: Configure the OPNsense "Instance" (The Server)
We need to create the server itself. In OPNsense, this is called a Local configuration.
- Go to VPN > WireGuard > Instances.
- Click the + button to add a new instance.
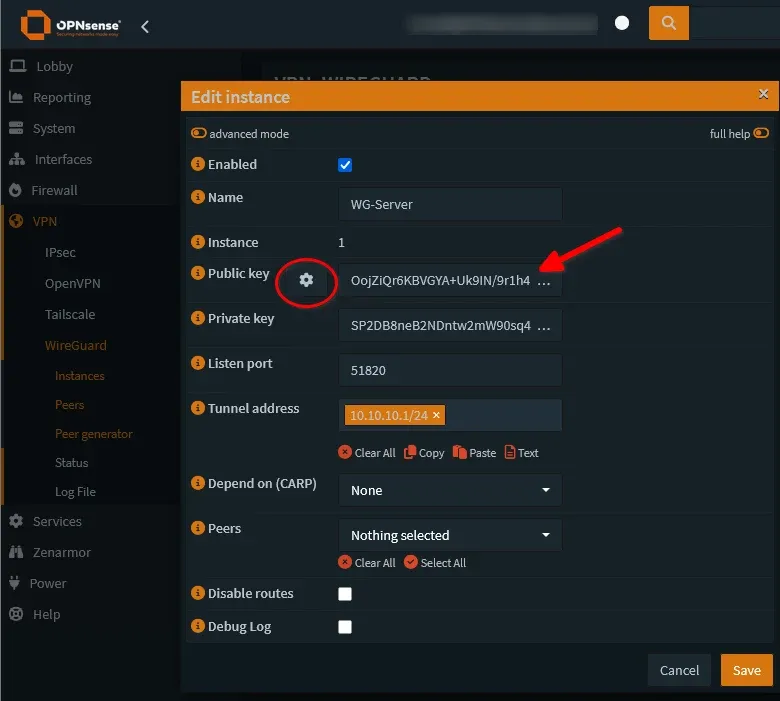
- Name:
WG-Serveror what you'd like to name it. Mine isWGRWfor wireguard road warrior. - Public Key / Private Key: Leave blank for a second. Click the Gear Icon (Generate) next to the field. It will auto-fill both keys.
- Action: Copy the Public Key to a notepad. You will need this for your phone or laptop later. You will re-use this public key for each 'client' you attach to this wireguard server instance.
- Listen Port:
51820(The standard WireGuard port). You will increment this by one or change it if you add another WG server. - Tunnel Address:
10.10.10.1/24- Note: This is a virtual internal network for the VPN. It must NOT‼️ match your actual LAN (e.g., if your LAN is 192.168.1.x, do NOT use that here).
- Peers: Leave blank for now (we haven't created them yet).
- Click Save.
It'll look like this:
📱 Step 3: Create the Client "Peer" (Your Phone)
Now we tell OPNsense who is allowed to connect.
- On your Android/iOS Phone:
- Download the official WireGuard app.
- Open it -> + -> Create from scratch.
- Click Generate to make a Private/Public key pair.
- Action: Copy the Public Key from the phone app. (Send it to yourself via Signal/Email, or type it carefully or send it via another secure means).
- Back on OPNsense:
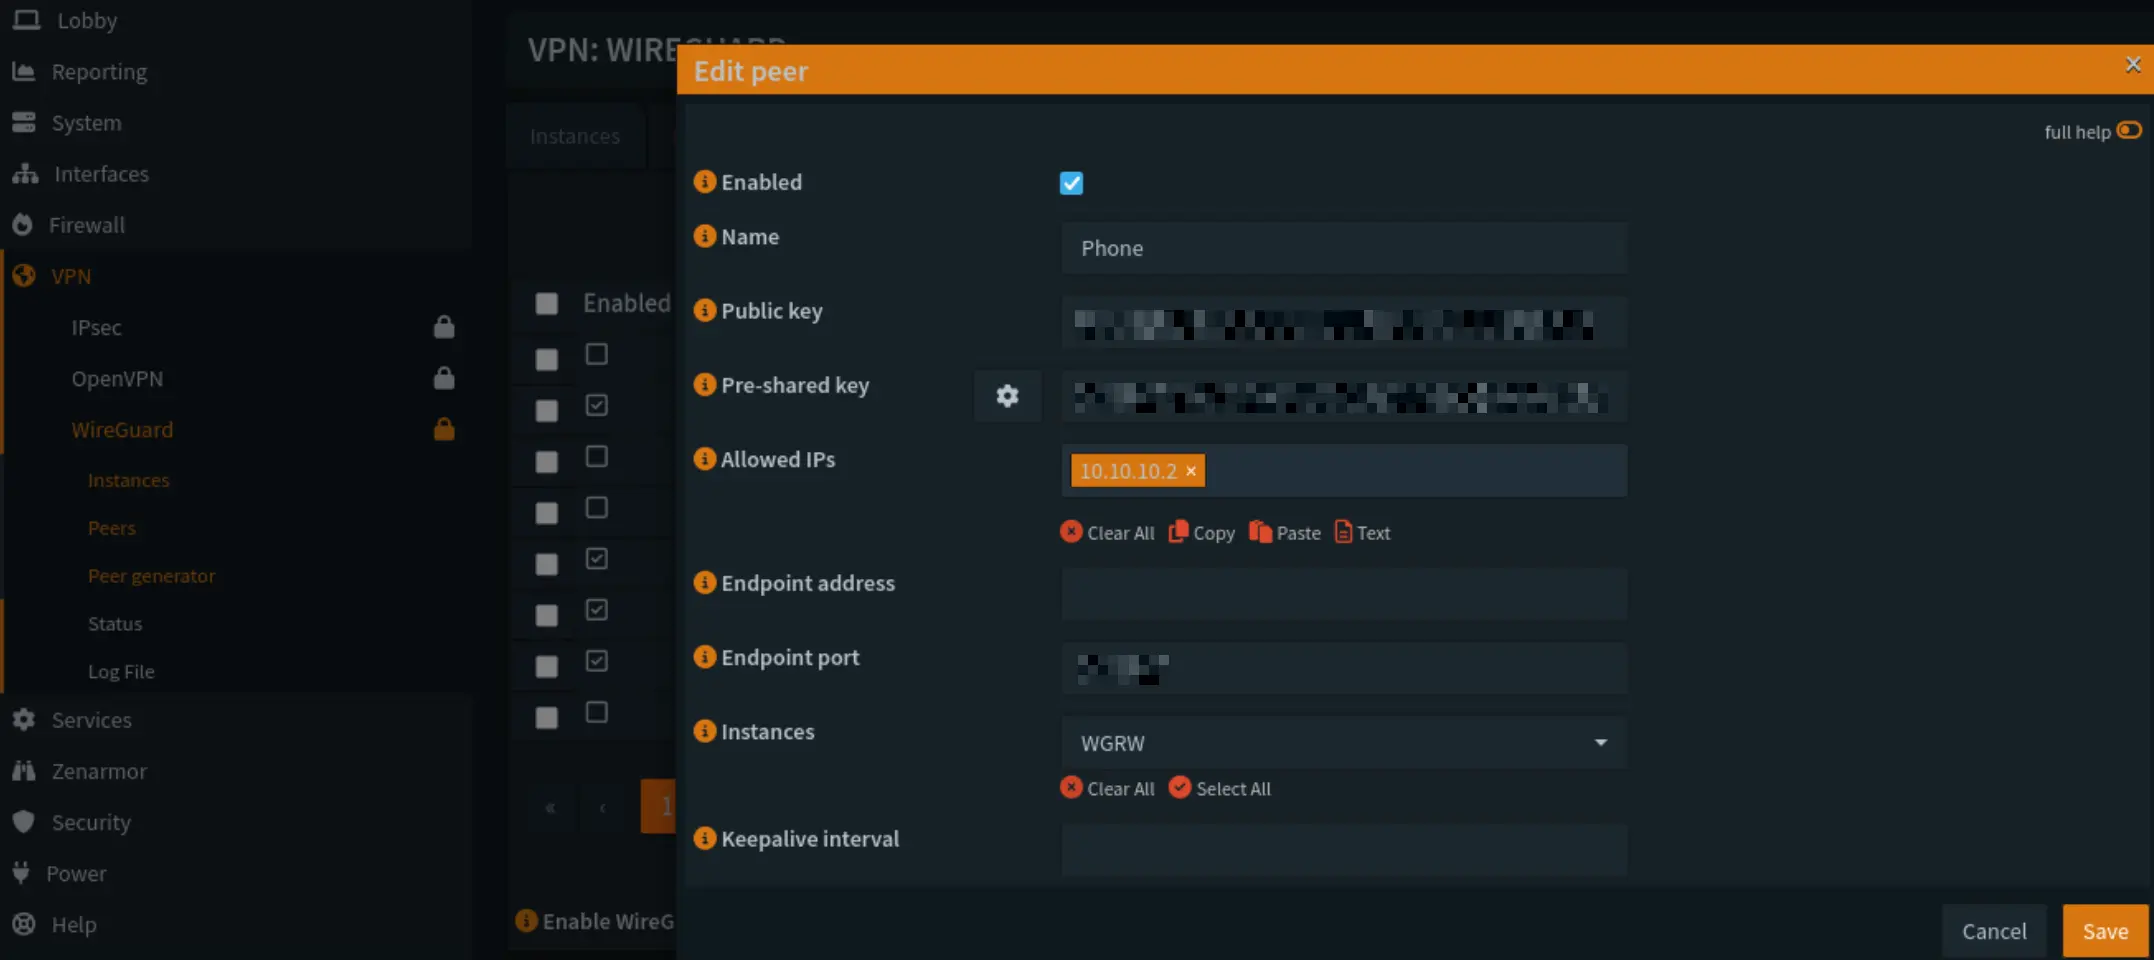
- Go to VPN > WireGuard > Peers.
- Click +.
- Name:
MyPhone - Public Key: Paste the Phone's Public Key here.
- Pre-Shared Key: Click the Gear Icon to generate one. Copy this! You need to put it on the phone later. C'mon, don't you want to be able to say you've already beat quantum decryption?!
- Allowed IPs:
10.10.10.2/32- Critical: This assigns a specific, single IP address to your phone inside the tunnel.
- Click Save.
- Link the Peer to the Server:
- Go back to VPN > WireGuard > Instances.
- Edit your
WG-Serverinstance. - In the Peers dropdown, check the box for
MyPhone. - Click Save.
- Enable WireGuard:
- Go to VPN > WireGuard > General.
- Check Enable WireGuard.
- Click Apply.
Should look like this:
🔌 Step 4: Interface & Firewall Rules (Opening the Gates)
WireGuard is running, but the firewall blocks everything by default. Yay your firewall is working - but damn...
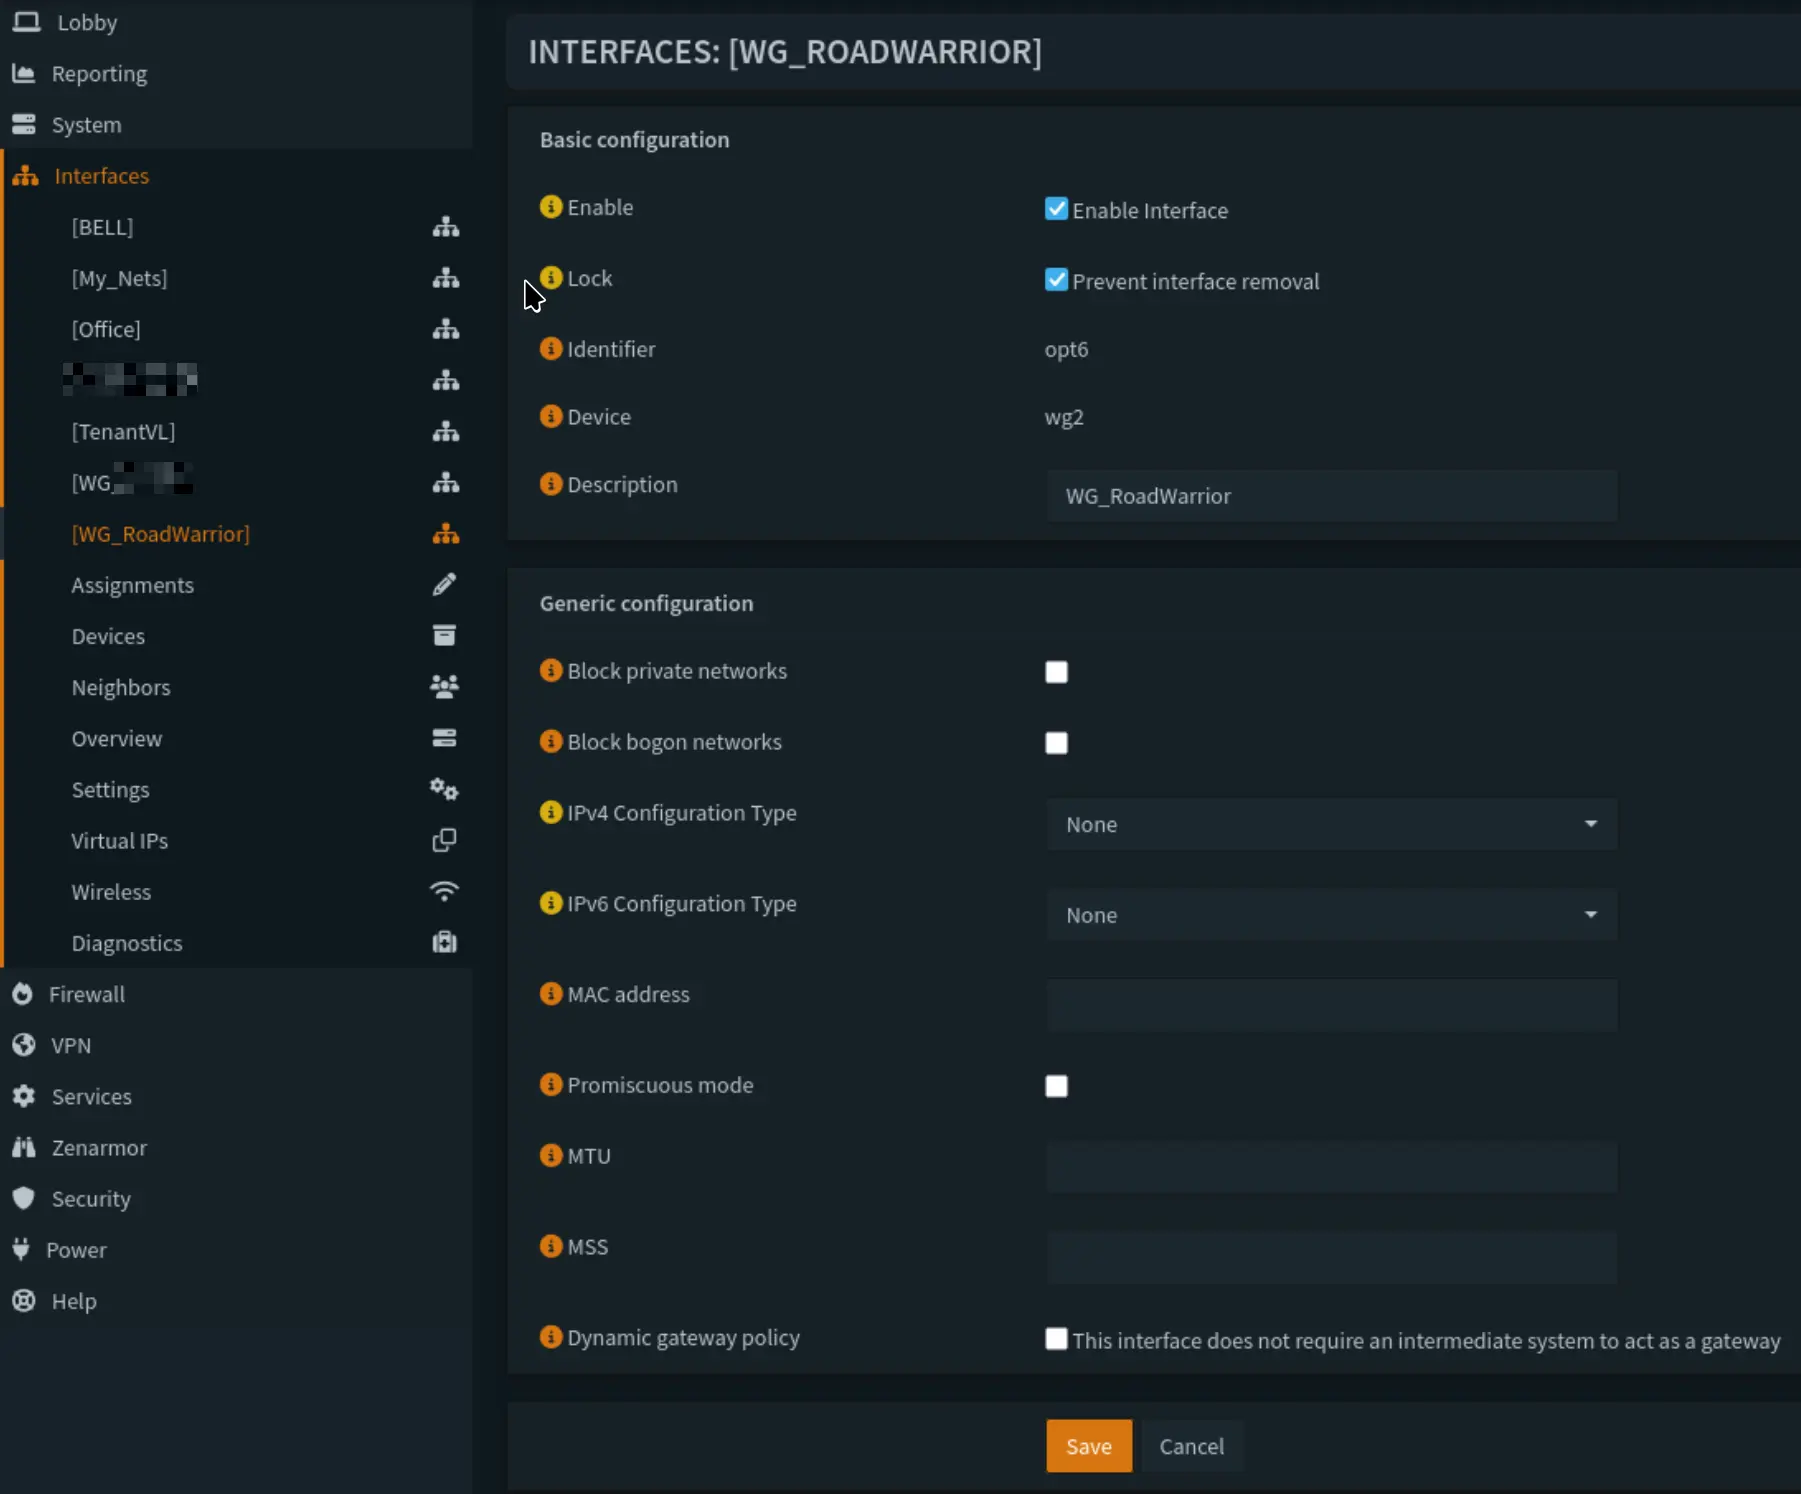
A. Assign the Interface
- Go to Interfaces > Assignments.
- You will see a new device
wg0(or similar). - Add a description:
VPN_WG. - Click + to add it.
- Click on the new
VPN_WGinterface name in the left menu. - Enable Interface: Checked.
- IPv4 Configuration: None (It gets the IP from the Instance config).
- Lock: Checked (Prevents interface removal).
- Save & Apply.
B. Allow the Handshake (WAN Rule)
We need to let the phone "knock" on the front door, or it'll never establish the tunnel.
- Go to Firewall > Rules > WAN.
- Click +.
- Protocol:
UDP(WireGuard is UDP only!). - Destination:
WAN address. - Destination Port Range:
51820to51820. - Description:
Allow WireGuard Inbound. - Save & Apply.
TL;DR = Only a 0 day Wireguard exploit is getting through here, and in this case, we're all F*cked!
C. Allow Traffic Inside the Tunnel (WG Rule)
Once the phone is connected, we need to let it access things.
- Go to Firewall > Rules > VPN_WG (or whatever you named it).
- Click +.
- Action:
Pass. - Source:
VPN_WG net(or the specific IP10.10.10.0/24). - Destination:
any(This gives the phone access to the internet AND your LAN).- Security Tip: If you only want the phone to access your LAN but NOT use your home internet bandwidth, create more specific rules here.
- Save & Apply.
D. The Outbound NAT (Crucial for Internet Access)
If you want to browse the internet through your VPN (so you look like you are at home), you need NAT.
- Go to Firewall > NAT > Outbound.
- Ensure you are in Hybrid or Manual mode. (Hybrid is best). I've personally never found a reason to set it to fully manual mode.
- Click +.
- Interface:
WAN. - Source Address:
10.10.10.0/24(Your WireGuard Network). - Translation / Target:
Interface address. - Description:
NAT for WireGuard. - Save & Apply.
📲 Step 5: Final Client Configuration
Now, fill in the blanks on your client devices and you'll be ready to test.
Android Setup
Go back to the entry you started on your phone.
- Interface Section:
- Private Key: (Already there).
- Public Key: (This is your phone's public key).
- Addresses:
10.10.10.2/32(The IP you assigned in OPNsense Peers). - DNS Servers:
1.1.1.1(Or your Pi-hole IP192.168.1.xif you want ad-blocking!).
- Peer Section (The OPNsense Server):
- Public Key: Paste the OPNsense Server Public Key (from Step 2).
- Pre-Shared Key: Paste the PSK you generated in Step 3.
- Endpoint:
vpn.corelab.tech:51820(Your Cloudflare Grey Cloud domain). - Allowed IPs:
0.0.0.0/0(This routes ALL traffic through the VPN).
Windows Setup
Install the WireGuard client. Click "Add Empty Tunnel". Paste this config (Edit the placeholders!):
[Interface]
PrivateKey = <Paste Windows Private Key Here>
Address = 10.10.10.3/32
DNS = 1.1.1.1

[Peer]
PublicKey = <Paste OPNsense Server Public Key Here>
PresharedKey = <Paste PSK Here>
Endpoint = vpn.corelab.tech:51820
AllowedIPs = 0.0.0.0/0
🕵️ Troubleshooting: The "Handshake"
The most common error in WireGuard is Silence. Because it is UDP, if the keys are wrong or the firewall is blocked, it won't give you an error message. It just... won't work.
- Check the Handshake:In OPNsense, go to VPN > WireGuard > Status. Look for your Peer.
- Handshake: "2 minutes ago" or similar = SUCCESS. ✅
- Handshake: "0" or (nothing) = FAILURE. ❌
If all goes well, it should look like this:

- If it fails:
- Check Keys: Did you accidentally swap the Server Public Key and Client Public Key? (Refer to the table at the top!).
- Check Cloudflare: Is that "Orange Cloud" turned off?
- Check WAN Firewall: Is Protocol set to UDP (not TCP)?
- Check Peer IP: Does the
Allowed IPson the client (10.10.10.2/32) match theAllowed IPsinside the OPNsense Peer config? They must match exactly.


Member discussion