
Secure Jellyfin with HTTPS: Reverse Proxy Guide (SWAG, NPM & Traefik)
You've got something to run as a server, you've got your Jellyfin all setup. Your library is scanned, your metadata is polished, and your local playback is flawless.
Want to access your Jellyfin server from anywhere - without exposing it to the entire internet?
Opening port 8096 might seem like the easy solution, but it leaves your server wide open:
- ❌ No HTTPS encryption (your data travels in plain text)
- ❌ Your public IP is exposed to bots and scanners
- ❌ Login credentials can be intercepted
There’s a better way...
The solution is a Reverse Proxy.
This guide shows how to securely expose Jellyfin using a reverse proxy with HTTPS.
What Is a Reverse Proxy? (and Why Jellyfin Needs One)🤔
Exposing Jellyfin directly to the internet (opening port 8096) is a security nightmare. Your traffic is unencrypted, your passwords are sent in plain text, and your server IP is visible to every bot scanner on the web.

A reverse proxy sits between the internet and your Jellyfin server, acting as a secure gateway:
- 🔒 Encrypts traffic with HTTPS (SSL/TLS)
- 🌐 Routes your domain (e.g., jellyfin.yourdomain.com)
- 🛡️ Hides your internal network and server IP
Reverse proxies have been around since the mid 1990's and have been powering the entire internet since then, and well into today. If you're accessing any website (including this one!) you're literally going through a reverse proxy. Roughly
There's also a firewall not shown in the graphic above, but that would sit in front of the reverse proxy as well. The firewall & reverse proxy also have additional security features like brute force protection, IDS/IPS, web application filtering etc, to make an entire security stack, eyeballing all ingress traffic!
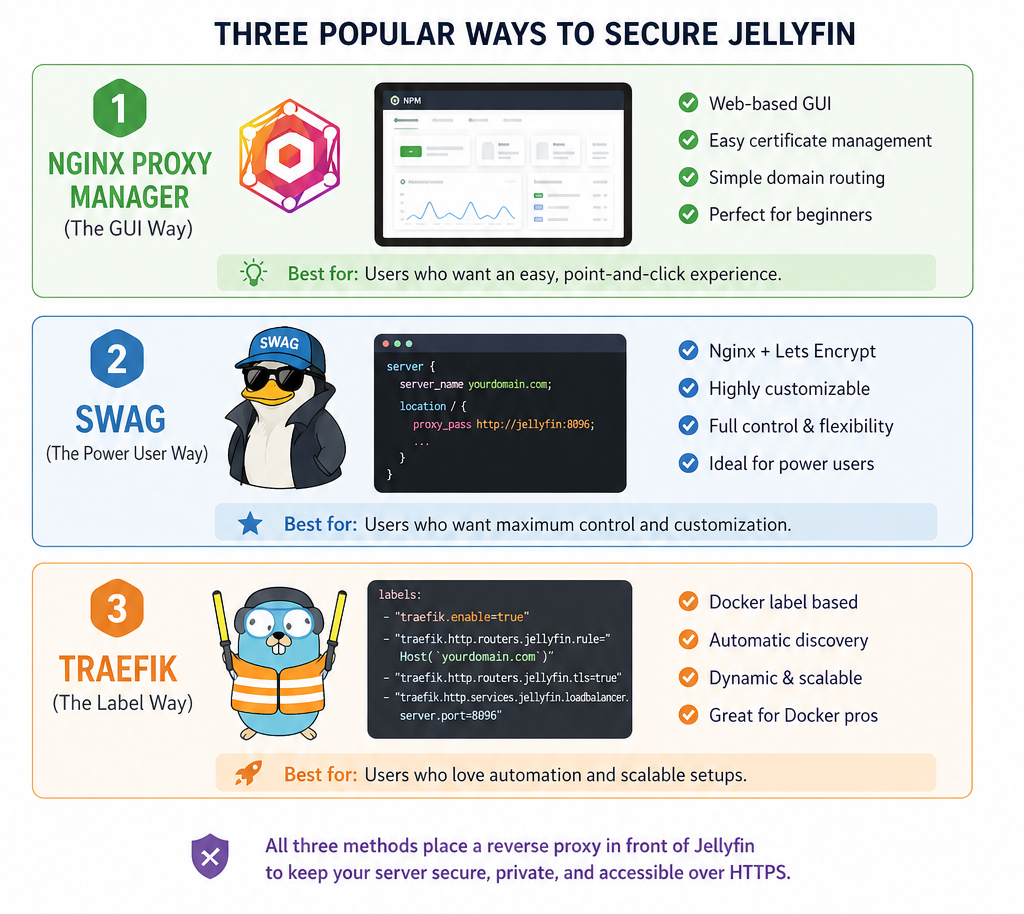
In this guide, you’ll learn how to securely expose Jellyfin using three proven reverse proxy setups:
- Nginx Proxy Manager → simple, visual, beginner-friendly
- SWAG (NGINX) → powerful, secure, highly customizable
- Traefik → fully automated, Docker-native routing
By the end, you’ll have a secure, encrypted Jellyfin server you can access from anywhere- without putting your network at risk.
📋 Prerequisites
Before you start, ensure you have the following ready. If you are missing these, check my guides.
If you don't know if you're behind CGNAT, here's a 1 liner to tell you -
curl -sL https://corelab.tech/audit.sh | bashSign up for Core Labs and get my Server Hardening Script 😀
- A Domain Name: You need a real domain (e.g.,
myflix.com), not just an IP address. Buy one from wherever you can find a domain name cheap! Sometimes you can get them for $5 a year. I use Hover a lot, and Cloudflare sometimes. - DNS Records: An
A RecordorCNAMEpointingjellyfin.yourdomain.comto your home WAN IP. If you need to set this up check this Cloudflare guide out. - Port Forwarding: Ports 80 (HTTP) and 443 (HTTPS) must be forwarded from your router/firewall to your server's local IP. Do NOT forward 8096❗
- Docker Network: Create a dedicated bridge network so your proxy can "talk" to Jellyfin as they will both be dockers. Read up on docker networks on my docker compose guide if needed.
- Something to run all this on, as a server. Click this link for [Media Server Hardware Builds].
- A reverse proxy! (Instructions below)
- Put your trusted proxy into the Jellyfin settings as per:


Have you ever wished you could start a library scan, reset a user's password or see when your download will be completed right from the comfort of your own couch? Here's the mobile Jellyfin management app for you!
⚓ Prepare Your Jellyfin Network (Universal Step)
No matter which proxy you choose, your Jellyfin container needs to be on the right network. If it's on host networking, that's fine but if your reverse proxy is not, you'll need to make some modifications to allow them to talk to each other.
Three Options, starting with simple to most complex:
- Put them on the same docker network (user defined bridge, default) or;
- Put them both on host mode network or;
- If one is on host networking and another in a docker network, you'll have to make a 'shim' network between the docker network and your host for them to talk.
If you're just starting out, option 1 or 2 is what I suggest! Setting up MACVLAN or IPVLAN docker networking is over here.
Reverse proxies like NGINX are widely trusted and battle-tested, but proper network segmentation adds an extra layer of protection.
Ultimate Security Guide - Advanced!
If you want the most security you can, hosting services at home, you need to put your reverse proxy in it's own VLAN (Think DMZ).
This way, if your proxy is hacked/bypassed etc, the attacker is 'stuck' in only that VLAN with no other services exposed. They would have to then hack through your firewall to break out of that VLAN. This is known as "attack surface reduction" and is very widely used across Corporate, Industry and Government networks.
How do I do this you ask?
The "True DMZ" (Macvlan + Firewall Routing)
- Setup:
- SWAG is on a
macvlannetwork on VLAN 50 (DMZ). It has NO other interfaces. - Jellyfin is on the Host network or a separate VLAN 10 (Trusted).
- Connection: SWAG sends traffic to its "Default Gateway" (OPNsense). OPNsense has a Firewall Rule allowing
DMZ -> Server_VLAN (Port 8096). - Obviously this means you must have a firewall/router capable of doing the job.
- SWAG is on a
- Security Level: Maximum (Enterprise Grade).
- The Big Win:
- IPS/IDS: Your OPNsense (Suricata) can inspect the traffic between Nginx and Jellyfin. It sees the internal request.
- Segmentation: If SWAG is hacked, the attacker is trapped in VLAN 50. They cannot see Jellyfin or your NAS unless they can defeat your OPNsense firewall rules.
This is the best way to protect your internal services from the outside world while still serving things publicly!
Edit your existing Jellyfin docker-compose.yml to set it up with the network scheme you've planned thus far and fire it backup!
Recreate the container: docker compose up -d.
Choose Your Reverse Proxy Solution
🟢 Nginx Proxy Manager (Easy GUI Option)
Best for: Beginners who want a visual dashboard.
If you haven't set up NPM yet, do that first. I'll write a guide for NPM at some point ;)
Configuration Steps
- Login to NPM: Navigate to
http://your-server-ip:81. - Add Proxy Host: Click Proxy Hosts -> Add Proxy Host.
- Details Tab:
- Domain Names:
jellyfin.yourdomain.com - Scheme:
http(Not https - the proxy handles encryption!) - Forward Host:
jellyfin(This works because they are on the same Docker network). - Forward Port:
8096 - Options: Check Block Common Exploits and Websockets Support (Critical for syncing play states).
- Domain Names:
- SSL Tab:
- SSL Certificate: Request a new Let's Encrypt certificate.
- Force SSL: YES (This redirects HTTP to HTTPS automatically).
- HTTP/2 Support: YES.
- Save.
Go to https://jellyfin.yourdomain.com. You should see the login screen with a secure padlock.
🛡️ SWAG (Power User Nginx Setup)
Best for: Users who want built-in security (Fail2Ban & CrowdSec) and don't require a GUI. Automated certificate enrollment & renewals as well, and Authelia integration for MFA!
SWAG is currently serving this site, my Jellyfin instance, and is my favorite reverse proxy by far.
SWAG (Secure Web Application Gateway) by LinuxServer.io is Nginx on steroids. It comes with pre-written configuration files for almost every app in existence.
SWAG includes a template for Jellyfin. You just need to turn it on. For detailed setup guide on SWAG hop on this link:
- Navigate to your SWAG config folder:
/opt/appdata/swag/nginx/proxy-confs/. - Find the file
jellyfin.subdomain.conf.sample. - Rename it to
jellyfin.subdomain.conf(remove the.sample). This is done by doing a 'move' command:mv /opt/appdata/swag/nginx/proxy-confs/jellyfin.subdomain.conf.sample /opt/appdata/swag/nginx/proxy-confs/jellyfin.subdomain.conf - Restart SWAG:
docker restart swag.
That's it. SWAG detects the file, reads the pre-optimized Nginx rules, and starts serving jellyfin.yourdomain.com.
For those who run a different type of NGINX, here's the optimized sample config:
## Version 2025/07/18
# make sure that your jellyfin container is named jellyfin
# make sure that your dns has a cname set for jellyfin
# if jellyfin is running in bridge mode and the container is named "jellyfin", the below config should work as is
# if not, replace the line "set $upstream_app jellyfin;" with "set $upstream_app <containername>;"
# or "set $upstream_app <HOSTIP>;" for host mode, HOSTIP being the IP address of jellyfin
# in jellyfin settings, under "Advanced/Networking" add subdomain.mydomain.tld as a known proxy

server {
    listen 443 ssl;
#    listen 443 quic;
    listen [::]:443 ssl;
#    listen [::]:443 quic;

    server_name jellyfin.*;

    include /config/nginx/ssl.conf;

    client_max_body_size 0;

    location / {
        include /config/nginx/proxy.conf;
        include /config/nginx/resolver.conf;
        set $upstream_app jellyfin;
        set $upstream_port 8096;
        set $upstream_proto http;
        if ($http_user_agent ~ Web0S) {
            add_header Access-Control-Allow-Origin "luna://com.webos.service.config" always;
        }
        proxy_pass $upstream_proto://$upstream_app:$upstream_port;

        proxy_set_header Range $http_range;
        proxy_set_header If-Range $http_if_range;
    }

    location ~ (/jellyfin)?/socket {
        include /config/nginx/proxy.conf;
        include /config/nginx/resolver.conf;
        set $upstream_app jellyfin;
        set $upstream_port 8096;
        set $upstream_proto http;
        if ($http_user_agent ~ Web0S) {
            add_header Access-Control-Allow-Origin "luna://com.webos.service.config" always;
        }
        proxy_pass $upstream_proto://$upstream_app:$upstream_port;

    }

    # Restrict access to /metrics
    # https://jellyfin.org/docs/general/networking/monitoring/#prometheus-metrics
    location /metrics {
        allow 192.168.0.0/16;
        allow 10.0.0.0/8;
        allow 172.16.0.0/12;
        allow 127.0.0.0/8;

        deny all;

        include /config/nginx/proxy.conf;
        include /config/nginx/resolver.conf;
        set $upstream_app jellyfin;
        set $upstream_port 8096;
        set $upstream_proto http;
        proxy_pass $upstream_proto://$upstream_app:$upstream_port;
    }
}
If you'd like to enable QUIC support, uncomment the lines at the very top, and ensure port 80 is open to your reverse proxy as well!
Raw link to that, for the latest example from SWAG: https://github.com/linuxserver/reverse-proxy-confs/blob/master/jellyfin.subdomain.conf.sample
🚀 SWAG Performance & Security Optimizations
Now that your green lock is active, it’s time to squeeze every bit of performance and security out of SWAG. We’re going to focus on two major upgrades: HSTS (to lock down the connection) and QUIC/HTTP3 (to make Jellyfin feel instantaneous on mobile or high-latency networks).
1. Hardening with HSTS (Security)
By default, SWAG keeps HSTS (HTTP Strict Transport Security) disabled to prevent you from accidentally locking yourself out if you decide to kill your SSL certificate. But for a permanent setup, it’s a must.
The Fix:
- Open
/config/nginx/ssl.conf. - Find the line for
Strict-Transport-Securityand uncomment it:
add_header Strict-Transport-Security "max-age=15768000; includeSubDomains" always;WARNING: If you move away from / disable HTTPS, or lose your domain, browsers will refuse to connect for the length of this setting!
This tells browsers: "For the next 6 months, don't even try to talk to this domain over insecure HTTP."
2. Enabling QUIC & HTTP/3 (Performance)
Standard HTTPS runs over TCP. HTTP/3 runs over UDP, which is significantly faster for streaming because it handles "packet loss" much more gracefully - perfect for that 4K Jellyfin stream on a shaky 5G connection. It's 'lossy' which means if a packet drops, it ignores it and keeps blasting out the video stream!
Step A: Open the UDP Gates (Docker)
For HTTP/3 to work, your container must be able to receive UDP traffic on port 443.
- Standard Docker/Bridge Users: You must update your reverse proxy/SWAG
docker-compose.ymlto include the UDP port mapping:
ports:
  - 443:443/tcp
  - 443:443/udp # <-- Critical for QUIC
Macvlan Users: If you are running SWAG on a macvlan network (giving the container its own IP on your LAN), you can ignore the port mappings in your compose file. The container already has full access to its own interface.
Step B: The Header & The Listen Directive
- In
/config/nginx/ssl.conf, uncomment theAlt-Svcheader:
add_header Alt-Svc 'h3=":443"' always;
- Now, open your
/config/nginx/proxy-confs/jellyfin.subdomain.confand update thelistenlines to support the QUIC protocol:
server {
    listen 443 ssl;              # Standard TCP
    listen 443 quic reuseport;   # HTTP/3 UDP

    # ... rest of your config
}
Step C: The OPNsense Firewall (The "Gotcha")
If you are an OPNsense user, your existing WAN rule probably only allows TCP 443 to your reverse proxy.
- Navigate to Firewall > Rules (new) > WAN.
- Find your HTTPS rule and change the protocol from
TCPtoTCP/UDP. Without this, the UDP packets will be dropped at the perimeter, and your server will fallback to the slower HTTP/2.
🛠️ Verification: Did it work?
Don't just take my word for it. Let’s verify the "Blue Team" way:
- The Header Check: Head over to https://securityheaders.com/ and then https://ssllabs.com/ssltest/ scan your domain. If you enabled HSTS correctly, your grade should jump significantly!
- The Protocol Check:
- Open Jellyfin in Chrome or Edge.
- Press F12 and go to the Network tab.
- Right-click the table header and check the Protocol column.
- If you see h3, you are officially living in the future. If it says h2, re-check your UDP port mappings and firewall rules.
🚦 Traefik (Docker Label-Based Routing)
Best for: Docker users who want automation and scalability.
Unlike Nginx-based setups, Traefik doesn’t rely on config files.
Instead, it watches your Docker containers and automatically routes traffic using labels.
This means:
- No manual proxy configs
- No per-app Nginx files
- Just spin up a container → it’s live with HTTPS
🧠 How Traefik Works (Quick Mental Model)
With Traefik, your routing is defined like this:
- Router → “Which domain?”
- Service → “Which container + port?”
- Middleware → “Any rules (redirects, headers, auth)?”
All of that is defined via Docker labels.
🧱 Minimal Working Docker Compose (Traefik + Jellyfin)
This is a clean, modern, working baseline using:
- Docker provider
- Let’s Encrypt (HTTP challenge)
- Single shared network
📁 docker-compose.yml
📄 View Full YAML Configuration (Click to Expand)
version: "3.8"

networks:
  proxy:
    name: proxy
    driver: bridge

services:
  traefik:
    image: traefik:v2.11
    container_name: traefik
    restart: unless-stopped

    command:
      - "--api.dashboard=true"
      - "--api.insecure=false"

      # Docker provider
      - "--providers.docker=true"
      - "--providers.docker.exposedbydefault=false"
      - "--providers.docker.network=proxy"

      # Entry points
      - "--entrypoints.web.address=:80"
      - "--entrypoints.websecure.address=:443"

      # Redirect HTTP → HTTPS
      - "--entrypoints.web.http.redirections.entrypoint.to=websecure"
      - "--entrypoints.web.http.redirections.entrypoint.scheme=https"

      # Let's Encrypt
      - "[email protected]"
      - "--certificatesresolvers.le.acme.storage=/letsencrypt/acme.json"
      - "--certificatesresolvers.le.acme.httpchallenge.entrypoint=web"

    ports:
      - "80:80"
      - "443:443"

    volumes:
      - "/var/run/docker.sock:/var/run/docker.sock:ro"
      - "./letsencrypt:/letsencrypt"

    networks:
      - proxy

  jellyfin:
    image: jellyfin/jellyfin
    container_name: jellyfin
    restart: unless-stopped

    networks:
      - proxy

    volumes:
      - ./config:/config
      - ./cache:/cache
      - ./media:/media

    labels:
      - "traefik.enable=true"

      # Router
      - "traefik.http.routers.jellyfin.rule=Host(`jellyfin.yourdomain.com`)"
      - "traefik.http.routers.jellyfin.entrypoints=websecure"
      - "traefik.http.routers.jellyfin.tls.certresolver=le"

      # Service (IMPORTANT)
      - "traefik.http.services.jellyfin.loadbalancer.server.port=8096"
⚠️ Critical Things People Mess Up (Read This)
This is where most Traefik setups fail:
1. ❌ Forgetting the service port
You must define:
traefik.http.services.jellyfin.loadbalancer.server.port=8096
Jellyfin does NOT run HTTPS internally—only HTTP on 8096.
2. ❌ Not using a shared Docker network
Traefik and Jellyfin must be on the same network:
networks:
- proxy
Traefik routes container-to-container, not via host IP.
3. ❌ Exposing port 8096 publicly
Don’t do this:
ports:
- "8096:8096"
That bypasses your proxy and defeats the entire point.
4. ❌ No real domain
Let’s Encrypt requires a public domain pointing to your server.
🧪 Test It
After running:
docker compose up -d
Visit:
https://jellyfin.yourdomain.com
You should get:
- ✅ Valid HTTPS certificate
- ✅ Jellyfin login page
- ✅ No exposed internal ports
⚠️ Common Jellyfin Reverse Proxy Issues (Fixes)
Setting up the proxy is only half the battle. If your TV or Phone app can't connect, check these settings inside the Jellyfin Dashboard.
1. Allow Remote Connections
Go to Dashboard -> Networking.
Ensure "Allow remote connections to this server" is checked. If this is off, Jellyfin will reject any traffic that doesn't originate from 192.168.x.x (which includes your proxy!).
2. Known Proxies (The "X-Forwarded-For" Fix)
Sometimes, Jellyfin thinks all traffic is coming from the Proxy's IP (e.g., 172.18.0.2) rather than the real user's IP. This breaks bandwidth limiting and logging.
- In Dashboard -> Networking -> Known Proxies:
- Add the IP range of your Docker network (e.g.,
172.18.0.0/16) or the specific Gateway IP of your proxy container.
3. HTTPS Settings (Important!)
First - in the Jellyfin Advanced/Networking tab, you will see fields for "Certificate Path" and "HTTPS Port".
Second - Advanced/Networking add subdomain.mydomain.tld as a known proxy.
Your Reverse Proxy is handling the HTTPS (TLS Termination). The traffic between the Proxy and Jellyfin should remain HTTP (Port 8096) to keep things fast and simple inside your LAN.
- Hamburger menu (top left)->Dashboard->Networking
You Here's what those settings look like:
You should also add your class C internal LAN subnet in the LAN networks setting too.
📱 Connect Jellyfin Apps Remotely
When you open the Jellyfin app on your Android TV, Roku, or iOS device, it will ask for a server address.
- Do NOT enter:
192.168.1.50:8096(This only works at home). - Do enter:
https://jellyfin.yourdomain.com.
Pro Tip: You do not need to add :443 to the end. HTTPS implies port 443 automatically.
Conclusion
You now have a globally accessible, fully encrypted media powerhouse.
- Used NPM? Enjoy the easy dashboard management.
- Used SWAG? Rest easy knowing Fail2Ban is watching your back.
- Used Traefik? Enjoy the automation as you spin up more services.
Now that your stream is secure, you're able to share it to fam & friends! Maybe it's time to upgrade your library storage or prepare for inevitable transcoding woes.

Another option, is mobile management of your new server! Say you're sitting on the couch and don't have a laptop handy, and don't want to pinch & squeeze and squint on your phone to trigger a library update? Check out JellyWatch!


Member discussion