
Cloudflare Protection for Homelabs: OPNsense, DDNS, & Wildcard Setup

I've been utilizing Cloudflare's DNS service since about 2017 or so. I discovered them when I was looking for ways to try to keep my young kids safe from the internet and stumbled upon their adult & malware filtering DNS service, for free!
Exposing self-hosted services to the internet is where many homelabs go from “fun project” to “potential disaster.”
You finally get Jellyfin, Authentik, Immich or Nextcloud working… then immediately run into:
- changing residential IP addresses
- SSL certificate headaches
- reverse proxy complexity
- bots hammering your login pages
- exposing your real home IP
The good news? Cloudflare Free Tier solves a shocking amount of this for free.
In this guide, I’ll show you how I use Cloudflare with OPNsense and a reverse proxy to:
- protect self-hosted services
- hide my origin IP
- automatically update DNS when my ISP changes IPs
- issue wildcard SSL certificates
- reduce exposure to bots and scans
- simplify ingress using wildcard DNS
All without paying Cloudflare a cent.
This is part 1 of Cloudflare Series, showcasing how to utilize Cloudflare's free services to securely allow ingress to your self-hosted services.
⚠️ Stop! Check your NAT status first. Before you spend 20 minutes on DNS, make sure your ISP actually allows inbound traffic. Run this one-liner in your terminal: curl -sL https://corelab.tech/audit.sh | bash
If you see "CGNAT Detected," you'll need my Tunneling Guide instead.
Cloudflare Free Tier Guides
Why Cloudflare is So Popular for Homelabs🤔
It's simple really, the price and features. Free is extremely compelling! Not only that, Cloudflare's business model is that of "Try before you buy!" to the extreme. You literally cannot find the same features they offer, for the price of free anywhere else.
The major compelling feature that homelabbers love is the Cloudflare orange cloud (proxy!) which allows you to 'hide' your real WAN IP from the internet.
If you turn off their orange cloud, you simply have DNS being served, no protections.
Understanding Modern Homelab Ingress
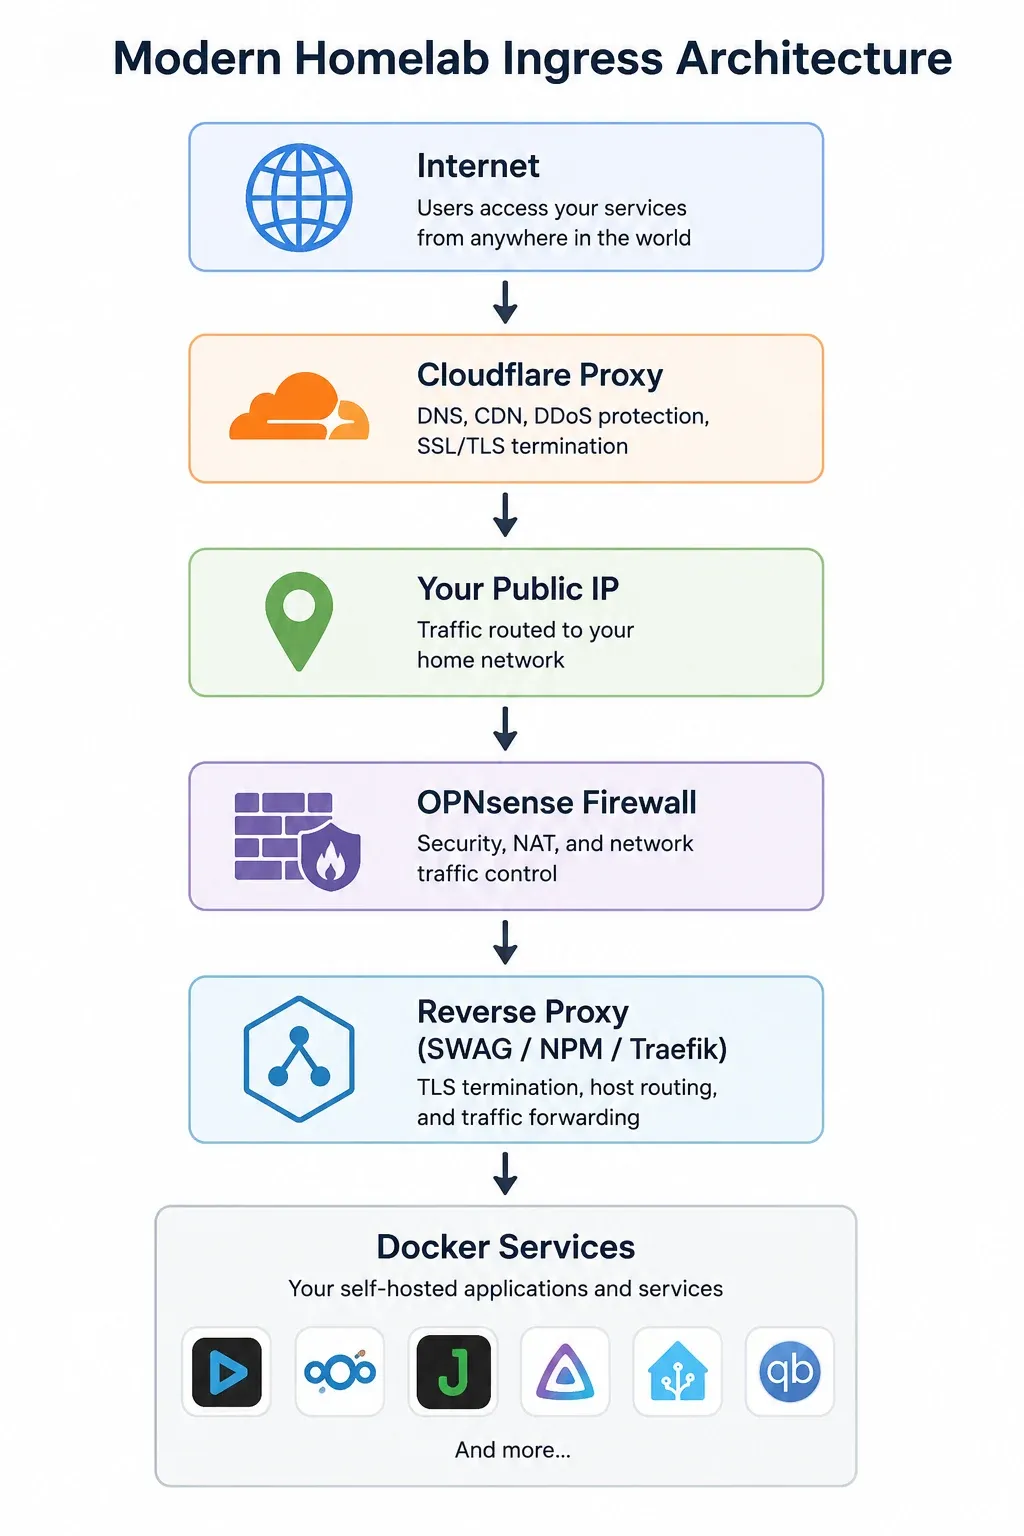
Utilizing Cloudflare for your ingress traffic instantly adds some layers to your cybersecurity posture. Hosting your DNS through them is like having a professional bouncer in the cloud, before anyone can even find your WAN interface IP! When configured correctly, you can utilize their free tier to introduce geo-ip filtering, bot scraping & training blocking, globally cached content for near-instant access and more.
CloudFlare CNAME Flattening & DDNS Tested With:
- OPNsense 26.x
- Plugin os-ddclient
- Cloudflare DNS
- Bell Fiber dynamic IP (Business version)
- SWAG reverse proxy
- In Canada
Cloudflare DNS-Only vs Proxied Records
You can use Cloudflare for only DNS, and no additional features as well. To be clear, if orange cloud is off - you are ONLY utilizing DNS from them, no additional security, proxy or WAF features.
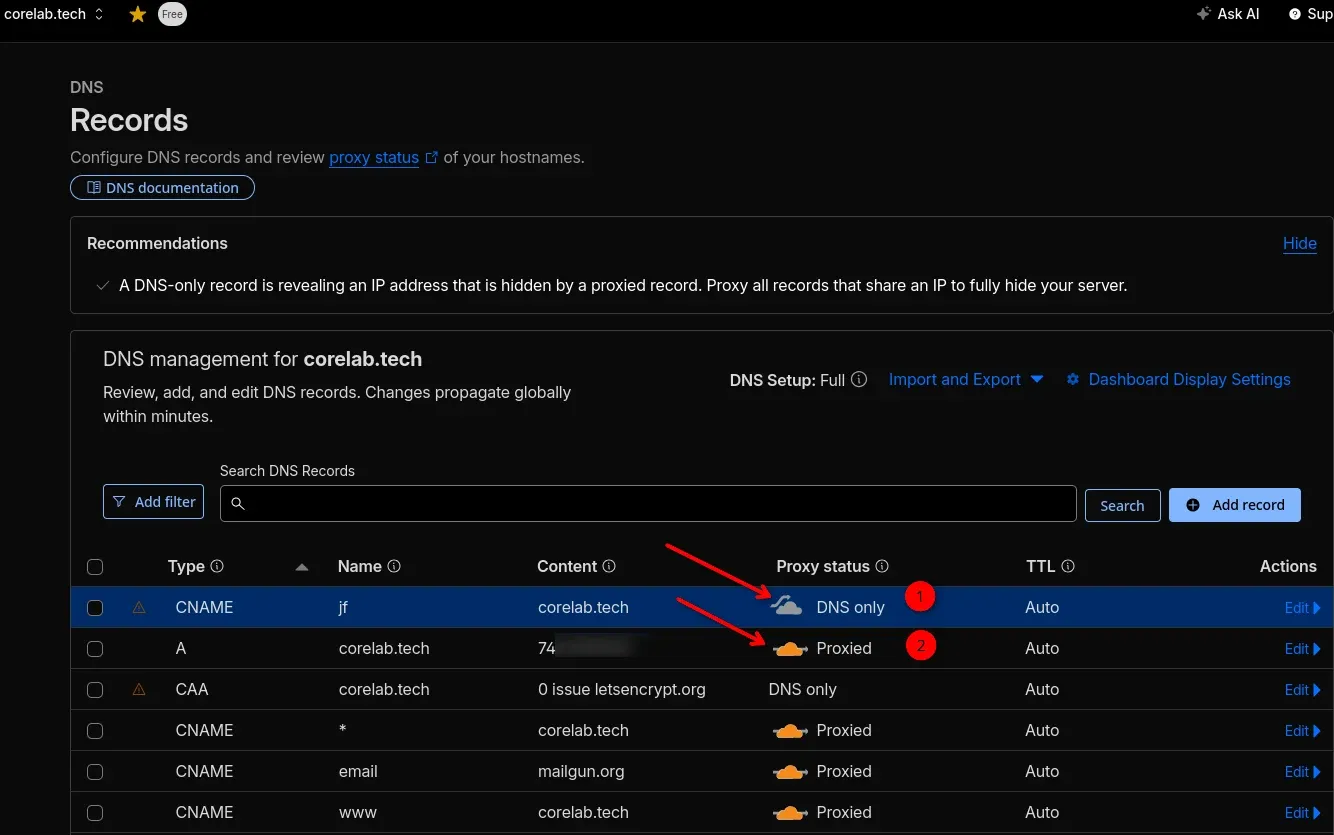
This is where you simply rely on your own layered defences to protect you. For example, my OPNsense firewall ruleset has a rule for that jf.corelab.tech shown as #1 above, that allows inbound traffic on a specific port, but ONLY from Canada. It's also then reverse-proxy served through SWAG, which means it has rate limiting, brute force (fail2ban) protection, and WAF via CrowdSec, PLUS all the other measures (known bad alias + dynamic blocklists!) that I have setup in my firewall.
This is a safe, effective and performant way to access your services, without breaking Cloudflare terms, or facing their limitations on a free tier!
Setting Up Your Domain in Cloudflare
Step 1: Create a Cloudflare Account
- Go to https://www.cloudflare.com/ and sign up for a free account. You’ll need to verify your email address. Here you'll need to do a little tech like changing your nameserver to Cloudflare (details below) if your domain registrar is different. For example mine was Hover.com where I originally purchased the domain, and I had to login there and change the DNS serving my domain from theirs, to CloudFlares!
Step 2: Add Your Domain to Cloudflare
- Once logged in, click "Add a Site."
- Enter your domain name (e.g.,
myserver.example.com) and click "Add site." - Cloudflare will scan your existing DNS records. Review them carefully.
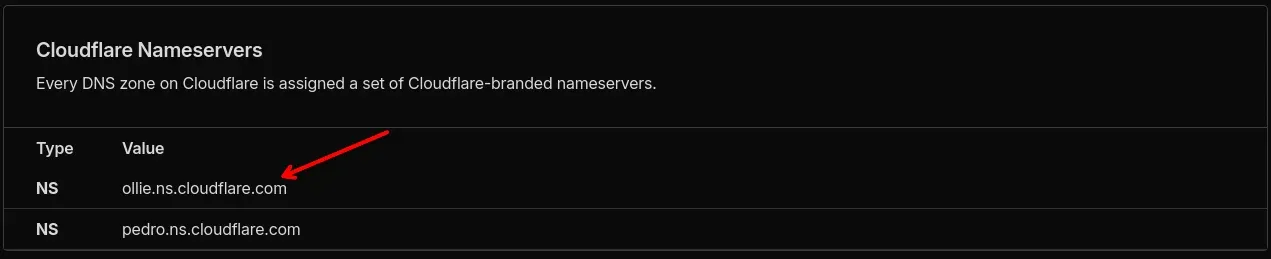
- It will give you two nameservers like april.ns.cloudflare.com or bob.ns.cloudflare.com. Go login to your domain resgitrar, from whom you purchased your domain like GoDaddy, Namecheap, Squarespace etc... You'll find an option to "change nameserver".
- Remove the default nameservers and insert Cloudflare's.
- Sit back once you make the changes it takes a few minutes for DNS propogation. Cloudflare will send you an email when it's done.
When you login to Cloudflare and hit DNS, your DNS servers will be shown at the bottom of the page.
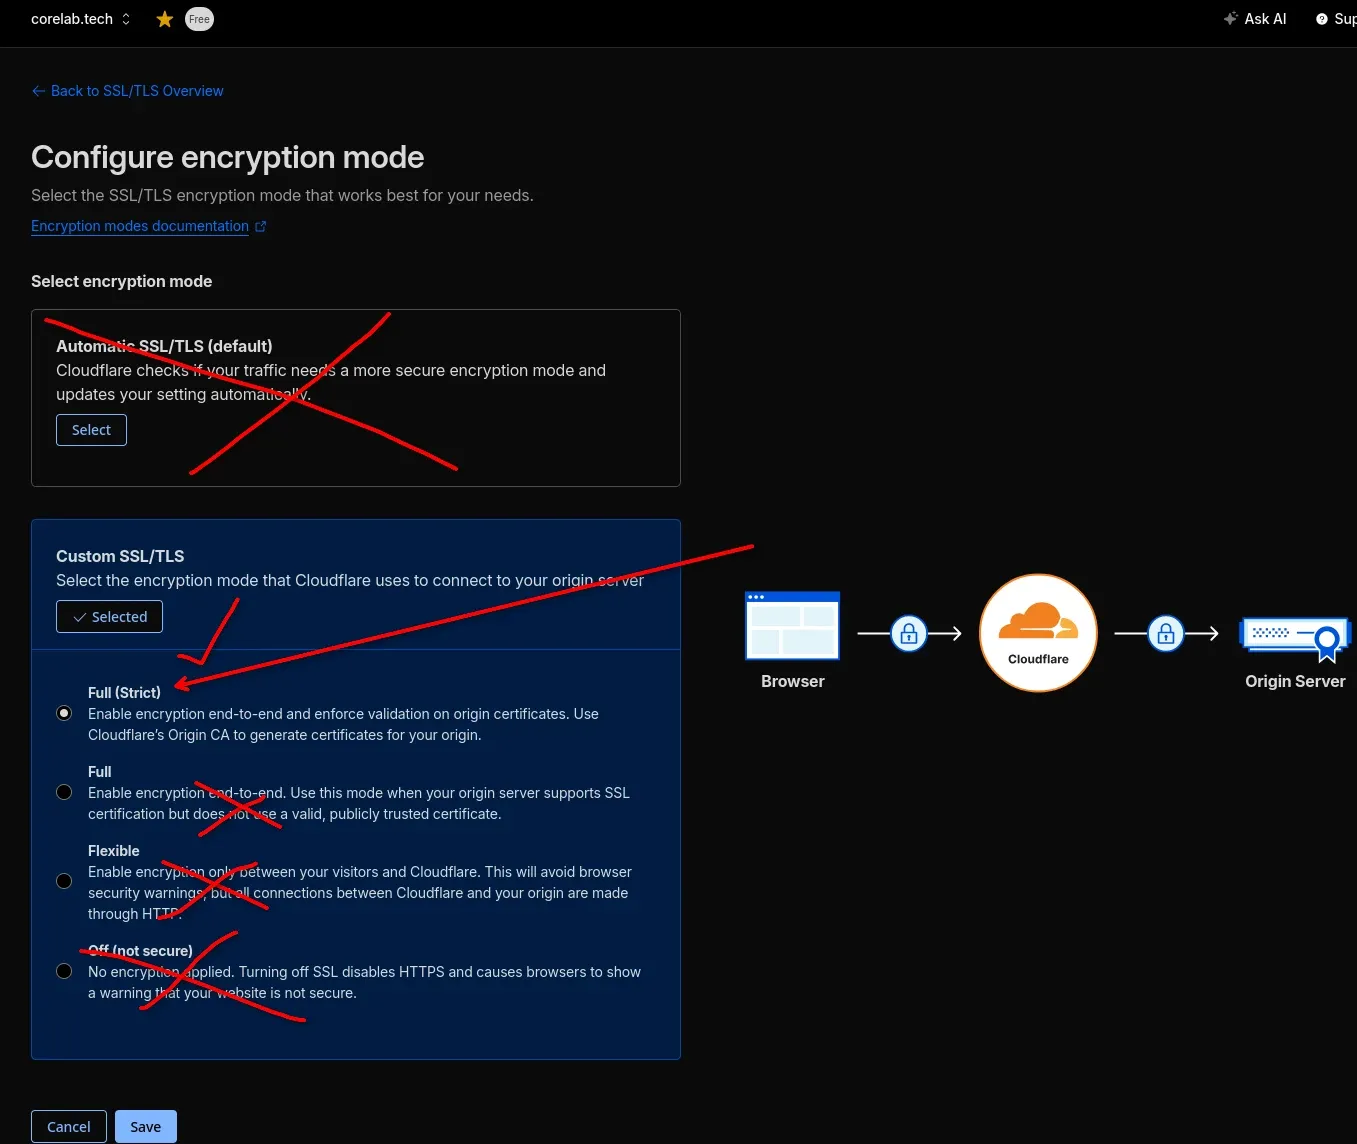
🛡️ Hardening the Connection: Understanding Cloudflare SSL Modes
When you enable the Cloudflare Proxy (Orange Cloud), you must decide how Cloudflare handles encryption between their edge servers and your OPNsense firewall (the "Origin").
| Setting | Traffic: User ↔ Cloudflare | Traffic: Cloudflare ↔ Your Server | Origin Certificate Requirement | Blue Team Security Rating |
| Flexible | 🔒 Encrypted (HTTPS) | 🔓 Unencrypted (HTTP) | None | DANGEROUS |
| Full | 🔒 Encrypted (HTTPS) | 🔒 Encrypted (HTTPS) | Self-Signed or Expired Allowed | OK (For testing) |
| Full (Strict) | 🔒 Encrypted (HTTPS) | 🔒 Encrypted (HTTPS) | Valid, Trusted Certificate Required | SECURE (The Goal) |
The "Scrap Lab" Verdict
- ❌ Never Use "Flexible": This creates a false sense of security. While the user sees a green lock, the traffic between Cloudflare and your actual home network travels over the open internet in plaintext. If you use a password on Jellyfin, it can be sniffed.
- ⚠️ Use "Full" ONLY if Stuck: This mode encrypts the traffic to your house, but Cloudflare won’t validate who is on the other end. It’s useful if you are in the middle of troubleshooting a Let's Encrypt issue with SWAG, but it shouldn't be your permanent state.
- ✅ Always Aim for "Full (Strict)": This is the hardened standard. Cloudflare will not only encrypt the traffic but will verify that the SSL certificate presented by your OPNsense/Reverse Proxy is valid, current, and trusted (e.g., from Let's Encrypt).

If you don't have a reverse proxy with automatic certificate creation & renewal yet, hop over to my complete SWAG deployment guide!
Step 3: Review and Adjust DNS Records
- Cloudflare will automatically create the following essential records:
- A Record: Points your domain to Cloudflare’s IP addresses.
- CNAME Records: For
wwwand other subdomains. - Setup SSL settings so you can immediately make use of Cloudflare protection by:
- Left sidebar - click SSL tab.
- Set to SSL full strict. This is preferred and ensures your sites are locked into using and being served only via your SSL certificate. If you get an error when trying to access your site after enabling this, set it to SSL Full (not strict). If you have not setup your reverse proxy and SSL certificates yet, visit this CoreLab guide before continuing! That's a 3 part series of blog posts but parts 1 & 2 should do.
- Crucially, enable Cloudflare Proxy (Orange Cloud): For every record (A, CNAME, MX, TXT), click the orange cloud icon. This activates Cloudflare’s proxy, which masks your server's IP address and provides protection against DDoS attacks, web scraping, and other malicious traffic.
If you'd like a nice well written deep-dive into DNS, and how it works on the internet, please jump over to Technodabbler's blog and have a read.

Step 4: Understanding Cloudflare's Proxy
- When you enable the proxy, Cloudflare acts as an intermediary between your users and your server. All traffic flows through Cloudflare’s network, adding a layer of obfuscation.
Step 5: Configure DNSSEC (Optional, but recommended)
- Cloudflare offers DNSSEC (Domain Name System Security Extensions) which adds a cryptographic layer to your DNS records, verifying that the DNS records you receive are authentic and haven’t been tampered with. Enable this by clicking the "Enable DNSSEC" toggle. This is highly recommended for added security.
Step 6: Configure Page Rules (Advanced!)
- Cloudflare’s Page Rules allow you to customize how Cloudflare handles specific URLs. For example, you could redirect all requests to a specific directory to a different IP address. (This is an advanced step and not essential for basic protection).
- There will be a separate post (part 2/3!) just about this later...
Step 7: Verify Your Configuration
- Use a DNS lookup tool (like https://www.whatsmydns.net/) to verify that your domain is resolving through Cloudflare’s servers.
Configuring Dynamic DNS in OPNsense
If you're running a self-hosted stack behind a residential ISP connection, your public IP is probably dynamic.
If you're using OPNsense and Cloudflare, there’s a right way to solve this - and a needlessly complicated way.
This part of our guide walks through the clean architecture:
- Use OPNsense Dynamic DNS to update a single Cloudflare DNS record
- Use wildcard CNAME records in Cloudflare
- Let CNAME flattening handle the rest
This avoids updating dozens of records individually and makes your homelab much easier to maintain.
Why Not Update Every DNS Record Individually?
A common first attempt is creating Dynamic DNS entries for every service:
- jellyfin.example.com
- n- auth.example.com
- docs.example.com
- vault.example.com
- frigate.example.com
That works... It will. It also creates unnecessary complexity. Every WAN IP change means updating multiple records, more moving parts, and more things to troubleshoot. Instead, use one anchor record!
The Better Architecture (Wildcard DNS)
Create a single dynamically updated DNS record:
home.example.com → Your WAN IP
Then point everything else at it:
*.example.com → home.example.com
This gives you:
jellyfin.example.com
auth.example.com
paperless.example.com
vault.example.com
All resolving through a single DDNS-updated endpoint.
Using Wildcard DNS + CNAME Flattening!
Step 1: Create a Cloudflare API Token
In Cloudflare:
Account Home → Account API Tokens → Create Token

Use a custom token with these permissions:
Required Permissions
- API Token → DNS & Zones → DNS → Read/Edit
- API Token → DNS & Zones → Zone → Read
- API Token → DNS & Zones → Zone DNS Settings → Read/Edit
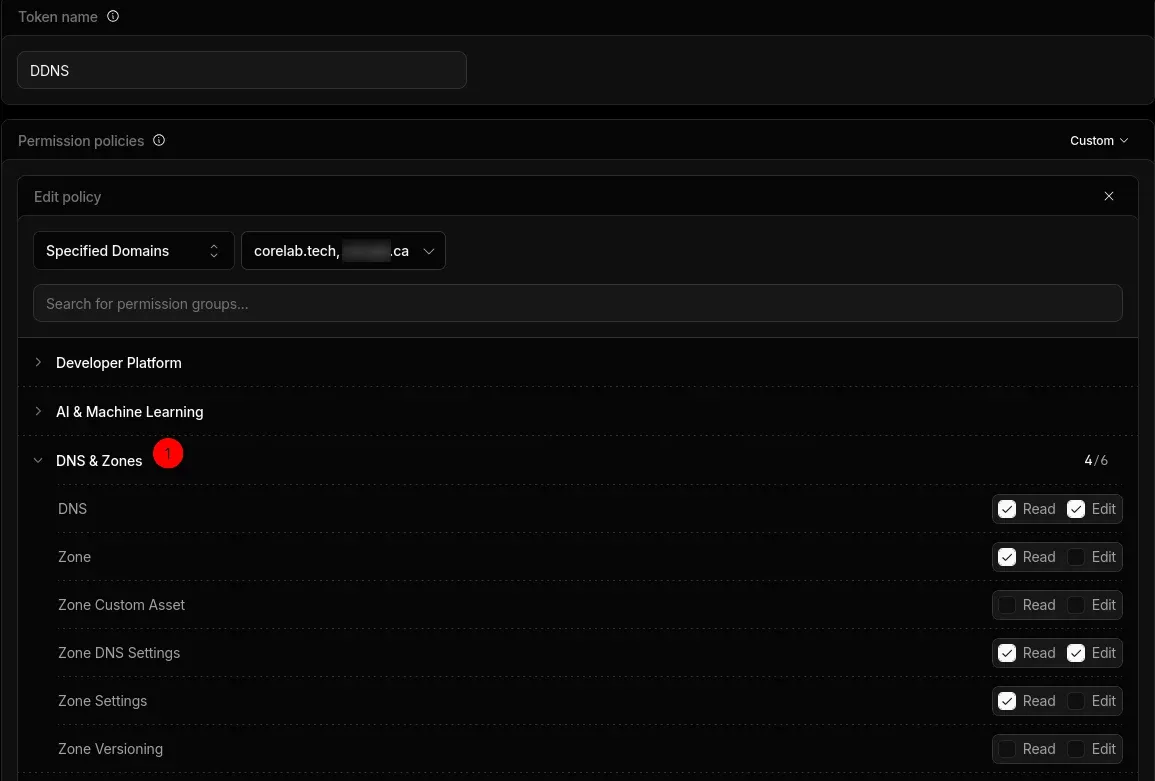
That second permission is critical.
Without Zone Read, OPNsense/DDClient will fail with:
FAILED: updating example.com: No zone ID found
You might have to provide additional DNS permissions if it gives you further errors.
Scope the Token
Restrict access only to the zones you actually need.
Example:
- example.com
- example.net
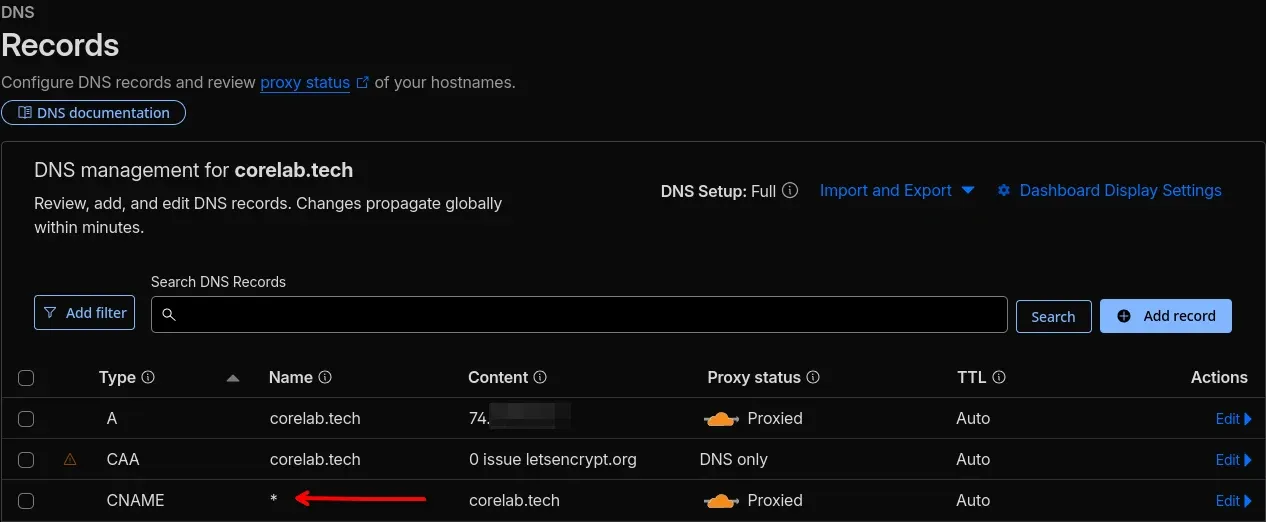
Step 2: Create the Anchor DNS Record
In Cloudflare DNS, create:
| Type | Name | Value | Proxy |
|---|---|---|---|
| A | home | Your current WAN IP | DNS Only |
Example:
home.example.com
This is the only record OPNsense will update.
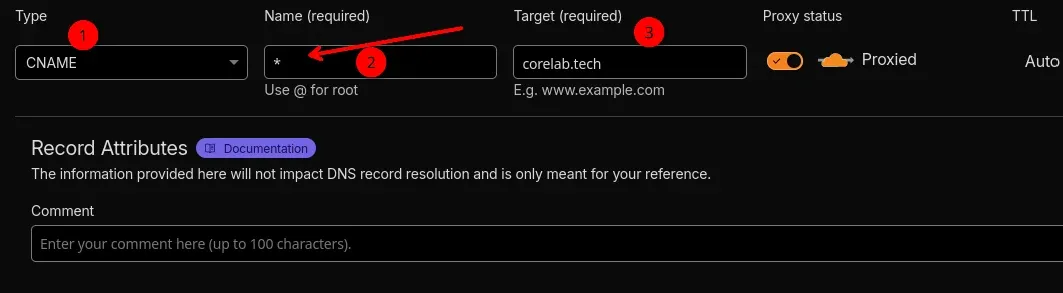
Step 3: Create a Wildcard CNAME
Add:
| Type | Name | Target | Proxy |
|---|---|---|---|
| CNAME | * | home.example.com | Proxied |
Now any undefined subdomain automatically resolves.
Examples:
- jellyfin.example.com
- auth.example.com
- paperless.example.com
All point through your dynamic endpoint.
Step 4: Install DDClient in OPNsense
Navigate to: System → Firmware → Plugins
Install:
os-ddclient
Refresh the UI after installation.
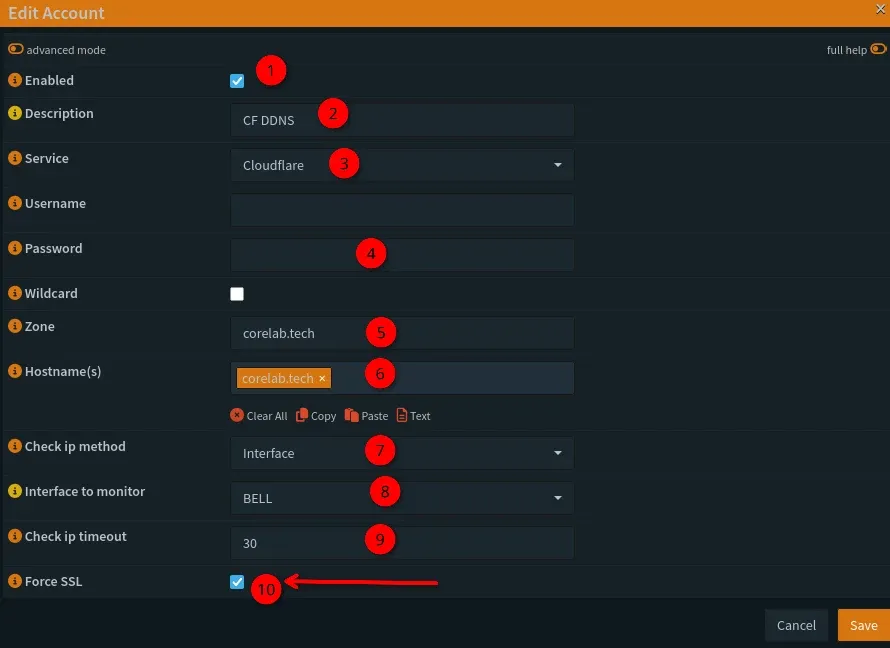
Step 5: Configure Dynamic DNS in OPNsense
Navigate to: Services → Dynamic DNS
Create a new entry.
Service Type
Cloudflare
Username
blank <- Yep, just leave it blank!
Password
#Your API token from Cloudflare!
48ba34v4a063j946u354096u596a93456354 # Big long string from CF
Interface
Usually:
WAN
Zone
Your root domain:
example.com
Hostname
FQDN as per OPNsense docs.
home.example.com
Not:
❌ *.example.com
❌ @
Check IP Method
Recommended:
Interface - Select your WAN interface, mine is named 'BELL'Fallback (if your WAN interface doesn’t expose the public IP):
Web
Step 6: Force an Update
Save the entry.
Click the manual update/play button.
Then inspect:
Services → Dynamic DNS → Log File
Successful output should look similar to:
SUCCESS: updating home.example.com
Mine looked exactly like this:
2026-05-07T12:24:42-04:00 Notice ddclient SUCCESS: corelab.tech: skipped: IPv4 address was already set to 74.X.X.X.
Final Thoughts
If you're self-hosting behind a dynamic residential IP, this is one of those foundational pieces worth setting up properly.
One DDNS record.
One wildcard CNAME.
Minimal maintenance.
Simple systems break less.
By following these steps, you’ve successfully configured Cloudflare’s free DNS tier to protect your self-hosted services. Remember that Cloudflare is a layer of security, not a complete solution. Combine it with other security measures for optimal protection, as per my Cybersecurity Homelab guide below.

More specifically, jump to the OPNsense guide to configure your rules & alias to lock things down to allow ONLY CloudFlare to reach your firewall!
🛠️ Troubleshooting & Frequently Asked Questions
Even with a perfect plan, networking has a way of being... networking. Here are the most common "gotchas" when setting up Cloudflare and OPNsense.
Common Errors & Fixes
- Error:
No zone ID found- Cause: Usually a permissions issue with your Cloudflare API Token.
- Fix: Ensure your token has Zone: Read permissions, not just DNS Edit. Also, verify that in OPNsense, your "Hostname" is just the record (e.g.,
home) and the "Zone" is your root domain (e.g.,corelab.tech).
- Error:
Too Many Redirects(ERR_TOO_MANY_REDIRECTS)- Cause: A mismatch between Cloudflare’s SSL mode and your reverse proxy.
- Fix: If you set Cloudflare to "Flexible" but your local proxy (SWAG) is forcing HTTPS, they will loop forever. Set Cloudflare to Full (Strict) to match your local encryption.
- Error:
522 Connection Timed Out- Cause: Cloudflare can’t reach your WAN IP on port 443.
- Fix: Check your OPNsense WAN rules. You must allow traffic from Cloudflare’s IP Ranges on port 443. (Pro-tip: Use the
pfBlockerNGor OPNsense Aliases to automatically keep the Cloudflare IP list updated).
Frequently Asked Questions
Q: Does Cloudflare’s Free Tier have a bandwidth limit?
A: For standard web traffic, no. However, for proxied (Orange Cloud) traffic, there is a 100MB upload limit per request. If you are using Immich to upload large 4K video files from your phone, those uploads might fail. In that specific case, you may want to set that specific subdomain to "DNS Only" (Grey Cloud).
Q: Can I use this if I am behind CGNAT (like Starlink or T-Mobile Home Internet)?
A: No. If you are behind CGNAT, you don't have a reachable public WAN IP for DDNS to update. In that scenario, you should look into Cloudflare Tunnels (cloudflared), or Headscale etc, which I cover in a separate guide.

Q: Is my home IP really hidden?
A: Yes. When the "Orange Cloud" is active, anyone performing a nslookup on your domain will see Cloudflare's IP addresses, not yours. Your home IP is only "visible" to Cloudflare so they know where to send the traffic.
Q: Why use an "Anchor Record" instead of just updating every subdomain?
A: Efficiency and reliability. By updating one record (home.example.com), you only make one API call. If you have 20 services, you don't want 20 different DDNS processes fighting for updates. CNAME Flattening handles the rest instantly.
Member discussion