
Homelable Deployment Guide: Visualize Your Network Topology with Docker (2026)
If you’ve stumbled across Remy Jardinet's [Homelable project] and want to self-host it, there’s a good chance your first deployment attempt will hit a few avoidable issues.
I ran into several while deploying it into a segmented Docker homelab environment, and this guide walks through the corrected (and simplified❗) deployment process using the prebuilt Docker images, proper service naming, and network scanner configuration.
This gets Homelable running cleanly without rebuilding anything from source.
What is Homelable? (The Network Source of Truth)
Homelable is a self-hosted network topology visualization and discovery tool designed for homelab environments.
It can:
- Scan your network ranges
- Discover active devices
- Build visual topology maps
- Track infrastructure relationships
- Provide a living documentation layer for your lab
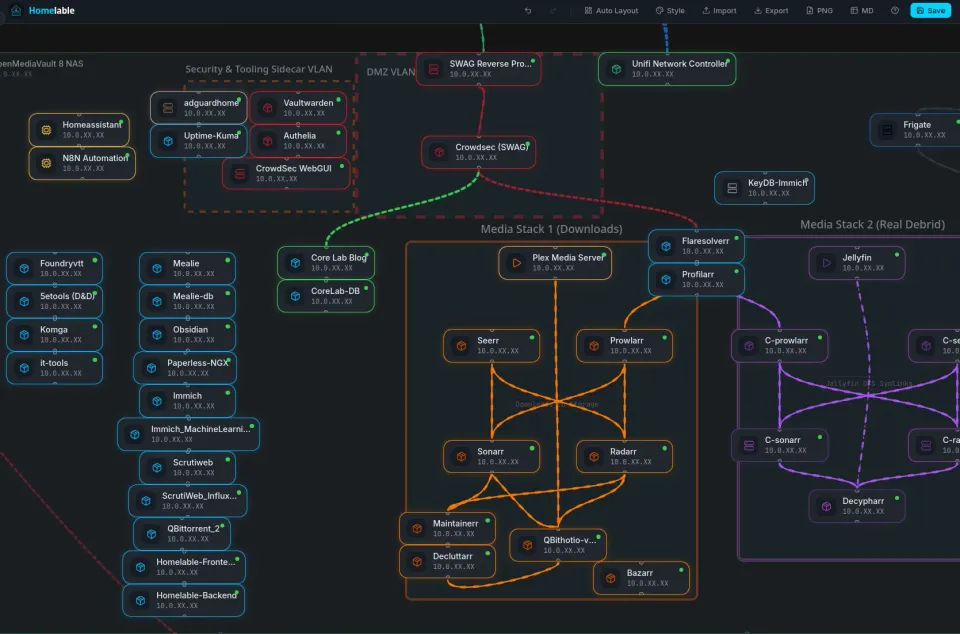
For anyone running multiple VLANs, Docker hosts, reverse proxies, switches, APs, and services, it’s a genuinely useful visualization layer. I can't understate how excited I was to discover this tool and happy to deploy it as soon as my fingers could whip up the corresponding compose!
Right now it's fantastic for doing complete 'logical' network diagrams, but not 100% there yet for physical, but there's some opened Issues & PR's to help them grow it in the right direction. It's just missing a few little things that someone like me would nit-pick over 😉
You can see pending devices (to approve and add, after initial scan), hidden devices, scan history, online/offline devices and more.
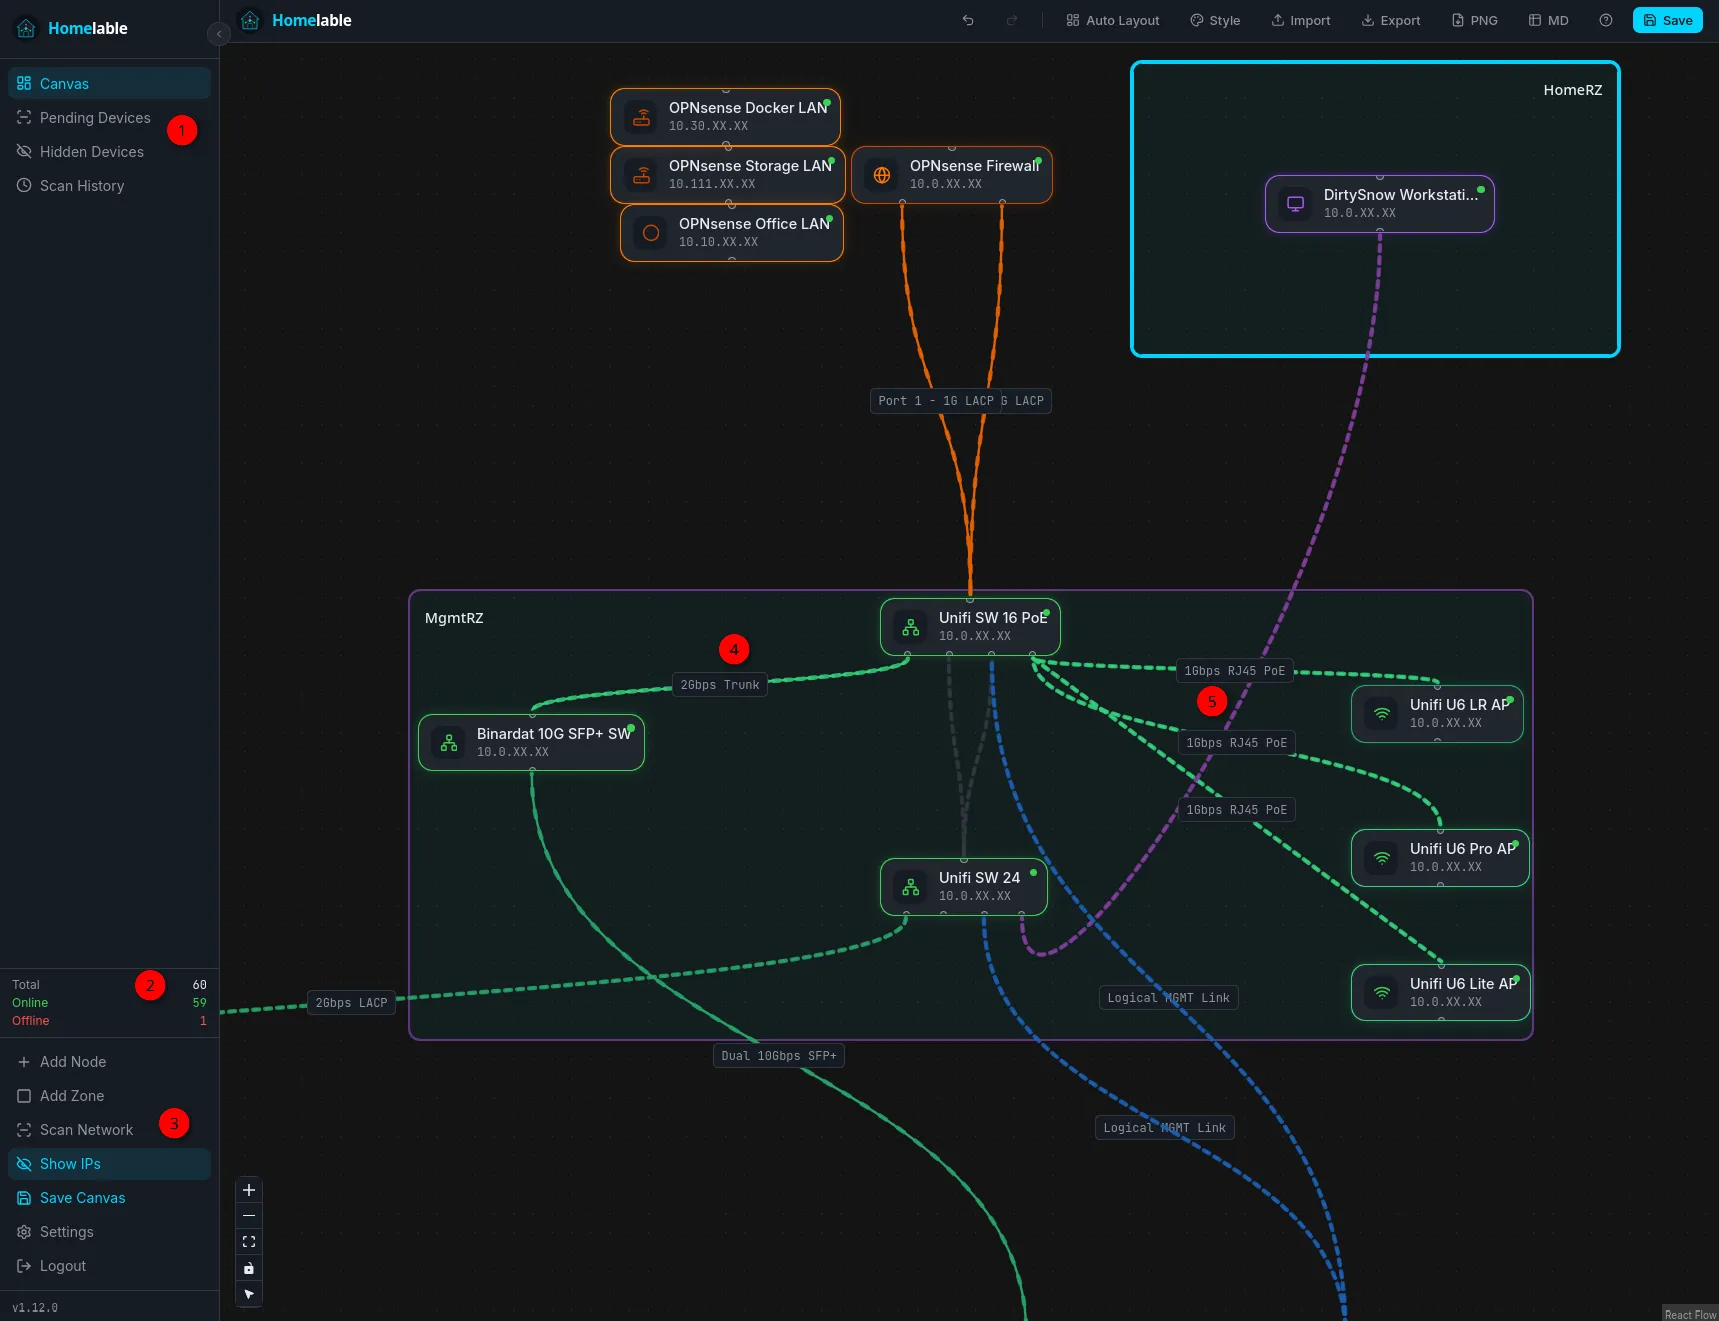
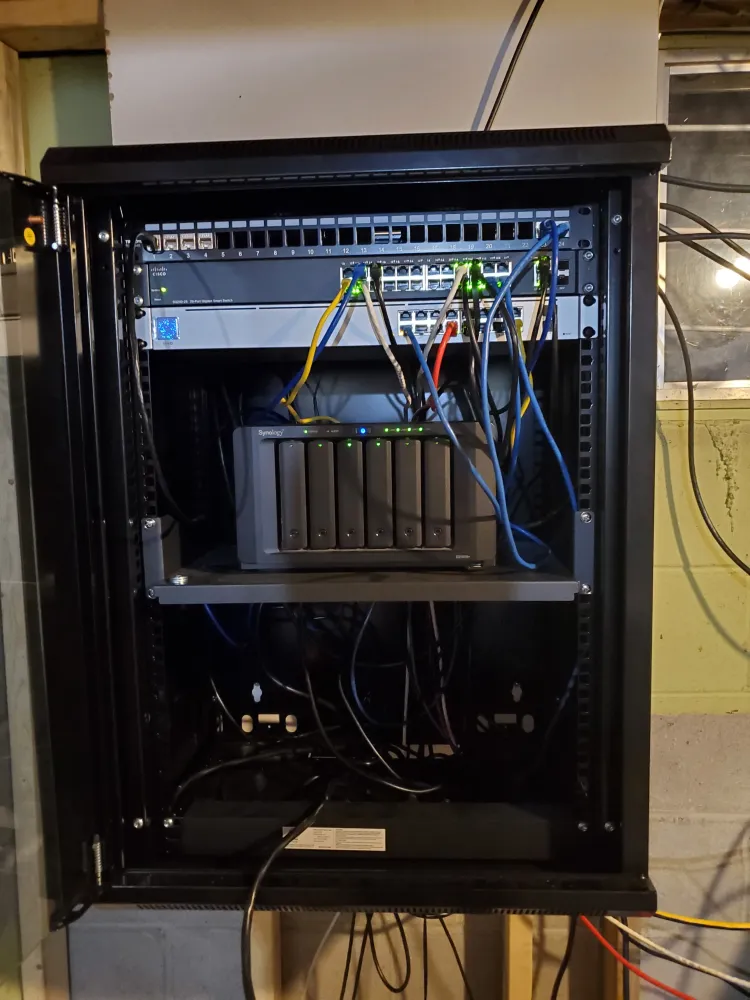
One of my fav features is the ability to LABEL all the connections! If you zoom in a bit on that pic above, you'll see on the left side I was able to label my 2Gbps LACP trunk from my Unifi SW 16 port POE to my Binardat 10G SFP+ switch! On the right side, I could label my PoE RJ45 Ethernet connections to each Unifi Access Point! You could totally go OCD crazy in here and nail everything down EXCEPT for say, all 16 or 24 ports on a switch to each device it's connected to. They don't have that implemented yet.
The Deployment Trap: Why Service Names Matter
Homelable’s frontend expects the backend service to be reachable via Docker DNS using the hard-coded host name, or the IP:
backend
This means your Docker Compose service names must remain:
frontendbackend
Renaming them to something cleaner like:
homelable-frontend
homelable-backend
will break startup with:
host not found in upstream "backend"
The container names (compose variable called container_name:) can be customized.
Homelable Docker Compose Installation
Prerequisites
Step 1: Directory Setup & Directory Structure
mkdir -p /opt/docker/homelable
cd /opt/docker/homelable
Step 2: Generating the Mandatory Bcrypt Password Hash
- Generate a new bcrypt hash: (Replace 'newpassword' with an actual password). 2 ways, if you have python installed use the first command, otherwise you can fire up the 'backend' docker of homelable (from compose below) and run the 2nd command.
python3 -c "from passlib.hash import bcrypt; print(bcrypt.hash('newpassword'))"Python way to generate the HASH
docker compose exec backend python -c "from passlib.context import CryptContext; print(CryptContext(schemes=['bcrypt']).hash('NewStrongPassword'))"Docker compose way to generate the HASH using Homelable backend
This then hashes that password you put in, and outputs some crazy string like $2b$12$4OG5dyoEEiBs/WqT7c97pOkT5xnbqG0Gn.8GFlfqb.POfVSQA5dwK
- Edit your .env file and slap that in on the
AUTH_PASSWORD_HASH:line.
Step 3A: Choosing Your Compose Strategy (Prebuilt vs. Custom)
You can use the prebuilt compose files that the developer already created.
Do not use the source-build compose unless you’re actively modifying Homelable with some specific customizations you want to roll in, but then you're building the docker directly.
wget https://raw.githubusercontent.com/Pouzor/homelable/main/docker-compose.prebuilt.yml
wget https://raw.githubusercontent.com/Pouzor/homelable/main/.env.example -O .env
mv docker-compose.prebuilt.yml docker-compose.yml
OR👇
Step 3B: Use plain old Docker Compose with Core Lab examples (What I used)
Create a brand new docker compose if you like to keep this in a separate stack, or roll it into your existing compose stack.
services:
  backend:
    image: ghcr.io/pouzor/homelable-backend:latest
    container_name: backend
    restart: unless-stopped
    env_file:
      - .env
    volumes:
      - /opt/DOCKERS/homelable_backend_data:/app/data
    networks:
      your_network:
        ipv4_address: 10.0.0.XX # Put your chosen IP here
    cap_add:
      - NET_RAW

  frontend:
    image: ghcr.io/pouzor/homelable-frontend:latest
    container_name: frontend
    restart: unless-stopped
    networks:
      vlan7_home:
        ipv4_address: 10.0.0.55
    ports:
      - "3000:80"
    depends_on:
      - backend
Core Lab's custom compose (used live)
Notes:
- I use (and love) bind mounts. Homelable normal compose uses volume mounts.
- Only use
networks:if you will deploy using a pre-existing macvlan or ipvlan docker network, otherwise just use normal bridge or default networking like so (see bottom for the network declaration):
services:
  backend:
    image: ghcr.io/pouzor/homelable-backend:latest
    restart: unless-stopped
    env_file:
      - .env
    environment:
      SQLITE_PATH: /app/data/homelab.db
      CORS_ORIGINS: '["http://localhost:3000"]'
    volumes:
      - backend_data:/app/data
    networks:
      - homelable
    cap_add:
      - NET_RAW

  frontend:
    image: ghcr.io/pouzor/homelable-frontend:latest
    restart: unless-stopped
    ports:
      - "3000:80"
    depends_on:
      - backend
    networks:
      - homelable

volumes:
  backend_data:

networks:
  homelable:
    driver: bridge
homelable original prebuilt docker dompose
Now for the env file, the first example is the raw unedited version from homelable:
# Backend - server-side only (NEVER commit .env)
SECRET_KEY=change_me_in_production
SQLITE_PATH=./data/homelab.db
# Set this to the URL(s) you use to access Homelable in your browser.
CORS_ORIGINS=["http://localhost:5173","http://localhost:3000"]

# Auth — default credentials: admin / admin
# ⚠️  Change before exposing on a network.
# Generate a new hash: python3 -c "from passlib.context import CryptContext; print(CryptContext(schemes=['bcrypt']).hash('yourpassword'))"
# ⚠️  Keep the single quotes around the hash — bcrypt hashes contain \$ which Docker misinterprets without them.
AUTH_USERNAME=admin
AUTH_PASSWORD_HASH='$2b$12$RtMbyw17l4N5UGzeXMNAWuzCaVV.XFBY7ZetWheQhxcBDcxahapkG'

# Scanner — JSON array of CIDR ranges to scan
SCANNER_RANGES=["192.168.1.0/24"]

# Status checker interval in seconds
STATUS_CHECKER_INTERVAL=60

# MCP server — used by the mcp service (port 8001)
# MCP_API_KEY: authenticates AI clients (Claude Code, etc.) → MCP server
# MCP_SERVICE_KEY: authenticates MCP server → backend (never exposed externally)
# Generate keys: python3 -c "import secrets; print(secrets.token_hex(32))"
MCP_API_KEY=mcp_sk_changeme
MCP_SERVICE_KEY=svc_changeme

# Live view — read-only public canvas at /view?key=<value>
# Off by default. Set to a random secret to enable.
# Generate: python3 -c "import secrets; print(secrets.token_urlsafe(32))"
# LIVEVIEW_KEY=
Example below is mine and what I changed/did differently.
# Backend - server-side only (NEVER commit .env)
SECRET_KEY=change_me_in_production

SQLITE_PATH=/app/data/homelab.db # Removed the . as I am using bind mounts
# Set this to the URL(s) you use to access Homelable in your browser.

CORS_ORIGINS=["http://10.0.0.55:3000"] # Changed this to the IP I gave my container, if exposing through reverse proxy would put the FQDN in.

AUTH_USERNAME=corelabjoe # I changed it to be what I wanted vs default 'admin'
AUTH_PASSWORD_HASH='Your_own_32bit_HASh!'

# Your actual VLAN ranges - replace as needed!
SCANNER_RANGES=["10.0.0.0/24","192.168.0.0/24"]

# Status checker interval in seconds
STATUS_CHECKER_INTERVAL=60

# MCP server — used by the mcp service (port 8001)
# MCP_API_KEY: authenticates AI clients (Claude Code, etc.) → MCP server
# MCP_SERVICE_KEY: authenticates MCP server → backend (never exposed externally)
# Generate keys: python3 -c "import secrets; print(secrets.token_hex(32))"
#MCP_API_KEY=mcp_sk_changeme
#MCP_SERVICE_KEY=svc_changeme

# Live view — read-only public canvas at /view?key=<value>
# Off by default. Set to a random secret to enable.
# Generate: python3 -c "import secrets; print(secrets.token_urlsafe(32))"
# LIVEVIEW_KEY=
Configuring the .env File (Variable Breakdown)
- AUTH_USERNAME = Login username.
- AUTH_PASSWORD_HASH: A bcrypt hash of your password. (not THE password!)
- SECRET_KEY: Generate with:
openssl rand -hex 32
SQLITE_PATH: Must remain -
/app/data/homelab.db
CORS_ORIGINS: Use the actual frontend access URL. Examples -
Local:
["http://10.0.0.55:3000"]
Reverse proxy:
["https://homelable.example.com"]
SCANNER_RANGES: Add every subnet you want scanned.
- Example multi-VLAN setup:
["10.0.0.0/24","10.20.0.0/24","10.30.0.0/24"]
Join the Core Lab Crew!
Networking & security deep-dives, delivered directly to your inbox!
Launching the Stack & Sanity Checks 🚀
Always sanity-check:
docker compose config
This catches:
- YAML indentation issues
- Missing variables
- Service naming mistakes
- Invalid syntax
Now Launch 🚀
docker compose up -d && docker logs -f frontend

# CTRL-C to stop the running live-log and drop back to console!
Verify:
docker ps
You should see:
- frontend
- backend
If you're having trouble finding it just do docker ps | grep frontend or backend.
Initial Configuration: Scanning Your Subnets
If using:
ports:
  - "3000:80"
Access via:
http://YOUR-HOST-IP:3000
If assigning the frontend its own LAN IP via macvlan/static networking:
http://CONTAINER-IP:3000
Example:
http://10.0.0.55:3000
Optional - Remove Demo Data
On first launch you may see placeholder network objects like:
192.168.1.0/24
These are seeded example entries. Clear them and run your own scans. To clear the sample dashboard, I simply highlighted it all and hit the Delete key - voila! All gone...
Adding "Pending Devices" to Your Canvas
Add your real network ranges (if you have not yet) and let Homelable discover devices. Large scans take time. I have multiple subnets but only about 100 devices in total, and it took about 12 minutes to run.

A few /24 networks can easily mean 1,000+ addresses. Be patient, it's worth it to get a proper thorough scan before you begin!
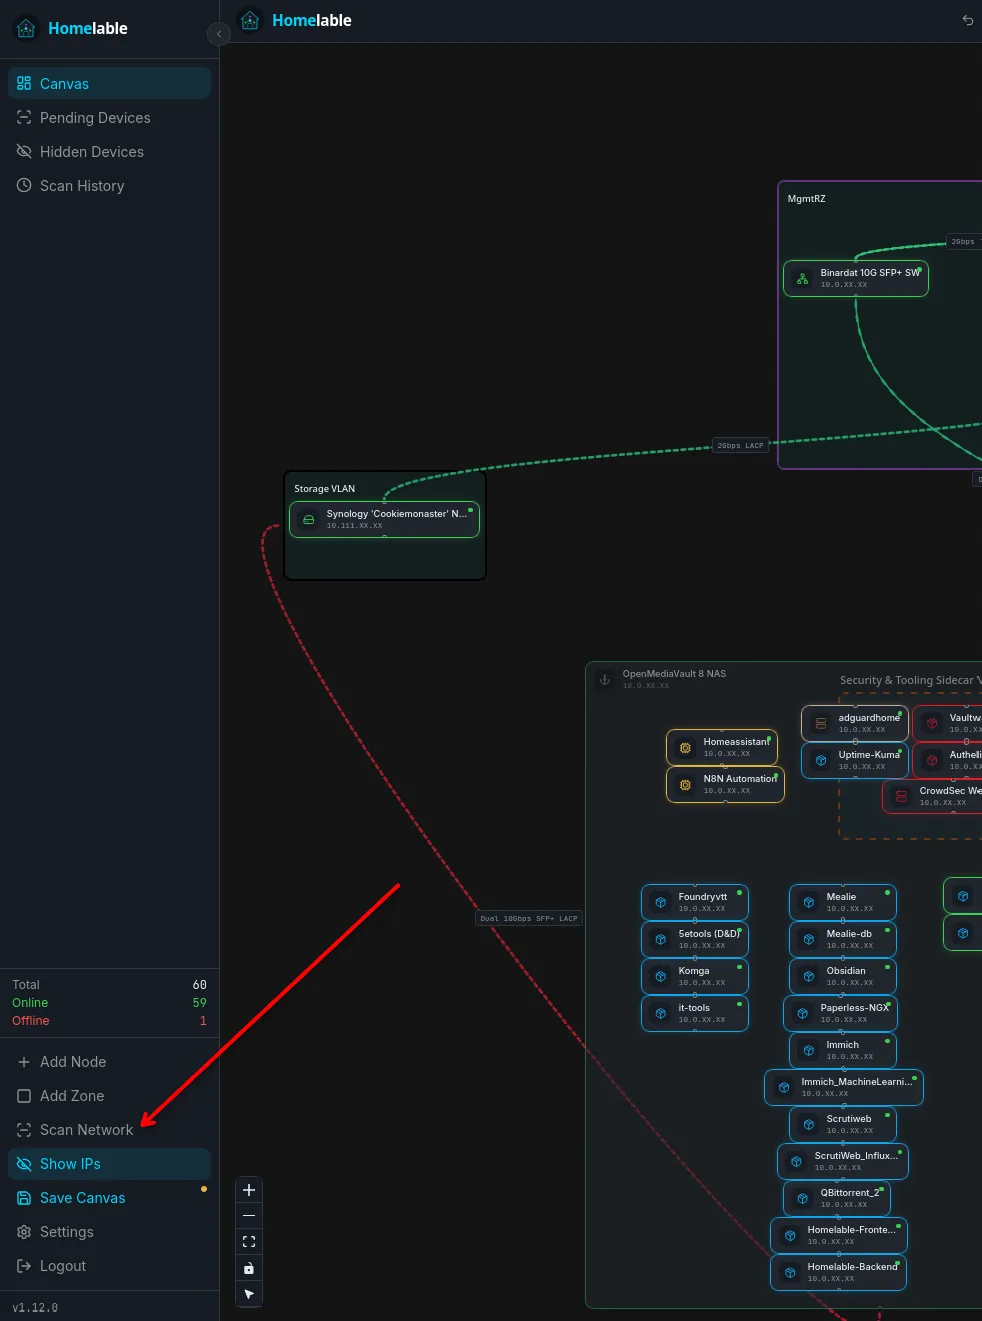
Once it's done you'll see a list in the top left under Pending Devices, click that and it should show a bunch. Now is the time to click and add them to your 1st canvas!
Once you open the pending devices tab, you select from a list and can modify a few settings before adding the device to your Canvas. The good news is, if you make a mistake you can simply double-click to re-open the item and make corrections.
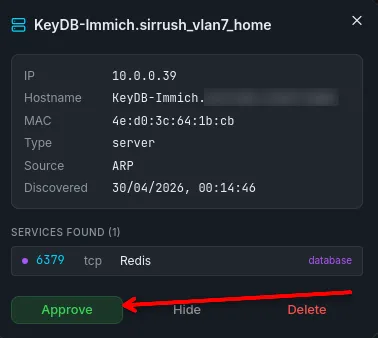
I'll show adding a 'Redis' container app, which is actually KeyDB from my Immich stack!
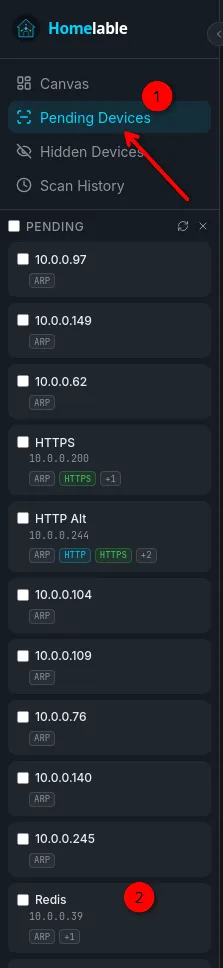
Here you can see it detected this as 'Redis' just because of the port used, but it's KeyDB. Pretty neat though that you can get an instant view of what is what here!
It detected this as a 'server' object but I changed it to Docker Container as it's running on my OMV8 system in docker compose.
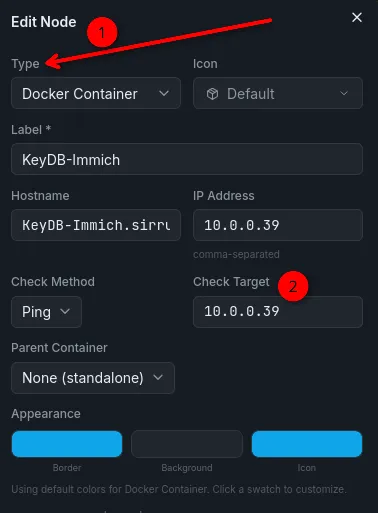
I copy/paste the IP into the 'Check Target' field so the Ping checks work, and customize the colours to suit my needs.
Final Thoughts
Homelable is still opinionated in a few deployment choices, but once configured correctly it’s a genuinely useful addition to a serious homelab. I'm very happy to have stumbled upon it! As someone who benefits greatly from visual cues / learning, I loved being able to map out and connect my homelab!
For anyone running:
- multiple VLANs
- Docker infrastructure
- segmented services
- reverse proxies
- mixed hardware
…it quickly becomes a visual source of truth for your environment. And as every homelabber eventually learns:
If your network exists only in your head, it’s already technical debt.
📋 FAQ & Common Troubleshooting
Command Note: Most Homelable deployment issues stem from the "Opinionated" nature of the frontend's Nginx configuration. Always verify your service names before troubleshooting the network.
Q: Why does my frontend fail with "host not found in upstream 'backend'"?
Homelable's frontend expects the backend service to be reachable via Docker DNS using the hard-coded host name. If you renamed your services to something like homelable-backend in your Compose file, the connection will break. The service names must remain frontend and backend.
Q: What should I do if my login credentials don't work?
This is usually caused by an incorrect bcrypt hash or a forgotten password. You can reset this by generating a new hash and updating your .env file. Remember to keep single quotes around the hash in your .env file, as the $ characters can be misinterpreted by Docker.
Q: How do I generate a bcrypt hash if I don't have Python on my host?
If you cannot run the command locally, start your containers first using docker compose up -d. Then, run the following command to use the Python environment inside the Homelable backend: docker compose exec backend python -c "from passlib.context import CryptContext; print(CryptContext(schemes=['bcrypt']).hash('YourPassword'))".
Q: Why is the network scanner returning zero results?
Check the following common roadblocks:
- Ensure the
NET_RAWcapability is added to your backend service. - Verify there are no firewall rules or ICMP restrictions blocking traffic between VLANs.
- Double-check that your
SCANNER_RANGESin the.envfile are correct CIDR notations.
Q: How do I remove the seeded demo data?
On your first launch, you may see placeholder network objects like 192.168.1.0/24. To clear the sample dashboard, simply highlight the unwanted items on the canvas and hit the Delete key.
Q: Can I change the SQLITE_PATH?
While you can change the host path in your bind mounts, the container path must remain /app/data/homelab.db. Changing this internal path will cause the backend to lose track of its database.
Q: How long do network scans typically take?
Large scans across multiple subnets take time. For a setup with roughly 100 devices across several subnets, expect the scan to take approximately 12 minutes. Be patient; it is worth a thorough scan to populate your "Pending Devices" list correctly.


Member discussion