
How to Setup Open Media Vault 8 (OMV8) for 2026
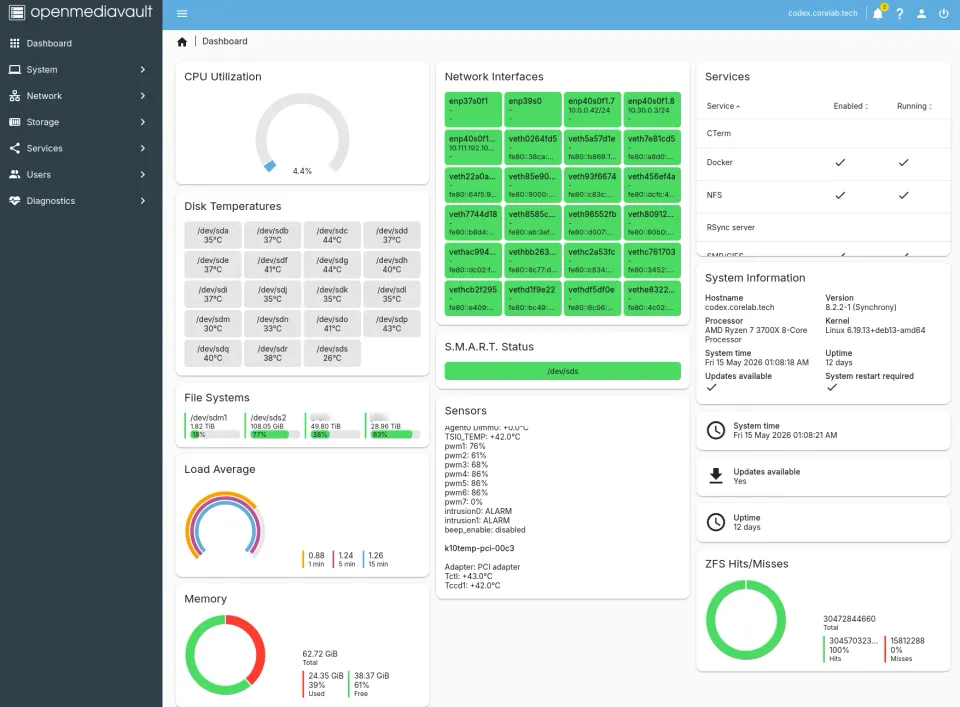
Breaking Free from Branded NAS Lock-in
For years, the "branded" NAS (Synology or QNAP) was the gold standard. But in 2026, the walls of those proprietary gardens are feeling a bit cramped. If you want total control, zero license fees, and enterprise-grade file systems, it’s time to build your own with OpenMediaVault 8 (OMV8).
This is part of my Open Media Vault series:
Open Media Vault Guides
Built on the rock-solid Debian 13 (Trixie), OMV8 "Synchrony" is faster, more secure, and natively supports modern hardware features that older versions simply can't touch. Whether you're a seasoned homelabber or a beginner escaping a branded NAS, this is your Day 1 playbook. We're aiming to empower you to build a truly "you" storage solution, free from the constraints of proprietary software. The best part? It’s free! Let’s dive in.
💎 What’s New in OMV 8 (Synchrony)?
Before we start the build, here’s why OMV8 is a mandatory upgrade:
- Performance: A massive overhaul of the WebGUI communication (RPCs) means pages load instantly. I thought it was fake/false it loaded so fast!
- Debian 13 Base: Native support for the latest hardware drivers and security patches. This is the most important consideration IMO.
- Apple Time Machine: Native size limits for SMB shares (no more backups eating your whole array).
- WPA3 Support: Enhanced security for Wi-Fi-based nodes (like Raspberry Pi 5).
- The End of 32-bit: OMV8 is 64-bit only (AMD64 and ARM64). It’s time to retire that 2005 Pentium.
Why Choose OMV8 Synchrony for Your Media Server?
Before we dive into the "how," let’s talk about the "why." There are plenty of NAS operating systems—Unraid, TrueNAS SCALE, and more—but OMV8 stands out for its flexibility. It’s essentially "Debian with a beautiful face," giving you full root access without the proprietary overhead. I find it's the perfect mix of freedom, with a usable and functional webGUI. You can completely manage your ZFS array for example, right in the GUI!
Part 1: Installing OMV8
🛠️ Prerequisites: Before You Burn the ISO
Don't skip the prep work. Success starts with the right hardware layout.
- Hardware: A 64-bit PC or Server. (Minimum 2GB RAM; 8GB+ highly recommended if using ZFS).
- The Proxmox Note: If you are virtualizing OMV8 on Proxmox VE, ensure you pass through your SATA controller or individual disks for the best ZFS performance.
- Network: Ethernet connection (Wi-Fi is possible but discouraged for servers).
- Dedicated OS Drive: You need a drive for the OS (16GB+ SSD or high-quality USB).
Crucial Rule: OMV8 owns the entire OS drive. You cannot easily store data on the same disk where the OS is installed. Keep your data drives separate!
The Foundation: Choosing Your Installation Medium
Before you even begin the installation process, a ❗critical decision needs to be made: where will OMV 8 reside?
You have two primary options: an internal hard drive or an external USB drive. Installing on an internal drive offers slightly better performance, as it avoids the overhead of USB transfer speeds. However, installing on a USB drive provides a crucial advantage: portability and saving an additional SATA port for another storage drive!
If something goes wrong with your main system, you can simply unplug the USB drive and plug it into another computer to recover your data and configuration. For most homelabbers, especially those new to OMV, the USB drive approach reasonable for its flexibility and recovery benefits. Regardless of your choice, ensure the drive is large enough to comfortably hold the operating system and any future updates.
A 16GB drive is typically sufficient. Download the OMV8 ISO from the official website (https://www.openmediavault.org/) and use a tool like Ether https://etcher.io/ or Rufus (https://rufus.ie/) to create a bootable USB drive.
Phase 1: Creating Your OMV8 Bootable Media
- Download the OMV8 ISO: Grab the latest "Synchrony" image from the official OpenMediaVault downloads page.
- Flash the Drive: Use Rufus (Windows) or Etcher (Mac/Linux).
- Note: In 2026, most BIOS are UEFI-only. Ensure you select "GPT" as the partition scheme in Rufus for modern hardware.
- Check Hardware Compatibility: OMV8 runs on Linux Kernel 6.12+. If you’re using brand-new 2026 hardware, this kernel is your best friend for driver support.
Phase 2: Installing OMV8 (The Debian 13 Base)
- Boot from USB: Mash that
F12orDelkey and prioritize your USB drive. - Network Config: Stick with DHCP for now. You can set a Static IP or VLANs once the WebGUI is live.
- The Hostname: Pick something legendary. I named mine "Codex." (Ten points if you know the sci-fi reference!). Give it a name like
vault,atlas, orcodex. - Target Drive: Triple-check you are selecting your small SSD/USB, not your 20TB data drives😮
- Root Password: Do not lose this. This is the keys to the (your new!) kingdom.
- The First Login: Once it reboots, find the IP on the screen. Log in via your browser using:
- User:
admin - Password:
openmediavault(Change this immediately in settings!)
- User:
REMINDER: Install OMV8 on a dedicated small SATA or NVMe SSD. Don't waste your massive 20TB storage drives on the OS; keep your data and OS separate!
Part 2: Post-Installation "Day 1 Ops"
Your server is alive, but it’s still "stock." Let’s tune it.
1. Update Everything
Go to System > Update Management > Updates. Click "Check" and then "Install." In OMV8, this process is significantly faster than previous versions.
2. The OMV-Extras "Magic"
OMV is great, but OMV-Extras makes it powerful. It enables Docker, specialized kernels, and advanced plugins. OMV-Extras is basically a plugin repository that expands the functionality of OMV quite a lot.
To unlock ZFS and Docker, open your terminal (SSH) and run: wget -O - https://github.com/OpenMediaVault-Plugin-Developers/packages/raw/master/install | bash Refresh your browser window. You’ll now see the OMV-Extras menu on the left!

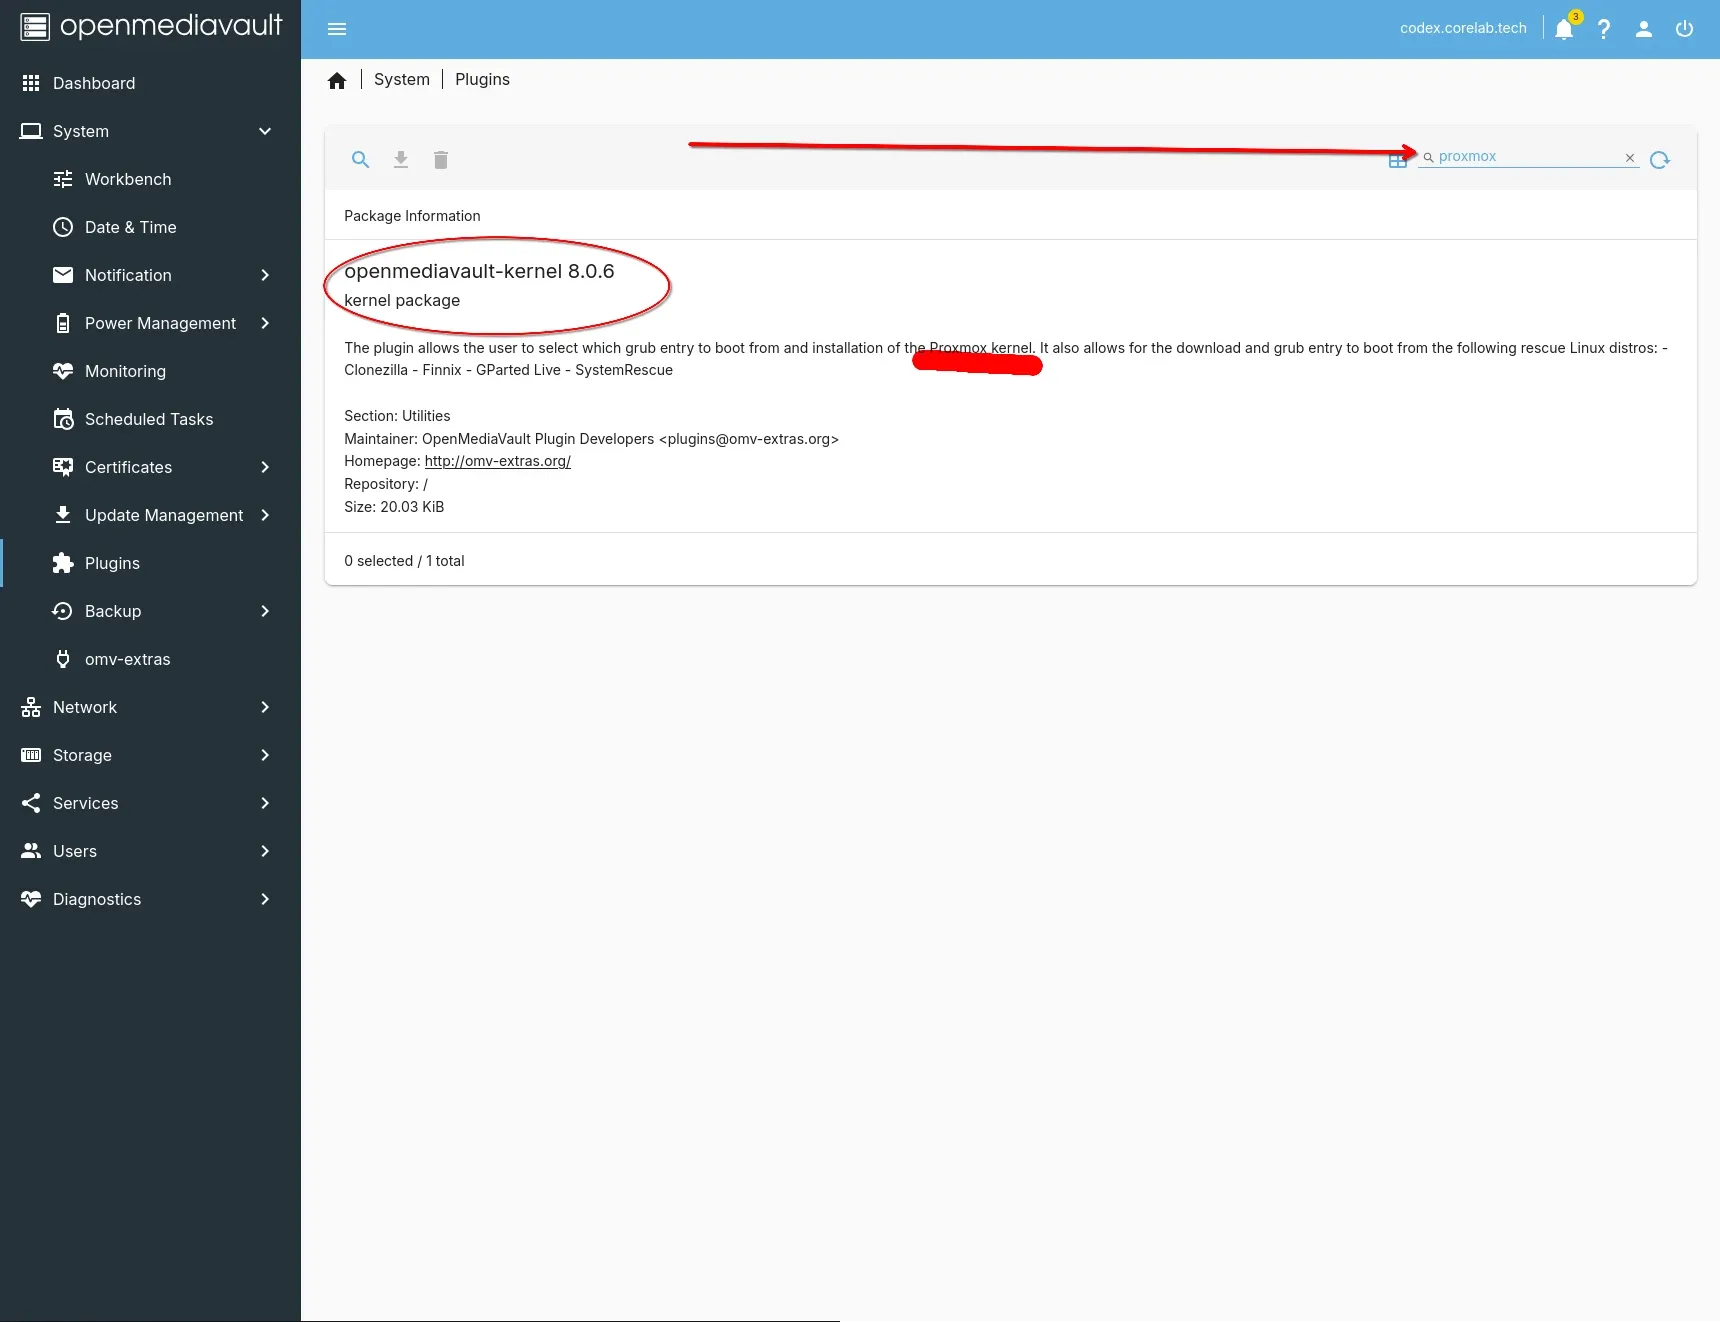
3. Install the Proxmox/ZFS Kernel
Native Debian kernels are great, but the Proxmox Kernel is optimized for ZFS.
- Navigate to System > Plugins.
- Install
openmediavault-kernel. - Go to System > Kernel, select the Proxmox/PVE kernel, and click Install.
- Reboot. Your server is now ZFS-ready.
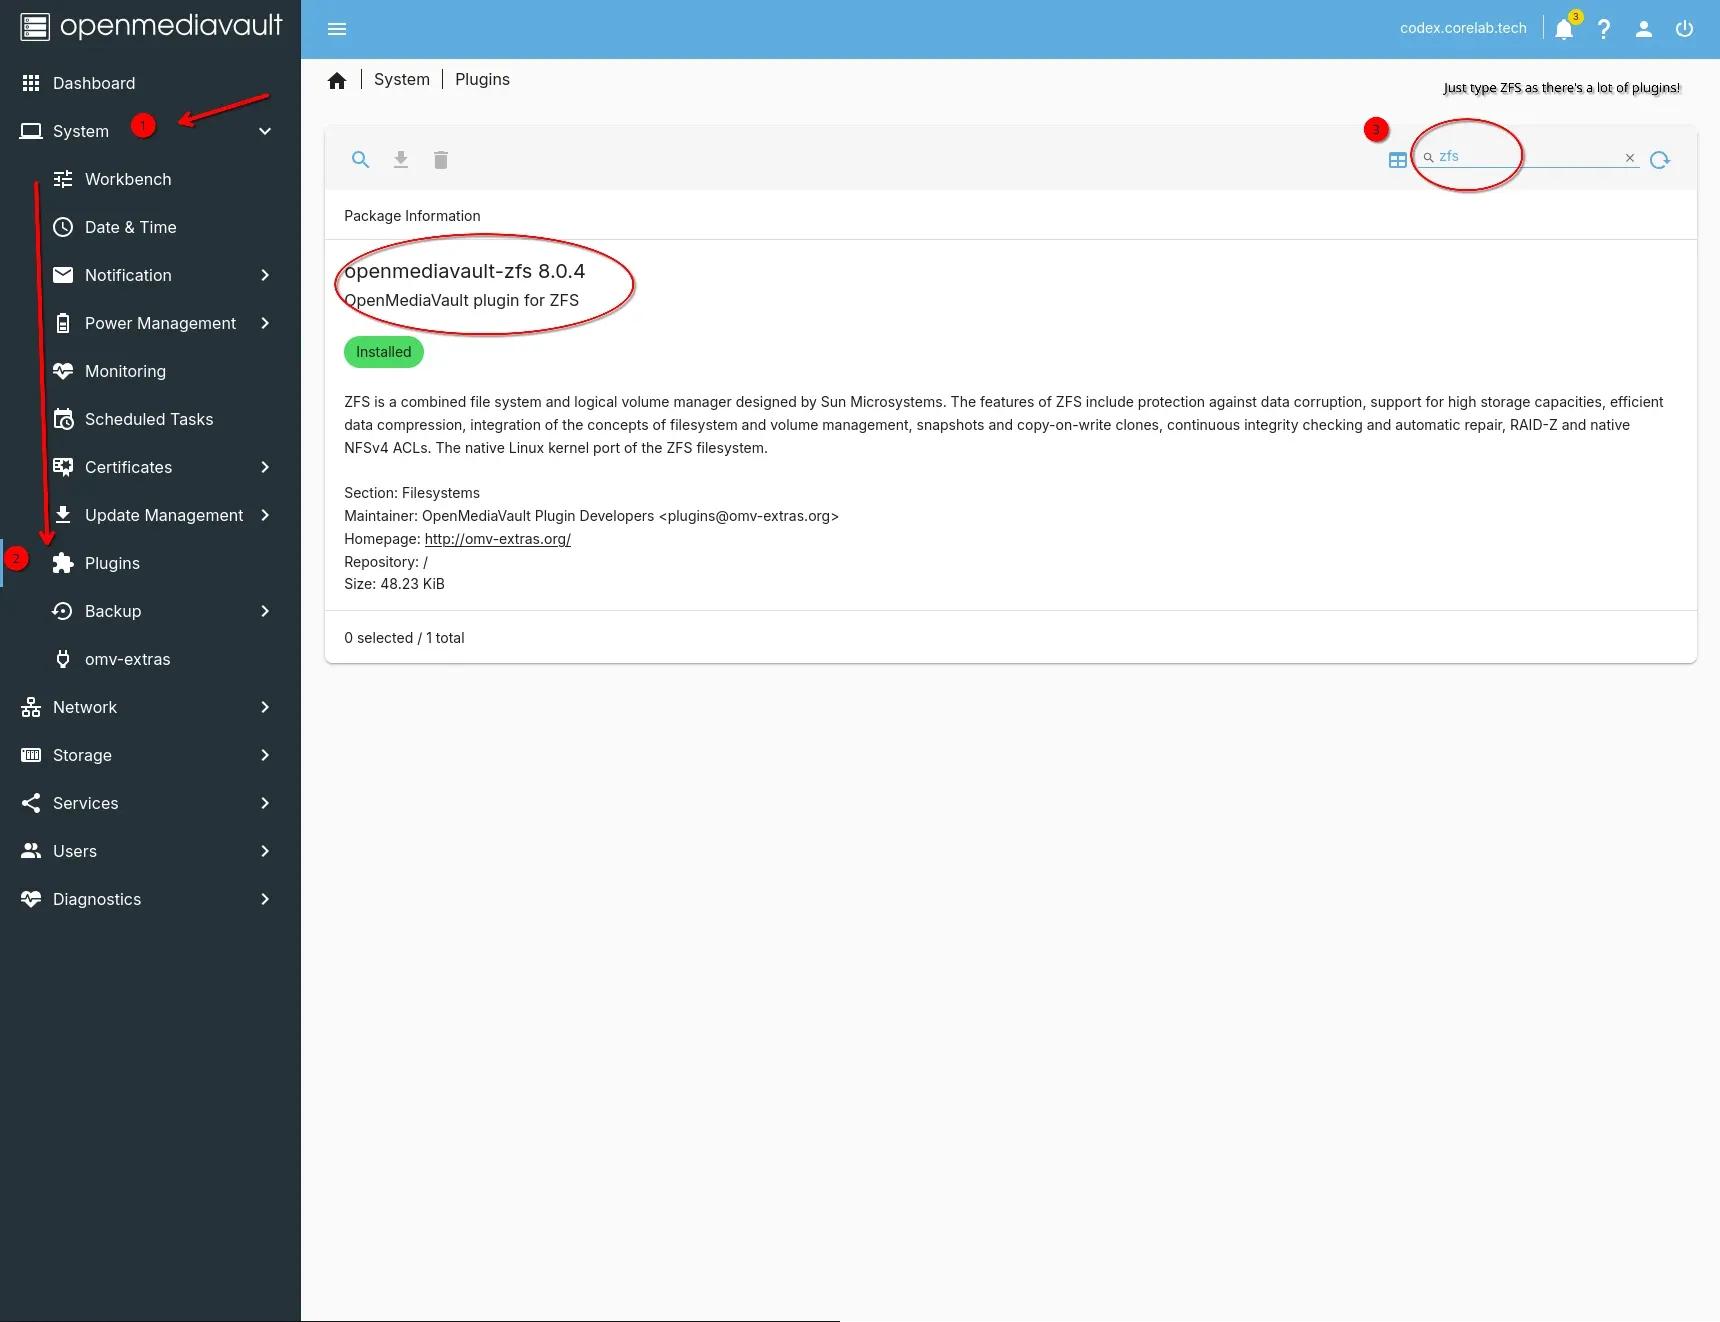
Now install the ZFS package! Same spot.
Part 3: Mastering ZFS (Enterprise-Grade Storage)
ZFS is the crown jewel of OMV8. It doesn't just store data; it protects it from "bit rot" using checksums. ZFS is more than just a file system; it is a volume manager that ensures your data never rots. Unlike traditional RAID, ZFS knows exactly what data is written and can self-heal corruption. Here's where your pre-planning will save you as you've already picked which ZFS RAIDZ to run, right? Eh? 😉
RAIDZ Levels Simplified
- Mirror (RAID 1): 2 disks. Fast, but you lose 50% capacity.
- RAIDZ1: 1-disk redundancy. Use for small, non-critical arrays.
- RAIDZ2: 2-disk redundancy. The Gold Standard. Safe for arrays of 4–10 disks.
Diving Into ZFS!
ZFS is a next-generation file system that offers unparalleled data integrity, advanced storage management features, and built-in RAID capabilities. Unlike traditional RAID systems, ZFS uses checksums to verify the integrity of your data, detecting and correcting errors before they can lead to data loss. While it can be more complex to set up initially, the benefits of ZFS are well worth the effort. The OMV-Extras plugin makes setting up ZFS significantly easier than it used to be. However, it's crucial to understand the basics before you start creating a pool. ZFS pools are built from one or more physical disks, and the way you configure these disks determines the level of redundancy and performance you achieve. Understanding RAID types like RAIDZ1, RAIDZ2, and RAIDZ3 is essential for making informed decisions about your ZFS configuration. (Stay tuned for a dedicated post on RAID types and ZFS!).
- ZFS Benefits: Data integrity, advanced management.
- OMV-Extras: Simplifies ZFS setup.
- Learn RAID Types: Essential for ZFS configuration.
- I very strongly suggest RAIDZ2 for 4-10 disk setups.
Stage 1: Preparing Your Disks (The "Clean Slate")
ZFS is picky; it won't touch a disk if it sees old partition data from a previous Windows or Linux install.
- Navigate to Storage > Disks.
- Select each of your data drives (NOT your OS drive!) and click the Wipe (eraser icon) button.
- Choose Quick. This clears the headers and prevents "Invalid VDEV" errors during pool creation.
Stage 2: Creating the Pool (The "Nerd Stats" Phase)
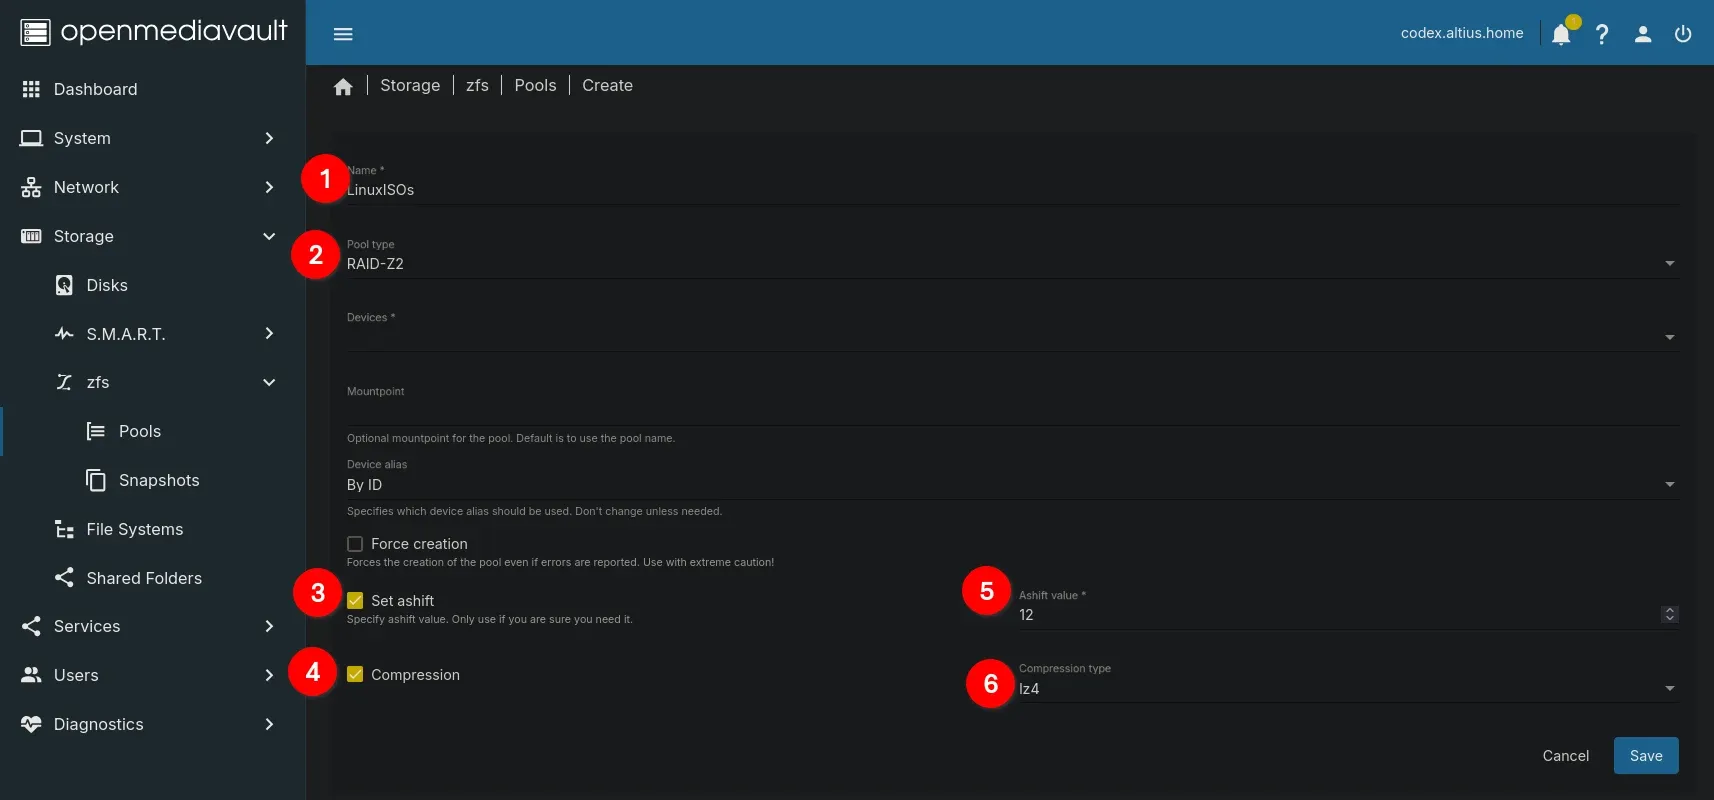
Now we build the actual storage array. Settings included to make this an 'Ultimate' ZFS array. Pictures below.
- Navigate to Storage > ZFS > Pools.
- Click the ➕ Create button.
- Name: Use something simple and lowercase (e.g.,
vault,tank, ordata). Avoid spaces or special characters. - Type: Select your redundancy level:
- Mirror: For 2 drives (RAID 1 equivalent).
- RAID-Z1: 1-disk failure tolerance (Minimum 3 drives).
- RAID-Z2: 2-disk failure tolerance (Minimum 4 drives — Recommended).
- Devices: Check the boxes for your wiped data drives.
- Advanced Options (The "Ultimate" Part):
- Ashift: Set this to 12. This is non-negotiable for modern drives (4k sectors). Setting it to 9 by mistake will kill your performance.
- Compression: Select lz4. It is extremely efficient and actually speeds up your NAS by reducing the amount of data the physical heads have to write.
- Click Save - Creation Time: Be patient – it can take a while.

Stage 3: Creating Datasets on your new Pool
Crucial Tip: Never share the "Root" of your ZFS pool. Instead, create "Datasets" (sub-filesystems) for different uses (e.g., Media, Backups, AppData). This allows you to set different permissions or snapshots for each.
- In Storage > ZFS > Pools, highlight your new pool.
- Click the ➕ button (Add filesystem/dataset).
- Name it (e.g.,
media). - Set atime to Off (this prevents the drive from writing "last accessed" timestamps every time you watch a movie, saving wear and tear).
- Click Add.
🚨 Quick Check & Troubleshooting: Is ZFS Healthy?
After the checkmark finishes, you can verify your work. Go to Storage > ZFS > Pools. You should see your pool status as ONLINE. If you want to see the "under the hood" stats, you can always SSH in and run:
zpool statusThis command is the "EKG" for your storage—it shows you every disk in the array and confirms they are all healthy and checksum-protected.
- "Connection Lost" during Kernel install? This is normal! The server is rebooting. Wait 2 minutes and refresh your browser.
- ZFS menu is empty? You likely aren't booted into the Proxmox kernel. Check System > Kernel and ensure the PVE kernel is the "Current" one.
- Drives missing in the list? They might still have a "hanging" partition. Go back to Storage > Disks and perform a "Full" wipe instead of "Quick."
🔥 Congratulations! You now have an enterprise-grade storage server running in your home. NERD! 😜
Now that your storage is safe and checksum-protected, it’s time to fill it. Head over to my [Arr Docker Compose Guide] to start your automated media library.
🐋 Docker Setup on OMV8: Choosing Your Path
In 2026, you shouldn't just install apps—you should deploy them. OMV8 (Debian 13) offers two ways to handle Docker. One keeps you in the comfort of the WebGUI, while the other lets you flex your Linux muscles in the terminal.
| Feature | The Workbench Wizard (OMV Way) | The Terminal Purist (Bare Metal Way) |
| Interface | OMV Web Interface (Dashboard) | SSH / Command Line |
| Ease of Use | High - Point and Click | Medium - Manual Config |
| Control | Standardized | Infinite |
| Backup | Managed via OMV-Compose | Manual Scripting |
Option A: The "Workbench Wizard" (The OMV Way)
This is the recommended path for 90% of users. It integrates Docker Compose directly into the OMV8 sidebar.
- Install the Plugin: Go to System > Plugins and search for
openmediavault-compose. Install it. - The Setup: Once installed, go to Services > Compose > Settings.
- Define Folders: Point OMV to where you want your YAML files stored (e.g.,
/data/compose) and where your container data lives (e.g.,/data/appdata). - Finalize: Click Reinstall Docker to ensure the OMV8 hooks are correctly set for the Debian 13 backend.
Why this rocks: You get a built-in editor with syntax highlighting and a "Check" button that validates your YAML before you try to run it. No more "spacing errors" ruining your night.
Option B: The Terminal Purist (The Bare Metal Method)
If you find the GUI limiting or you're already managing a fleet of servers via Ansible or Portainer, you might want to install Docker the "Raw Debian" way. This ensures you are using the official Docker repositories directly.
1. Clean the Slate
Ensure no legacy versions are hanging around: sudo apt-get remove docker docker-engine docker.io containerd runc
2. Set Up the Repository
Since OMV8 is based on Debian 13 (Trixie), we use the modern apt-key replacement (storing keys in gpg format):
# Add Docker's official GPG key:
sudo apt-get update
sudo apt-get install ca-certificates curl gnupg
sudo install -m 0755 -d /etc/apt/keyrings
curl -fsSL https://download.docker.com/linux/debian/gpg | sudo gpg --dearmor -o /etc/apt/keyrings/docker.gpg
sudo chmod a+r /etc/apt/keyrings/docker.gpg

# Add the repository to Apt sources:
echo \
  "deb [arch="$(dpkg --print-architecture)" signed-by=/etc/apt/keyrings/docker.gpg] https://download.docker.com/linux/debian \
  "$(. /etc/os-release && echo "$VERSION_CODENAME")" stable" | \
  sudo tee /etc/apt/sources.list.d/docker.list > /dev/null
3. Install the Engine
sudo apt-get update sudo apt-get install docker-ce docker-ce-cli containerd.io docker-buildx-plugin docker-compose-plugin
4. Verify Terminal Force
Check your version: docker compose version
Note: In 2026, the hyphenateddocker-composeis officially a relic. We now use thedocker compose(space) command, which is faster and written in Go.
⚠️ The Golden Rule of OMV8 Docker
Pick one and stick to it. If you install Docker via the Terminal Purist method, the OMV Workbench Wizard might not "see" your containers correctly in the GUI dashboard. If you want the pretty graphs and status lights in OMV, use theOMV Way. If you want to feel like a hacker in a dark room, go Bare Metal.
🛠️ The Essential "Day 1" Starter Stack
Once Docker is humming, you need your foundation. This stack includes AdGuard Home for network-wide ad blocking, Vaultwarden for your passwords, and Dozzle for log monitoring.
This YAML follows the Core Lab "Media Fortress" standard: everything is organized, permission-correct, and ready for 2026.
1. Prepare your .env file
Place this in your compose directory alongside the YAML.
PUID=1000
PGID=100
TZ=America/Toronto
ROOT_APP_DATA=/path/to/your/zfs/pool/appdata
2. The Starter Compose (docker-compose.yml)
services:
  # AdGuard Home - Network-wide Ad & Tracker Blocking
  adguardhome:
    image: adguard/adguardhome:latest
    container_name: adguardhome
    restart: unless-stopped
    volumes:
      - ${ROOT_APP_DATA}/adguard/work:/opt/adguardhome/work
      - ${ROOT_APP_DATA}/adguard/conf:/opt/adguardhome/conf
    ports:
      - "53:53/tcp"
      - "53:53/udp"
      - "80:80/tcp"
      - "443:443/tcp"
      - "443:443/udp"
      - "3000:3000/tcp" # Initial Setup WebUI
    networks:
      - internal-proxy

  # Vaultwarden - Lightweight Bitwarden-compatible Password Manager
  vaultwarden:
    image: vaultwarden/server:latest
    container_name: vaultwarden
    restart: unless-stopped
    environment:
      - SIGNUPS_ALLOWED=true # Set to false after you create your account!
    volumes:
      - ${ROOT_APP_DATA}/vaultwarden:/data
    ports:
      - "8080:80"
    networks:
      - internal-proxy

  # Dozzle - Real-Time Container Log Viewer
  dozzle:
    image: amir20/dozzle:latest
    container_name: dozzle
    restart: always
    volumes:
      - /var/run/docker.sock:/var/run/docker.sock:ro
    ports:
      - "8081:8080" # Access at http://your-ip:8081

networks:
  internal-proxy:
    driver: bridge
Note: If AdGuard fails to start, you may need to disable systemd-resolved on the host to free up port 53. Other option is to put adguard home on it's own IP with macvlan or ipvlan networking!
🚀 Why these three?
- AdGuard Home: Before you start downloading ISOs, secure your DNS.
- Vaultwarden: You’re going to be creating a dozen new accounts for indexers and trackers. Keep them secure from the start.
- Dozzle: If a container doesn't start, Dozzle tells you why in plain English. No more digging through
/var/lib/docker/logs.
How to Deploy
- The Wizard Way: Paste the code into the Services > Compose > Files section in OMV8, click "Save," then "Up."
- The Raw Way: Save the files to a folder, SSH in, and run
docker compose up -d.- You can check how a container is doing by watching live logs with
docker logs -f dozzlefor example and get a live running log! CTRL-C to cancel out and drop back to console.
- You can check how a container is doing by watching live logs with
🆘 Troubleshooting OMV8
- Can't reach the WebGUI? SSH into the server and type
omv-firstaid. It’s the Swiss Army knife for fixing IP conflicts and forgotten passwords. - ZFS Plugin Missing? Ensure you have enabled the OMV-Extras repository first, then search for
openmediavault-zfsin the Plugins menu. - Package Errors? If you see "Error 500" during updates, go to System > OMV-Extras > Settings and click Apt Clean.
- If you run into issues during install, or did a ZFS setting wrong, just start over if you're really stuck! The install does not take long, and destroying or re-creating a ZFS pool to get the settings just right long term are worth it. You're laying a long-term foundation here, Rome wasn't built in a day!
Your Journey Begins Here
You’ve just built a storage powerhouse that rivals enterprise systems costing thousands. You're officially a NAS Architect. 😜
Your choices are now endless. Welcome to the Core Lab! 🪽
Next Steps in your Self-Hosting Journey
➡️Setup Docker Compose!
➡️Setup Plex Media Server!
➡️Setup NGINX via SWAG!
➡️Setup a Dedicated Gaming Server!
Ready to level up? Now that your core services are running, you can move on to the Ultimate Arr Stack Guide to turn this into a full-blown media powerhouse!
 Core Lab Joe
Step 1: The "Which NAS OS?" FAQ
This section directly targets users who are "NAS-curious" and helps them decide why OMV8 is the right choice for 2026.
Frequently Asked Questions
- Is OMV8 better than Unraid for a Media Server? Unraid is known for its ability to mix-and-match drive sizes, while OMV8 (via ZFS) focuses on enterprise-level data integrity and speed. If you have identical drives and want the fastest possible performance with protection against "bit rot," OMV8 is the superior choice.
- Why does OMV8 require a separate OS drive? OMV is built on Debian, which treats the OS partition as a system-exclusive area. While you can hack it to store data, it is a "best practice" to keep your data on a separate ZFS pool to ensure that an OS reinstallation never puts your media at risk.
- Can I use a Raspberry Pi for OMV8? Absolutely. OMV8 is highly optimized for ARM64 architecture (like the Raspberry Pi 5). However, for ZFS, we recommend a minimum of 8GB of RAM, which makes the 8GB Pi 5 or a dedicated x86 Mini-PC a better fit than older models.
- What is the benefit of the Proxmox Kernel in OMV? The Proxmox kernel includes the most up-to-date ZFS drivers and is tuned for high-performance storage and virtualization. It ensures your ZFS pool is running on the same stable foundation used by enterprise data centers.
- What do I do if I forget my OMV8 WebGUI password? SSH into your server and run the command
omv-firstaid. This built-in utility allows you to reset the admin password, fix network interfaces, and restore WebGUI access without a full reinstall.



Member discussion