
Mastering WireGuard: Site-to-Site & Road Warrior Setups Behind OPNsense NAT

Introduction: Why Decouple Your VPN?
Welcome back to the lab. If you’ve followed my OPNsense series, you’ve built a fortress. You have VLANs, Intrusion Detection, and a strict firewall ruleset. But sometimes, you don't want your firewall to handle everything.
Maybe you want to run a cutting-edge version of WireGuard. Maybe you want to easily migrate your VPN server between hardware without touching your firewall config. Or maybe, like me, you just love Docker containers!
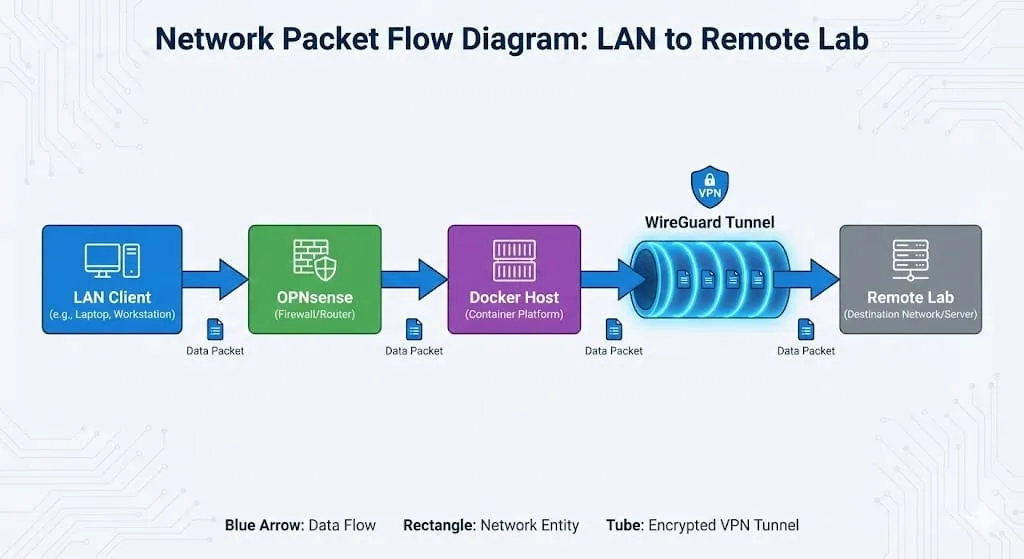
In this guide, we are going to do something advanced. We are going to punch a precise, secure hole in our OPNsense fortress to allow an internal Linux Host (running Docker or a VM) to act as our VPN Gateway.
We will cover two critical scenarios:
- The Road Warrior: Your phone/laptop connecting securely back to your home LAN from a coffee shop.
- The Mesh Peer (Site-to-Site): Connecting your lab to another network (like a friend's lab or a cloud VPS) so devices on both sides can talk to each other.
Let’s get to work.
Part 1: The Docker Method 🐳
For those who want lightweight, portable speed.
Prerequisites
- A Linux host running Docker & Docker Compose (Ubuntu/Debian recommended).
- OPNsense running as your edge firewall.
- A static IP on your Docker host (e.g.,
10.10.1.50).
Step 1: Prepare the Docker Host (Routing is Key!)
By default, Linux does not forward packets between interfaces. If you want to access other devices on your LAN (Scenario A) or bridge two networks (Scenario B), your host must act as a router.
- SSH into your Linux/Docker host.
- Edit the sysctl configuration:
# Create a persistent config file
sudo nano /etc/sysctl.d/99-wireguard.conf- Paste the following to enable forwarding:
net.ipv4.ip_forward = 1
net.ipv6.conf.all.forwarding = 1
- Apply the changes immediately:
sudo sysctl -p /etc/sysctl.d/99-wireguard.confIf you'd like to give it a whirl, do this:
sudo nano /etc/sysctl.d/wireguard-tuning.conf- Paste this in the new file:
# 1. Enable BBR for better speed over internet
net.core.default_qdisc = fq
net.ipv4.tcp_congestion_control = bbr

# 2. Increase UDP Buffer sizes (Critical for WireGuard/Tailscale speed)
net.core.rmem_max = 7500000
net.core.wmem_max = 7500000

# 3. Optimize ARP cache (Since you are routing a subnet)
net.ipv4.neigh.default.gc_thresh1 = 512
net.ipv4.neigh.default.gc_thresh2 = 2048
net.ipv4.neigh.default.gc_thresh3 = 4096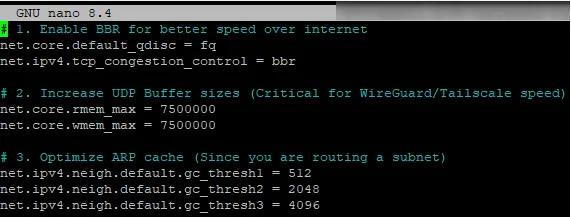
Step 2: The Docker Compose Stack (Easy way!)
We will use the excellent linuxserver/wireguard image. It’s stable, supports multiple architectures, and handles keys gracefully.
Create a folder for your project and a docker-compose.yml:
services:
  wireguard:
    image: lscr.io/linuxserver/wireguard:latest
    container_name: wireguard
    cap_add:
      - NET_ADMIN
      - SYS_MODULE # Optional: Only if using host kernel modules
    environment:
      - PUID=1000
      - PGID=1000
      - TZ=America/New_York
      - SERVERURL=vpn.corelab.tech # Your DDNS or Static WAN IP
      - SERVERPORT=51820
      - PEERS=3 # Number of client configs to generate (Phone, Laptop, Tablet)
      - PEERDNS=1.1.1.1 # Or use your PiHole/AdGuard IP (e.g. 10.10.1.5)
      - INTERNAL_SUBNET=10.13.13.0 # The VIP range for the VPN tunnel
      - ALLOWEDIPS=0.0.0.0/0 # For Road Warriors (Tunnel Everything)
    volumes:
      - ./config:/config
      - /lib/modules:/lib/modules # Optional: For kernel module access
    ports:
      - 51820:51820/udp
    sysctls:
      - net.ipv4.conf.all.src_valid_mark=1
    restart: unless-stopped
Launch the stack:
docker compose up -d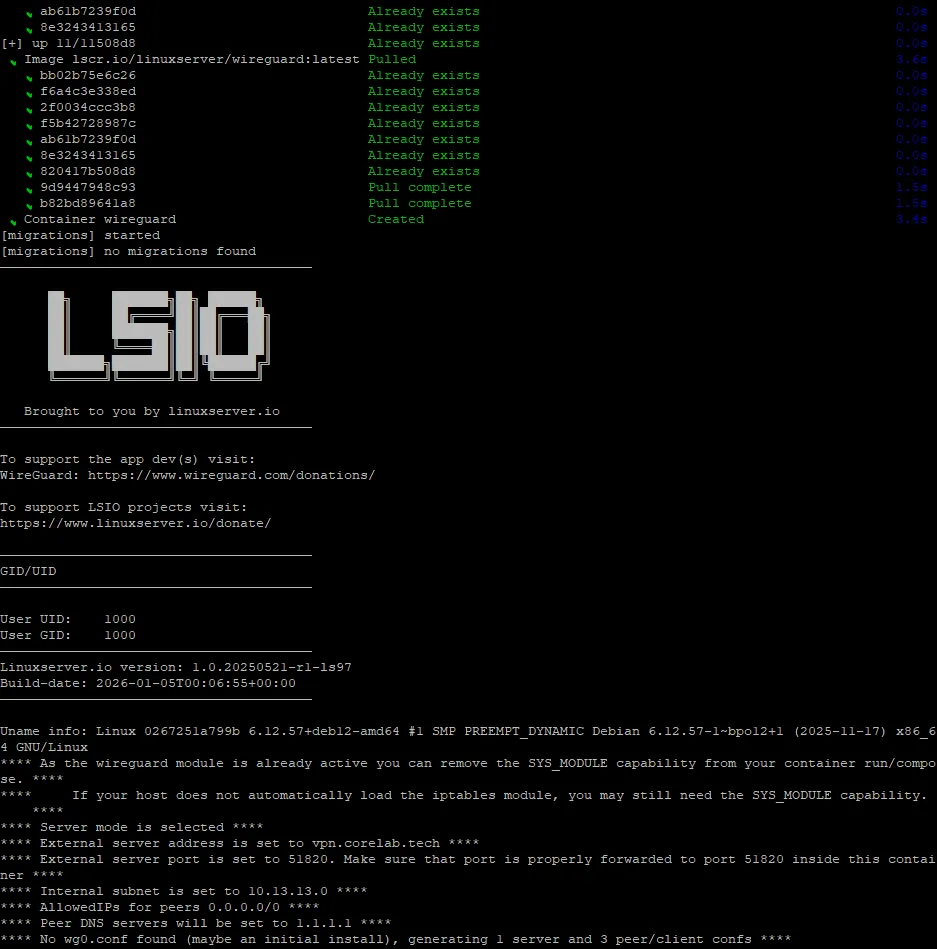
Check the logs to see the QR codes generated for your peers!
docker compose logs -f wireguard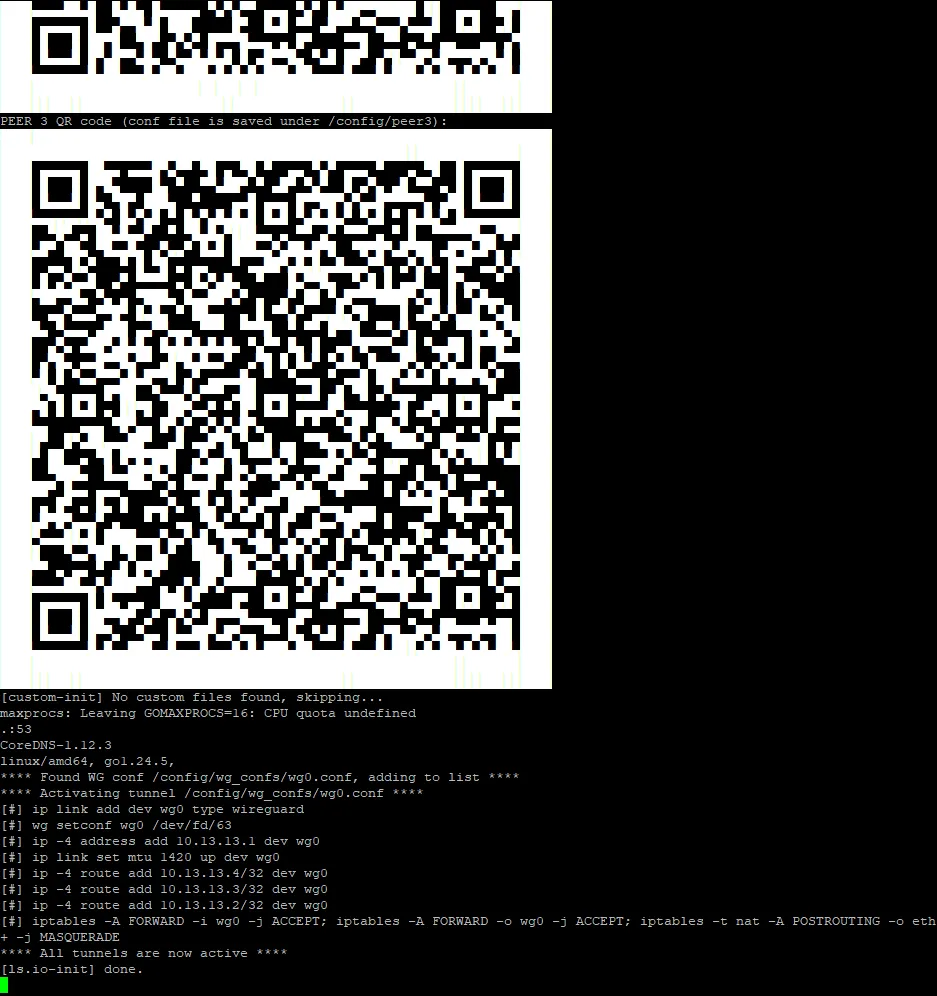
- Phone: Scan the QR code from the terminal.
- Laptop: You can't scan a screen with the same screen. Navigate to
./config/peer1/and copy the text frompeer1.confinto your WireGuard client.
Step 3: OPNsense Configuration (Opening the Gates)
Your container is listening, but your fortress (OPNsense) is currently blocking the door. We need to forward the traffic.
A. Port Forwarding (NAT)
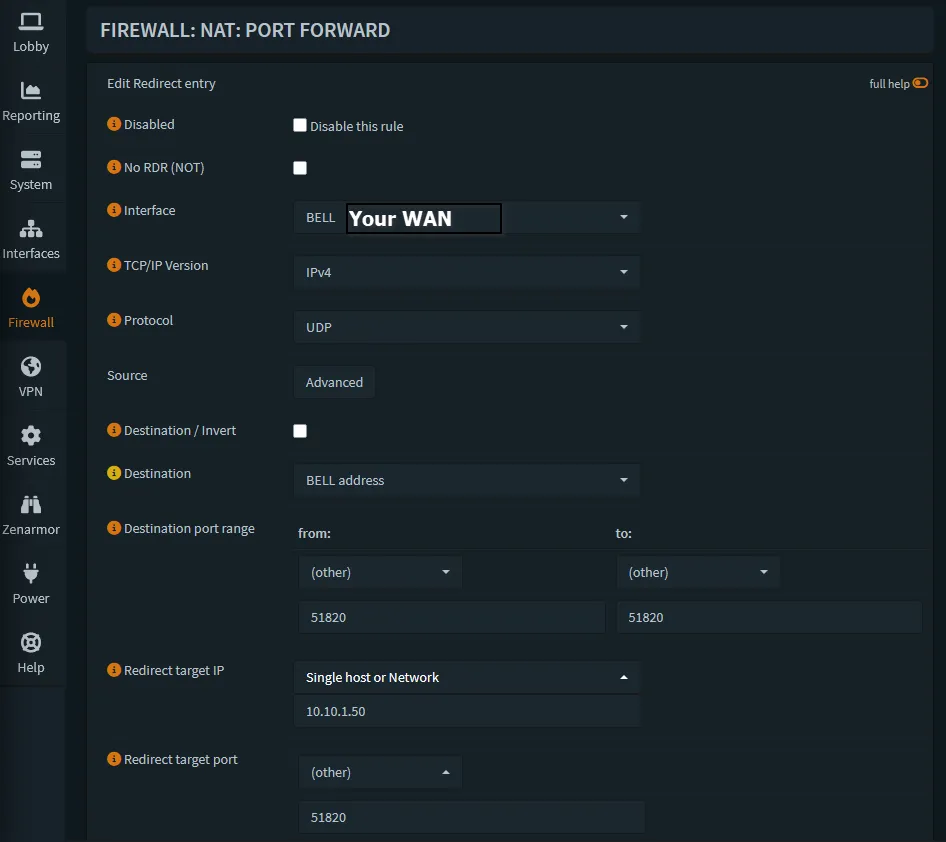
- Navigate to Firewall -> NAT -> Port Forward.
- Click Add (+).
- Interface: WAN
- Protocol: UDP
- Destination: WAN address
- Destination Port Range: 51820
- Redirect Target IP:
10.10.1.50(Your Docker Host IP) - Redirect Target Port: 51820
- Log: Checked (Optional, recommended for initial troubleshooting)
- Filter Rule Association: Add associated filter rule.
- Save and Apply.
⚠️ Verification: Go to Firewall -> Rules -> WAN and ensure the rule created by the NAT wizard is present and enabled (Green play icon).
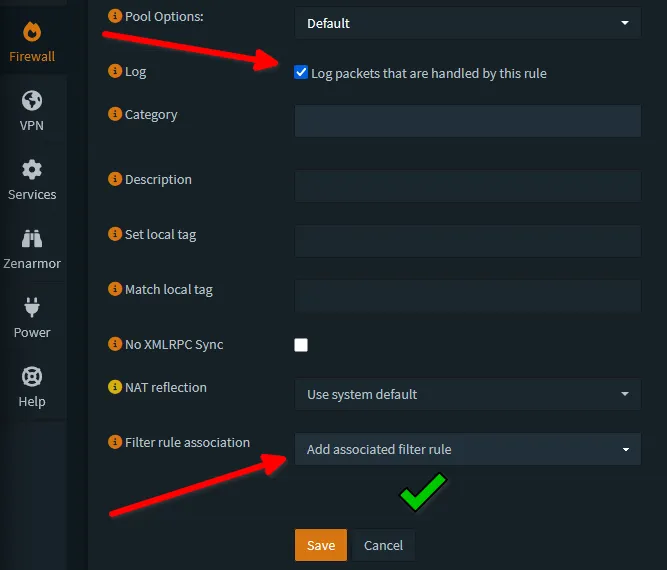
Telling OPNsense to pass the encrypted baton to our Docker container.
At this point, Scenario A (Road Warrior) works! Your phone can connect, and because we enabled IP Forwarding on the host, you can browse your LAN.
Step 4: Scenario B - Site-to-Site (The "Mesh" Config)
Advanced Level: Connecting two labs!!!
If this Docker container is connecting to a remote peer (e.g., a friend's network 192.168.99.0/24) and you want your entire LAN to reach it, we need Static Routes.
- Edit
wg0.conf: Stop the container and editconfig/wg0.conf. Add a peer block for the remote site:
[Peer]
# The Remote Site
PublicKey = <Remote_Public_Key>
Endpoint = remote.lab-friend.com:51820
# Allow traffic to the VPN IP AND the Remote LAN
AllowedIPs = 10.13.13.2/32, 192.168.99.0/24
PersistentKeepalive = 25- Tell OPNsense the Path Exists: OPNsense knows about your LAN (
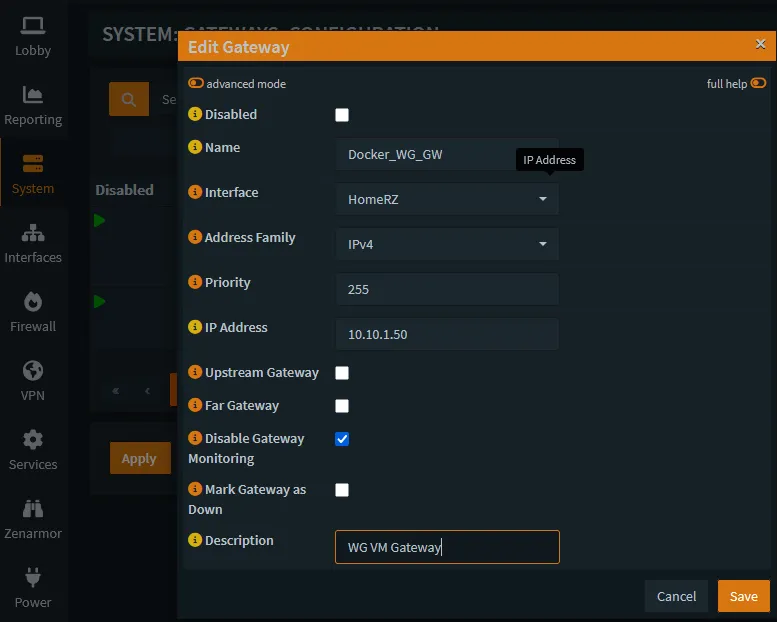
10.10.1.0/24), but it has no idea that192.168.99.0/24exists inside that Docker container.- System -> Gateways -> Configuration: Add a new Gateway.
- Name:
Docker_WG_GW - Interface: LAN
- IP Address:
10.10.1.50(Docker Host IP)
- Name:
- System -> Gateways -> Configuration: Add a new Gateway.
- System -> Routes -> Configuration: Add a Static Route.
- Network:
192.168.99.0/24(The Remote Lab) - Gateway:
Docker_WG_GW
- Network:
Part 2: The Full VM Method 🖥️
For those who want maximum kernel performance and cleaner routing.
Sometimes Docker networking (NAT inside NAT) gets messy. Running WireGuard on a dedicated micro-VM (like a Proxmox LXC or a small Ubuntu VM) removes the Docker abstraction layer.
Step 1: Install WireGuard
On your Ubuntu/Debian VM (10.10.1.60):
sudo apt update && sudo apt install wireguard resolvconf -yEnable IP Forwarding just like we did in the Docker step (sysctl.conf).
Step 2: Configure the Server
Create your config file:
sudo nano /etc/wireguard/wg0.confThe Config (Server Mode):
[Interface]
Address = 10.13.13.1/24
ListenPort = 51820
PrivateKey = <Server_Private_Key>
# The Magic Masquerade Rule (Required for returning traffic!)
# This ensures that traffic leaving the VM appears to come from the VM's IP,
# solving routing issues for lazy clients.
PostUp = iptables -A FORWARD -i %i -j ACCEPT; iptables -A FORWARD -o %i -j ACCEPT; iptables -t nat -A POSTROUTING -o eth0 -j MASQUERADE
PostDown = iptables -D FORWARD -i %i -j ACCEPT; iptables -D FORWARD -o %i -j ACCEPT; iptables -t nat -D POSTROUTING -o eth0 -j MASQUERADE

[Peer]
# Road Warrior Client (Phone)
PublicKey = <Phone_Public_Key>
AllowedIPs = 10.13.13.2/32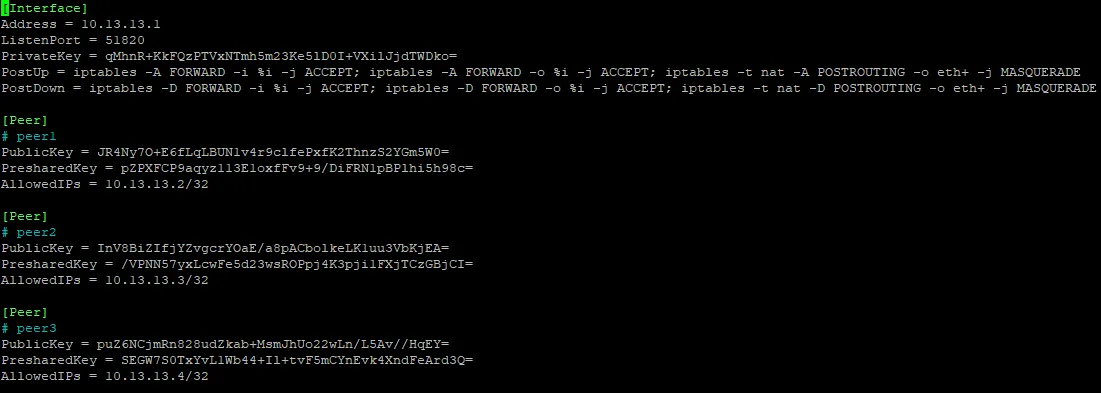
Start it up:
sudo wg-quick up wg0
sudo systemctl enable wg-quick@wg0
Step 3: OPNsense Integration
This is identical to the Docker method.
- Port Forward UDP 51820 to the VM IP (
10.10.1.60). - Static Routes (for Site-to-Site) pointing to the VM IP.
Part 3: Performance Tweaks & "The Need for Speed" 🚀
Whether you use Docker or a VM, WireGuard is fast. But we can make it faster.
1. MTU Tuning (The #1 Fix for "It connects but websites won't load")
When you wrap a packet inside a packet (VPN), it gets bigger. If it exceeds 1500 bytes, it fragments, causing massive slowdowns.
- The Safe Bet: Set
MTU = 1280in your[Interface]block. This is the WireGuard minimum and works on almost every connection type (LTE, Starlink, Fiber). - The Optimized Bet: Try
1420.
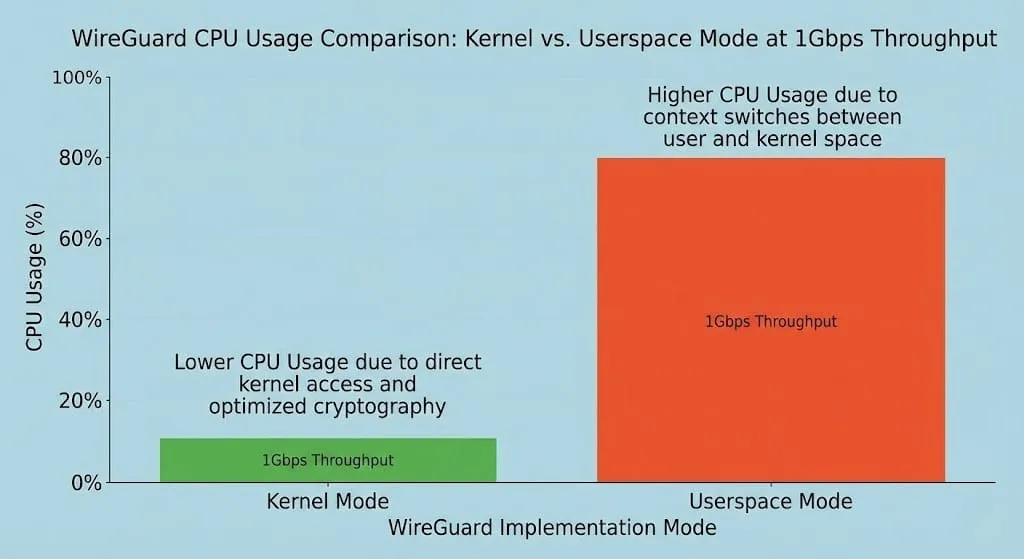
2. Userspace vs. Kernel Mode (Docker Specific)
By default, Docker containers run WireGuard in "Userspace" (using Go). This is fine for 100-500Mbps. If you have Gigabit fiber, you want Kernel Mode.
- How: Ensure your Docker Host has the
wireguardmodule installed (sudo apt install wireguard). - Compose: In your docker-compose.yml, ensure you have:
volumes:
  - /lib/modules:/lib/modules
cap_add:
  - NET_ADMIN
- SYS_MODULE- The container will detect the host's kernel module and use it automatically, drastically reducing CPU usage!
3. Persistent Keepalive (NAT Survival)
If your connection drops silently after a few minutes of inactivity, your NAT router (or OPNsense) is closing the state.
- Fix: Add
PersistentKeepalive = 25to your[Peer]configs. This sends a tiny "heartbeat" ping every 25 seconds to keep the firewall tunnel open.
Conclusion
You have now successfully decoupled your VPN from your edge firewall. You can update, restart, or nuke your WireGuard instance without ever taking your main internet connection offline. You can also connect to a friend's network across the world with a secure, performant and private VPN, 100% of your own creation! #PowerOverwhelming!
Your OPNsense handles the security policy, and your Linux host handles the heavy cryptographic lifting.
This is the Way!
What's Next? Now that you have a secure tunnel, why not use it to access your local LLMs remotely? Check out my guide on hosting local AI safely!
Now you can move on to enabling the "all seeing eye" of your LANs with Zenarmor, part 3 of the OPNsense series.
Or maybe keep things light and leave wireguard on OPNsense directly?


Member discussion