
OPNsense Layer-7 Control: A Deep Dive into Zenarmor (Part 3)
In Part 1, we built the firewall (Layer 3/4). In Part 2, we hardened it with user accounts, 2FA, blocklists, and CrowdSec. Now, it's time to add Layer 7 (Application) awareness.
Your firewall is great at blocking IPs and ports, but it has no idea what is running inside your traffic. Is that HTTPS traffic on port 443 your bank, or is it Netflix? Is it a "smart" TV sending data to an ad server, or is it a game update?
This is where Zenarmor comes in. Zenarmor is a Next-Generation Firewall (NGFW) plugin that gives you incredible visibility and control over the applications on your network.
Zenarmor is highly effective even without full TLS/SSL decryption setup because it examines the initial unencrypted stages of a TCP session, where it can examine the headers of a packet. This is highly effective. It examines the server names (via DNS SNI), IP addresses and remote application types & categories all from just headers and metadata. If you'd like to dig in and have a read how this works, head here.
This guide provides a detailed walk-through of installing and configuring the Zenarmor Free Edition, which provides a powerful foundation for visibility and basic filtering.
The OPNsense Architect

Prerequisites: Hardware & Performance Considerations (Read This First!)
Before you click "install," you must understand that Zenarmor is not 'free' in terms of system resources. It performs Deep Packet Inspection (DPI), which is CPU and RAM-intensive. To review my CPU recommendations, head over to the detailed hardware guide.
- CPU: A modern, multi-core 64-bit (x86_64) CPU is required. Older J-series Celerons will struggle. Modern Intel Celeron N-series (N100, N305), Core i3/i5, or AMD Ryzen CPUs are strongly recommended.
- RAM: A minimum of 4GB of RAM is recommended for OPNsense to run with Zenarmor. 8GB or more is strongly advised for a stable experience, especially if you run other services. If you'll have symmetrical 1Gbps or faster WAN or inspected traffic speeds, you'll want 16GB.
- Something like:
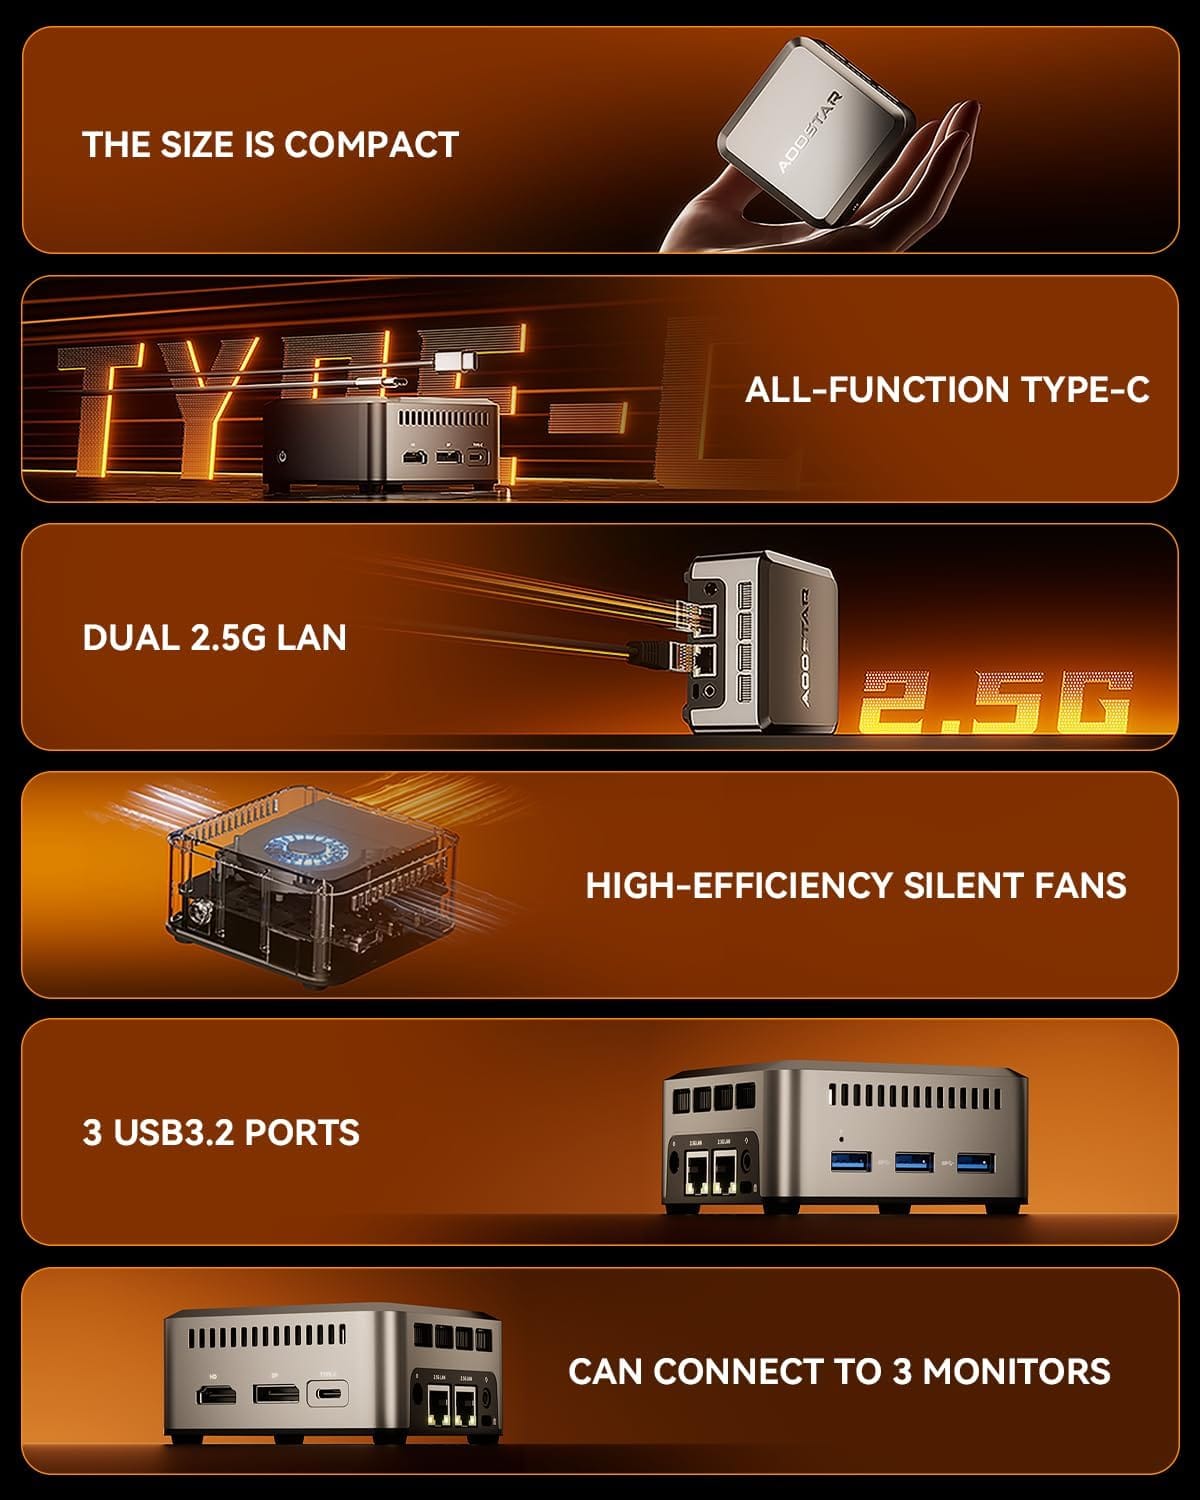
Intel Twin Lake N150 (Upgraded N100) Mini PC
Mini Desktop PC with LPDDR5 12GB RAM 512GB M.2 2242 SSD, Mini Computers 4K Triple Display/Dual 2.5G LAN/WiFi5/BT5 for Office/Business
- or even more powerful:
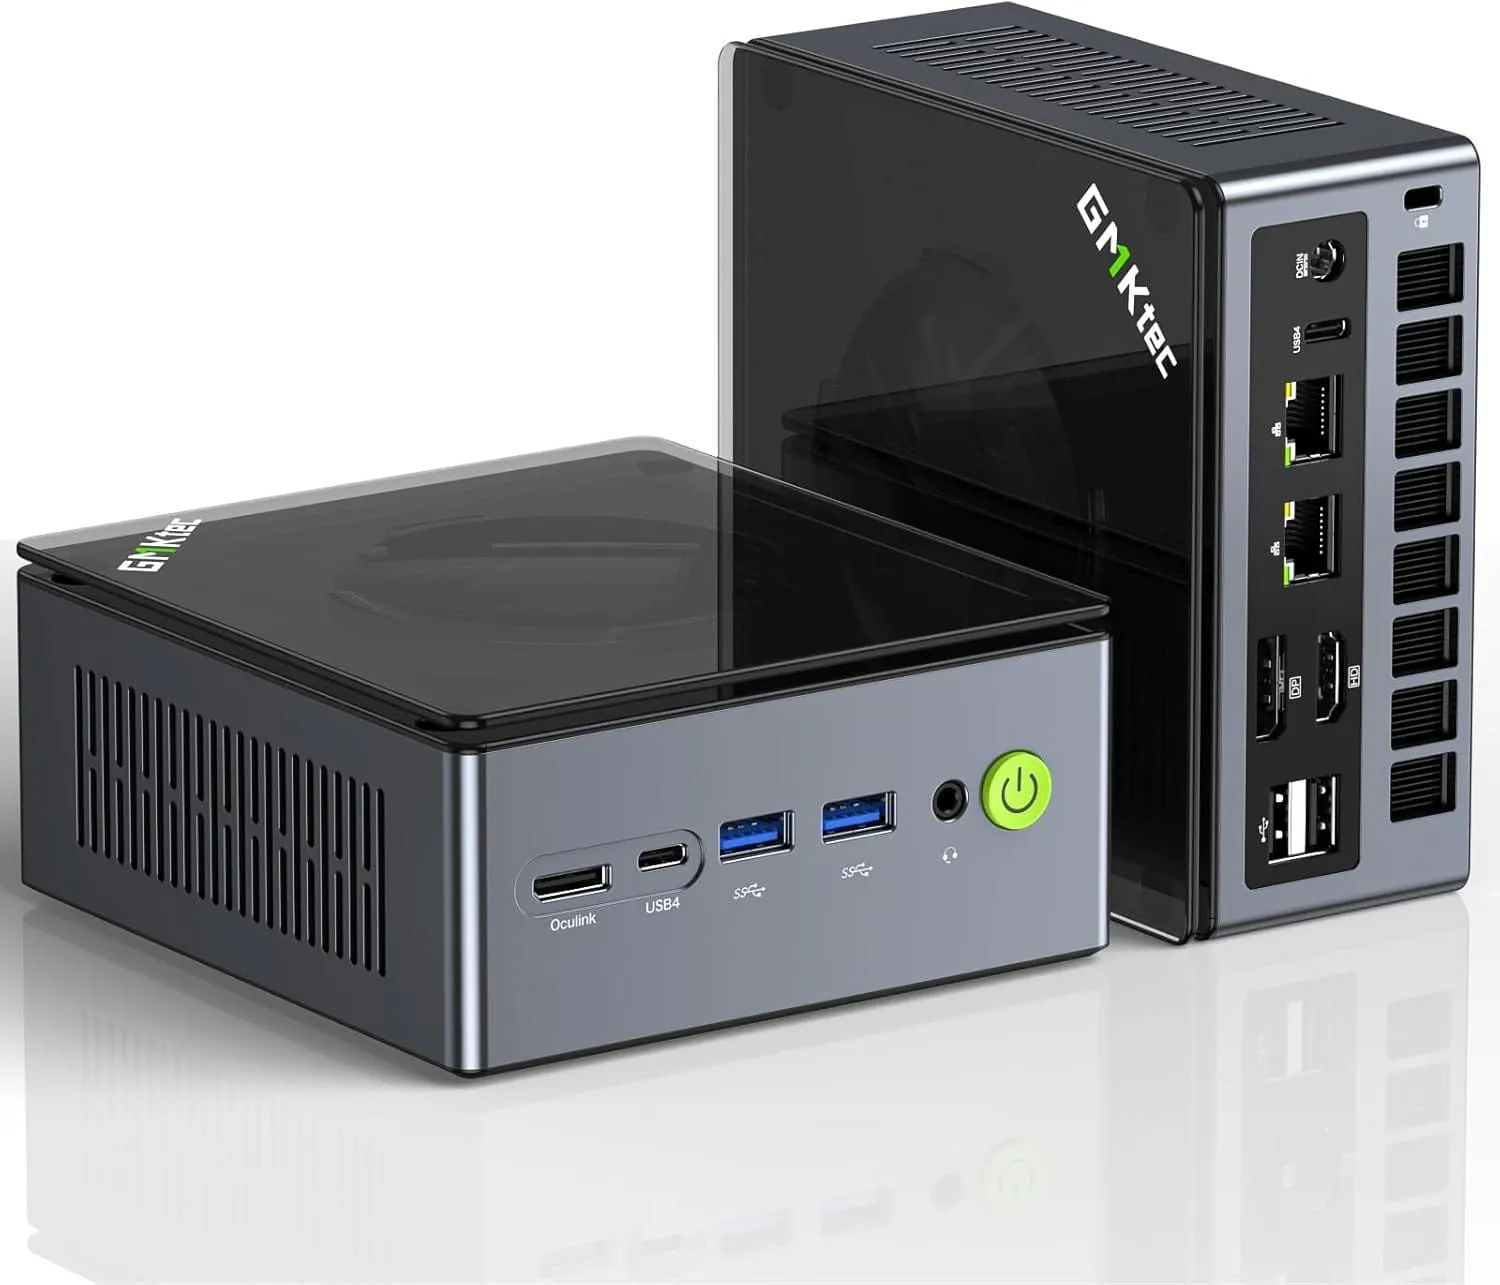
Dual NIC LAN 2.5G Desktop Computer, 32GB DDR5 RAM + 512GB Hard Drive PCle SSD, Dual USB4, HDMI 2.1, USB-C
⚠️ A Note on 1Gbps Symmetrical Connections
If you have a 1Gbps symmetrical connection or faster, this is the "stress test" for any firewall. Getting to 2.5Gbps, 5Gbps and 10Gbps is also, much harder.
Achieving full, line-rate 1Gbps throughput (up and down) while performing deep packet inspection is extremely demanding.
- With the Free Tier: On mid-range hardware (like a newer Intel N150 or Core i3), you will likely see a noticeable impact on your absolute maximum throughput. You may no longer hit the full 940+ Mbps on a speed test. The firewall's CPU will become the bottleneck as it inspects every packet.
- With Paid Tiers of Zenarmor: This performance hit becomes dramatically worse if you upgrade and enable advanced features like TLS (HTTPS) Inspection. To handle 1Gbps+ with full Zenarmor features enabled, you need a powerful, modern, desktop-class CPU (e.g., a Core i5/i7 or Ryzen 5/7) and 8GB+ of RAM. This scales up the faster your WAN connection goes generally.
The trade-off is simple: You are making a conscious decision to exchange some of your raw, top-end throughput for a massive increase in security and visibility. For most homelab users, this is an excellent trade. Do not be alarmed if your speed tests drop from 940 Mbps to 600-900 Mbps after enabling Zenarmor—this is the cost of inspection. If you will publicly expose any services, I think this is well worth the trade-off and you can upgrade hardware if you really want anyway. Test it out!
 Core Lab Joe
If you accept this performance trade-off, let's proceed.
Part 1: Installation & Initial Setup Wizard
Let's get the Zenarmor engine and its dependencies installed.
Step 1.1: Install the Zenarmor Plugins
Zenarmor requires two separate plugins to function.
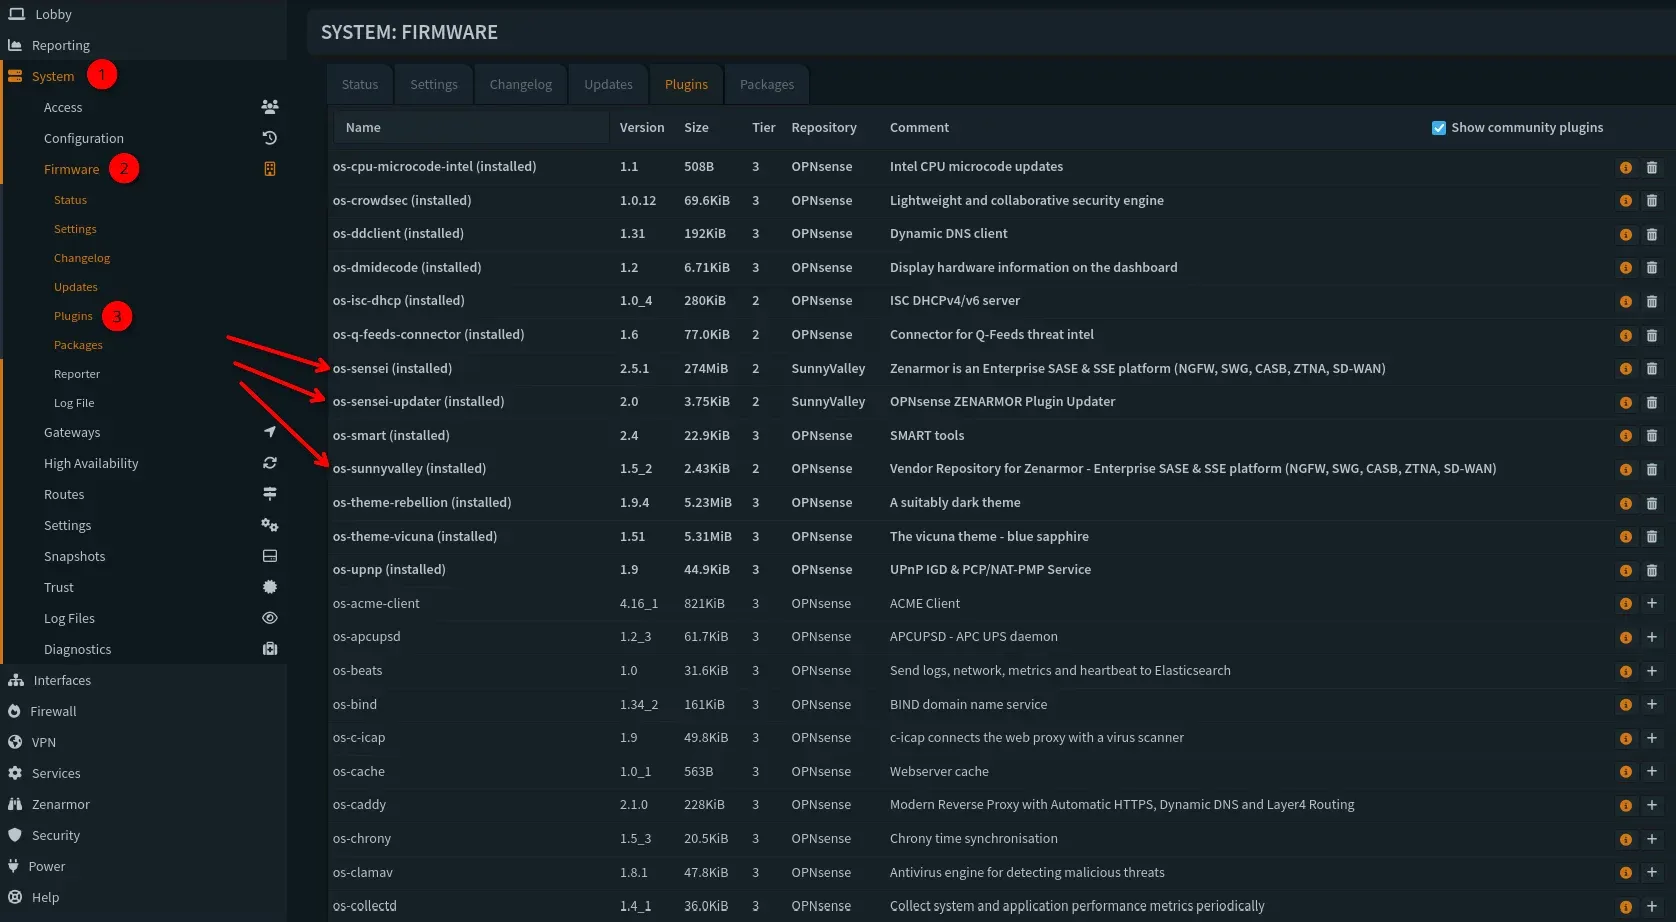
- Navigate to System -> Firmware -> Plugins.
- In the search bar, type
zenarmor. - You will see two packages. You must install both:
- os-sunnyvalley: This is the vendor repository and database. Click the
+to install it. - os-zenarmor: This is the main engine. Click the
+to install it.
- os-sunnyvalley: This is the vendor repository and database. Click the
- The installation will take several minutes as it downloads all the necessary components. Be patient.
Step 1.2: The Setup Wizard (Hand-Holding 👋)
Once installed, a new Zenarmor menu item will appear on the left. Click it to launch the setup wizard. If it's not there, CTRL-F5 refresh or clear cache and refresh.
- Hardware Check: The wizard will first analyze your server's hardware to ensure it meets the minimum requirements. Click Next.
- Deployment Mode: This is your first major choice.
- Select Routed mode with emulated netmap driver.
- Why this mode? This is the most compatible and stable option for most OPNsense users. It integrates with the firewall's standard packet inspection, allowing Zenarmor to work alongside your other firewall rules and services without complex network changes.
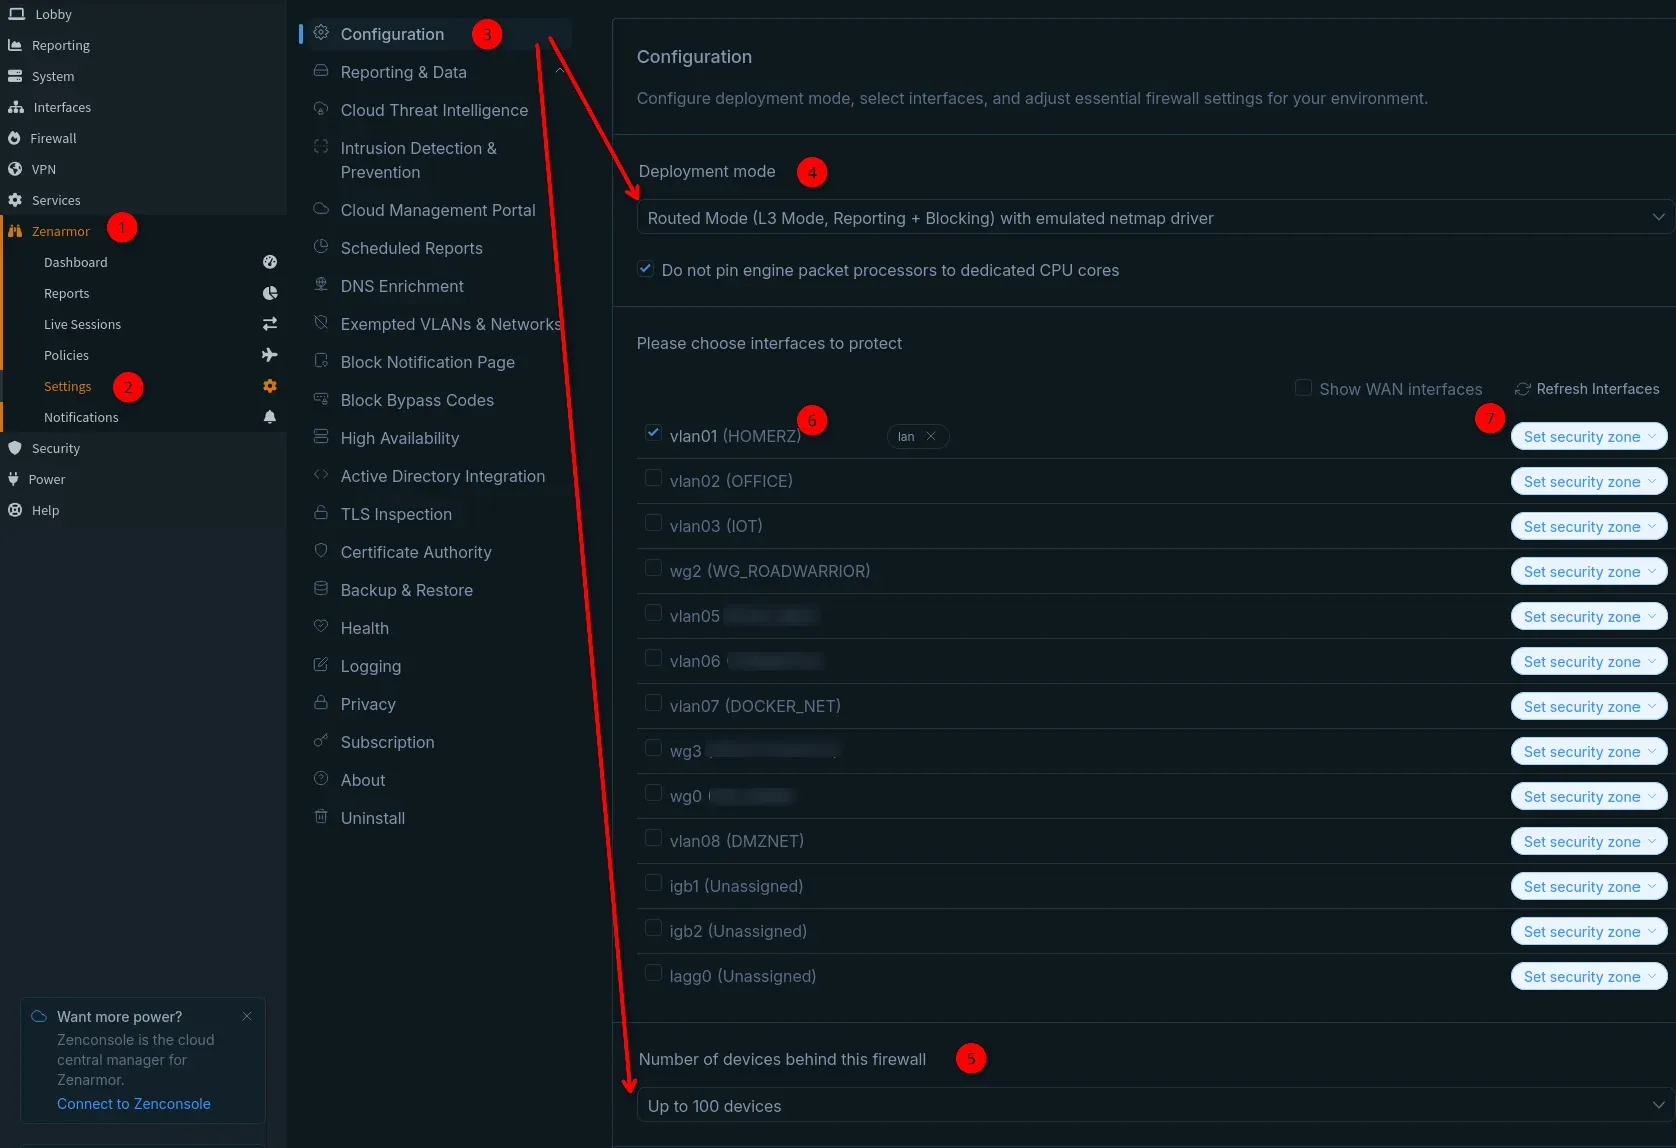
- Interface Selection: This is the most critical step.
- Zenarmor's strategy is to protect your internal networks.
- Select all your internal interfaces:
LAN(or your taggedHOMEVLAN 8),IOT,CAMERAS,GUEST, andDMZ. - CRITICAL: Do NOT select your
WANinterface. Your WAN is already protected by your main firewall rules and CrowdSec (from Part 2). Zenarmor's job is to see what your internal devices are doing and control their traffic as it flows out. Selecting WAN here can cause performance issues and conflicts.
- Click Next.
- Cloud Management (Zenconsole):
- Zenarmor will ask if you want to connect to its free cloud management console. I opted to manage the console remotely and didn't want to manage it from the cloud. Up to you!
- Why? The Zenconsole is free and gives you a much better interface for viewing reports and managing policies. It doesn't offload your traffic; it's just a management dashboard. It's highly recommended (by them).
- You'll be prompted to sign in or create a free Sunny Valley account and "register" your firewall.
- (If you really prefer to keep everything local, you can skip this like I did, but the on-box reporting is less powerful).
- Finish: Once registered (or skipped), click Finish. Zenarmor will finalize its configuration, start its services, and begin downloading its database. This can take 5-10 minutes.
Part 2: Configuring Your Free Policy
The Free Edition gives you one policy (the "Default" policy) that applies to all the interfaces you just selected. I selected only my private internal home network vlan. Not guest, not IoT, etc... This is a key limitation to understand. If you block Social Media, it's blocked for everyone (on LAN, IOT, GUEST, etc.). Paid tiers allow per-interface policies.
Let's configure this one policy for a solid, free baseline.
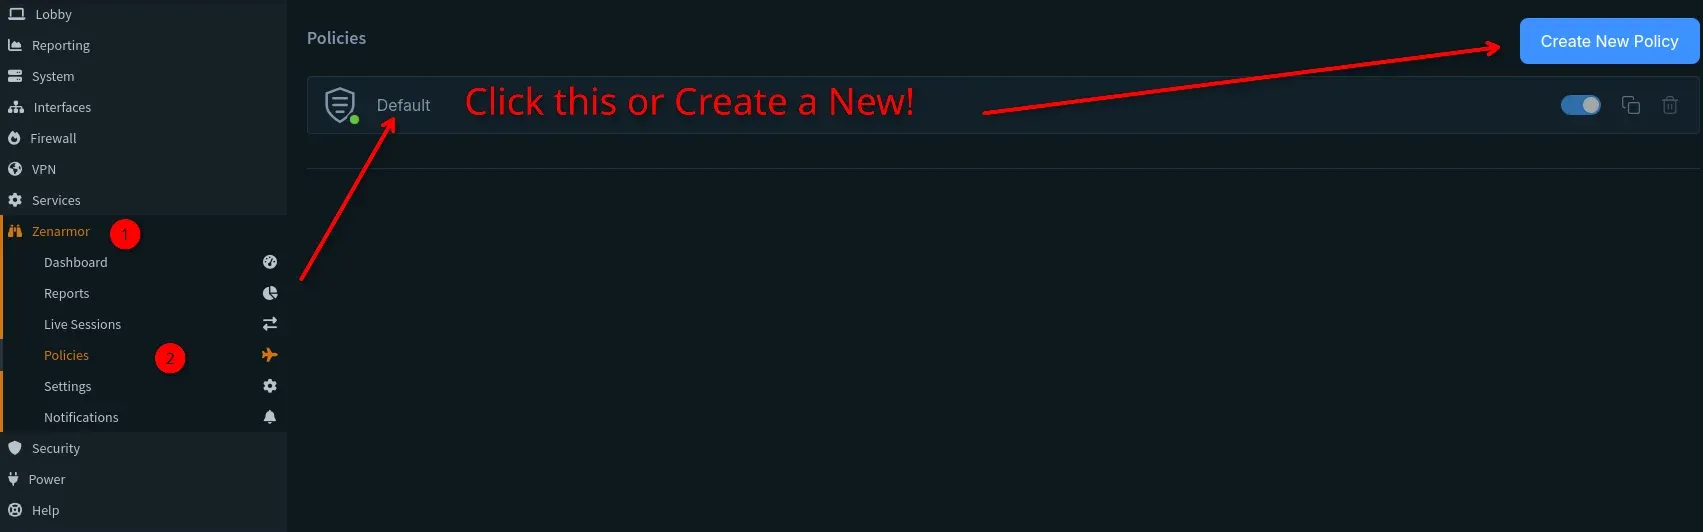
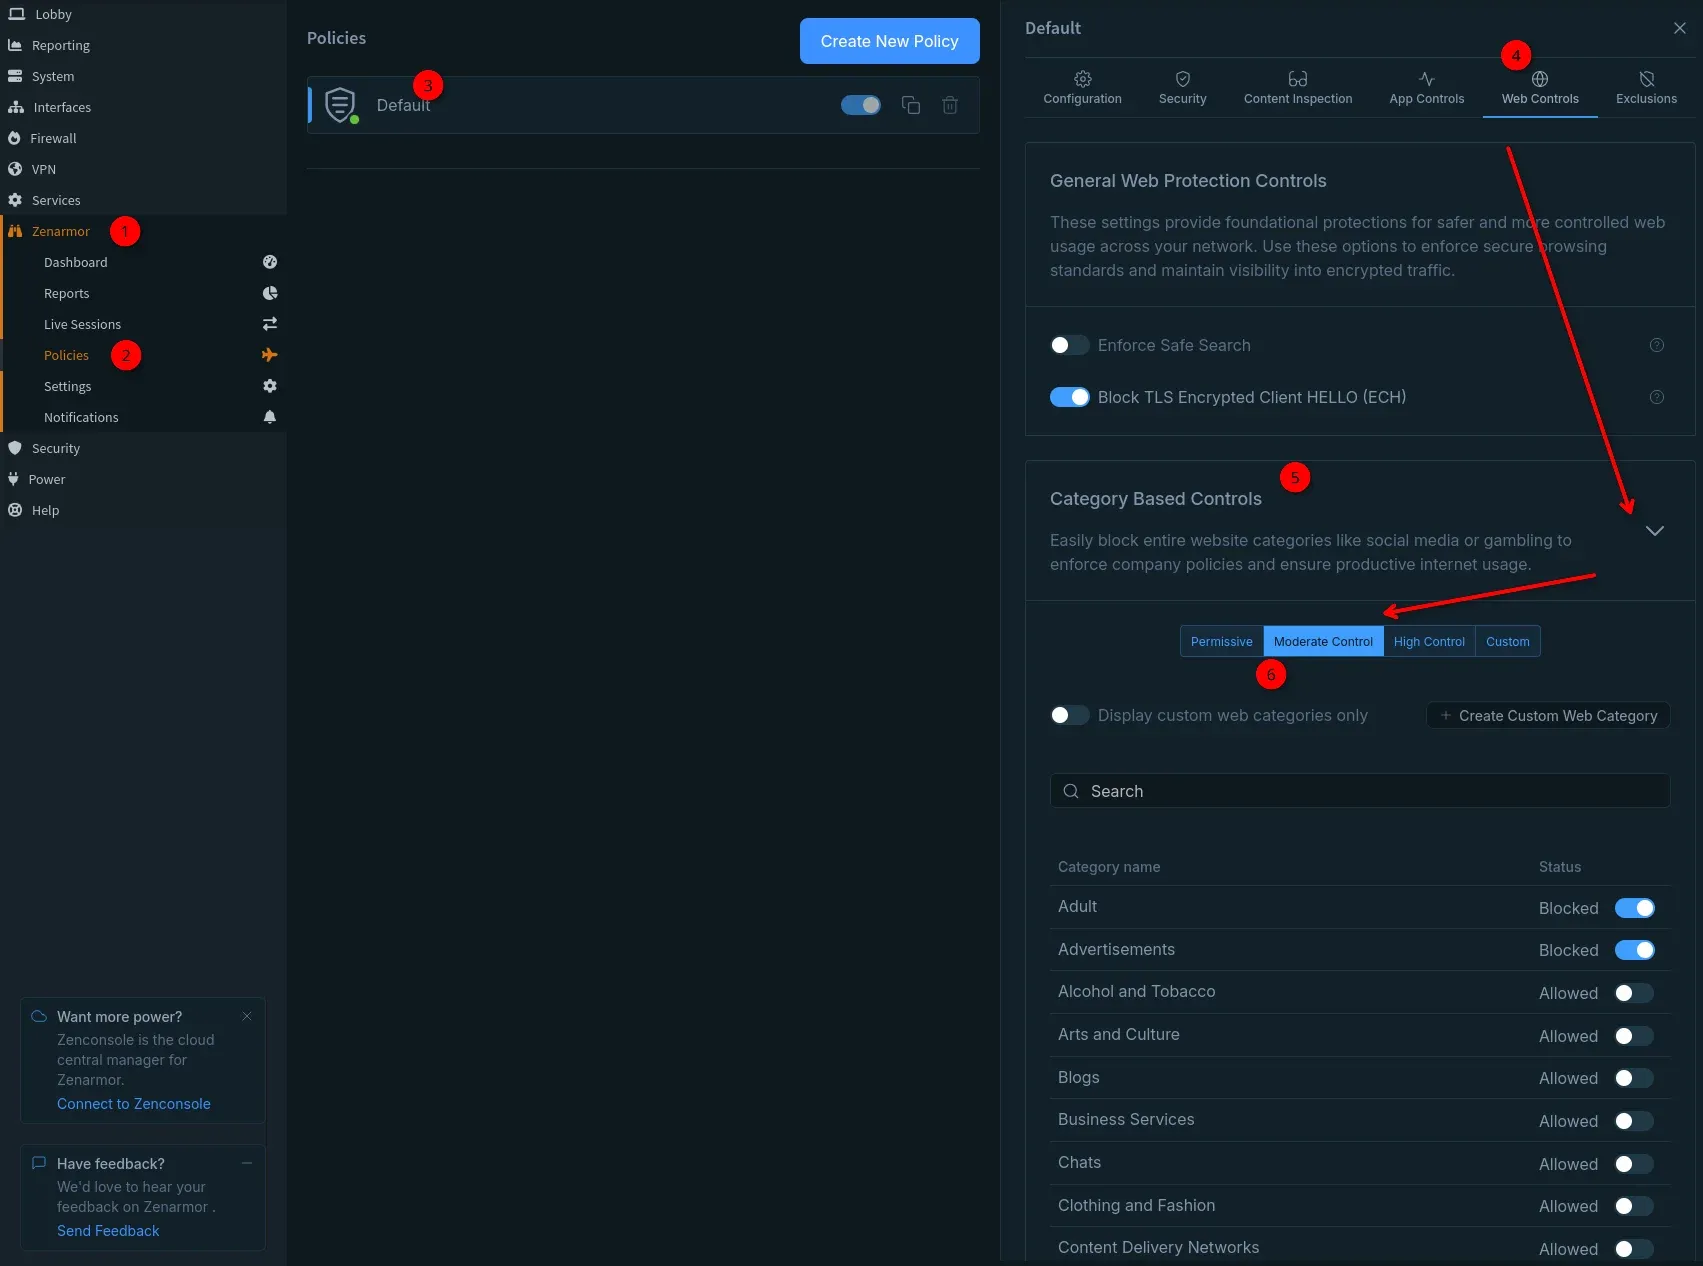
- Navigate to Zenarmor -> Policies.
- You will see your Default policy. Click the right on the word "Default". It's kinda weird.
Step 2.1: Enable Basic Security
This is the most important "set it and forget it" feature.
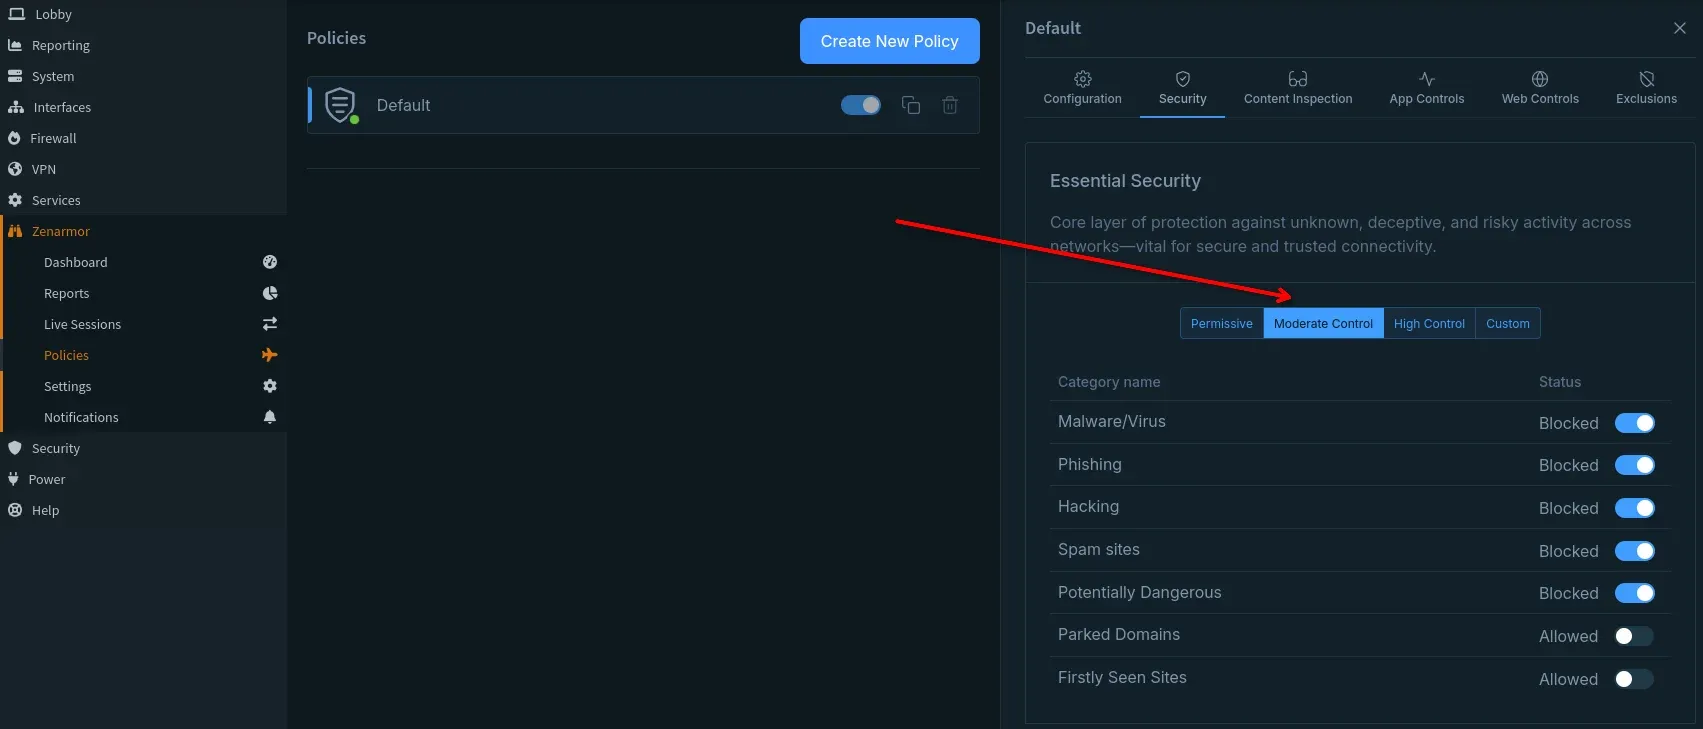
- Click on the Security tab within the policy.
- Enable the "Moderate Control" setting. This provides a nice instant-security increase.
- Click Save Changes at the bottom. Zenarmor is now actively blocking known-bad sites.
Step 2.2: Configure Basic Web Filtering
Now, let's block broad categories of websites.
- Click on the Web Controls tab.
- Then select Category Based Filtering.
- Limitations: The Free tier only provides the ability to select from their pre-created group of associated categories. Moderate is what I chose and it blocks all of these:
Adult ContentAdvertisingPornographyGamblingViolenceHate & Intolerance
Step 2.3: Configure Basic Application Filtering
This lets you block applications regardless of the website or port they use.
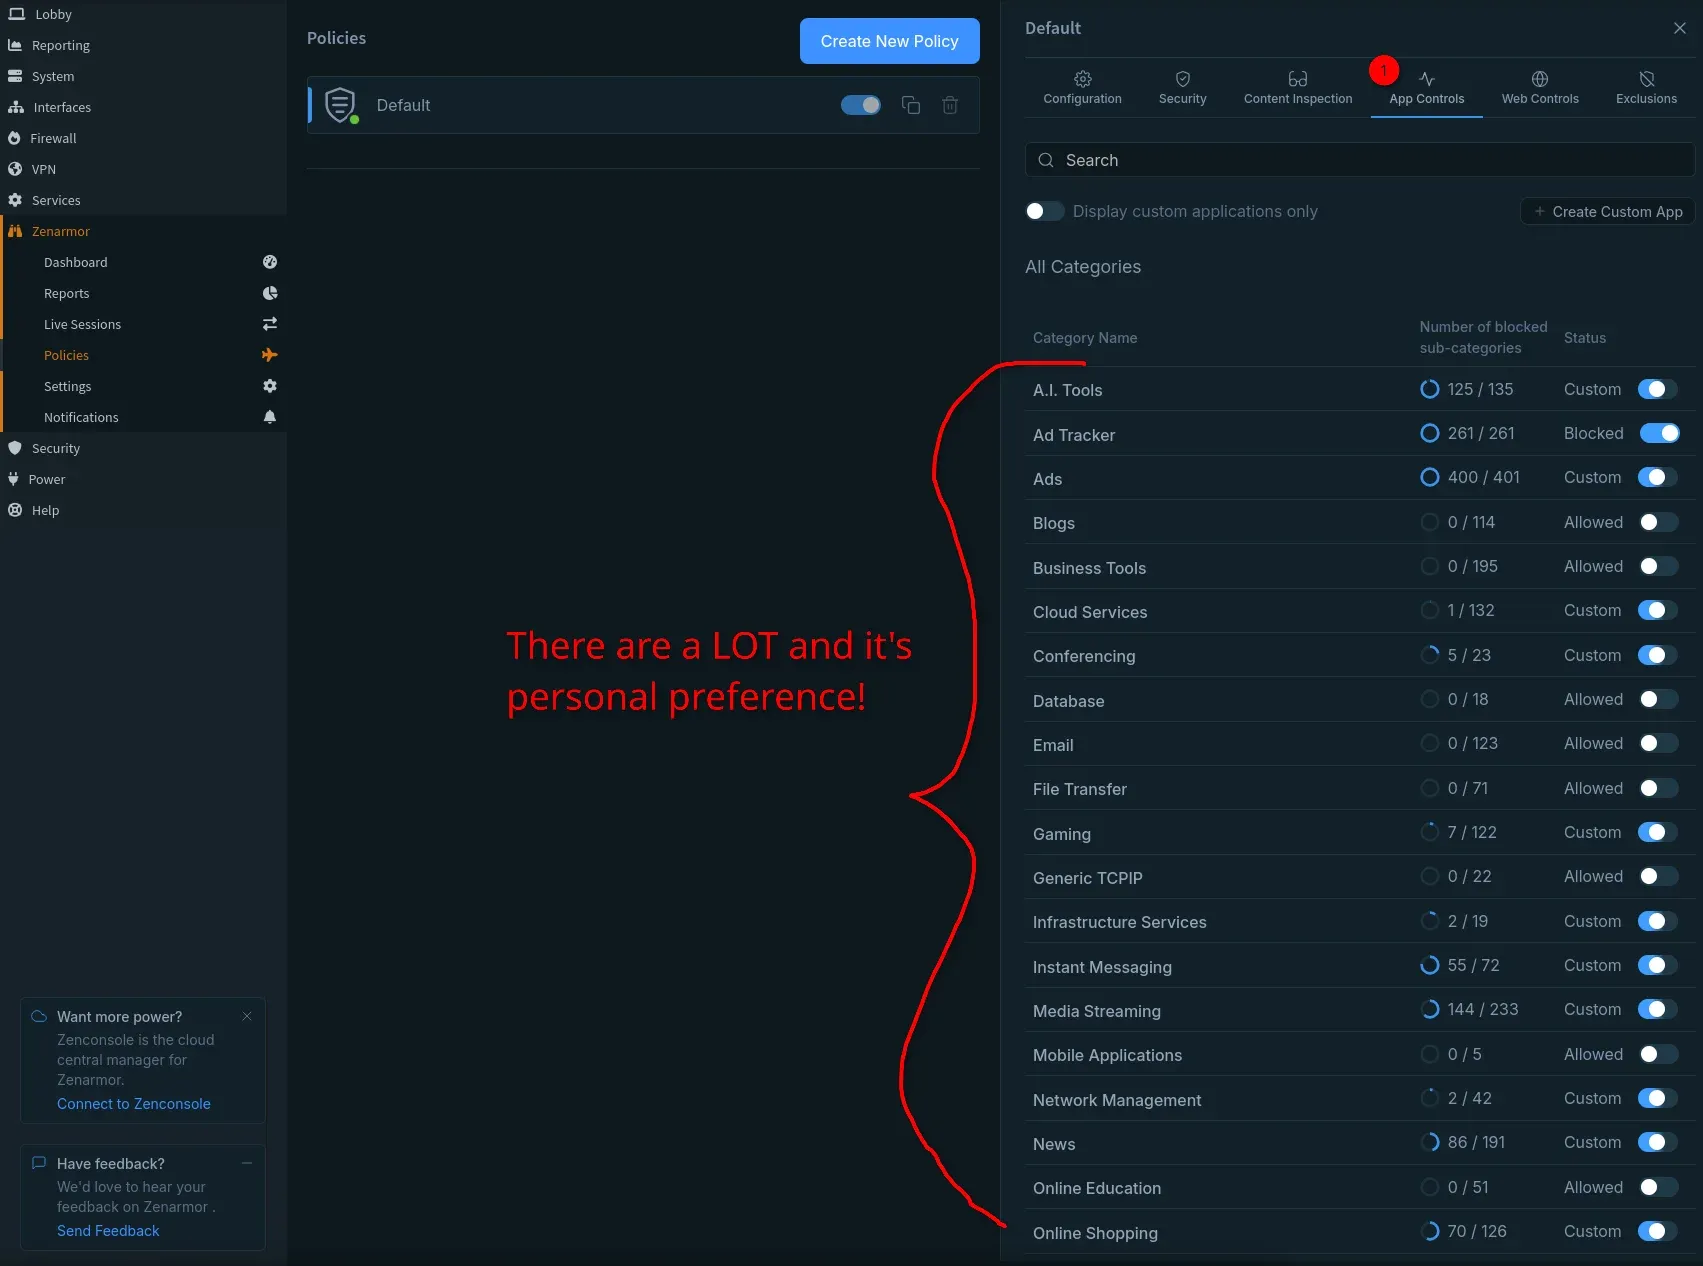
- Click on the App Controls tab.
- Recommended Blocks:
- Anything and everything you won't be using on your network.
- Seriously. It'll take some time, can do it slowly over multiple days or just blast through a bunch of the categories all at once.
- You might block legitimate traffic so if you hear your family yelling, ask which thing isn't working 😂
- Click Save Changes.
Part 3: Using the Zenarmor Dashboard (The Payoff)
Why did we do all this? For the visibility. The dashboard is where Zenarmor shines.
- Navigate to Zenarmor -> Dashboard.
- Give it a few hours to collect data. You will be amazed!
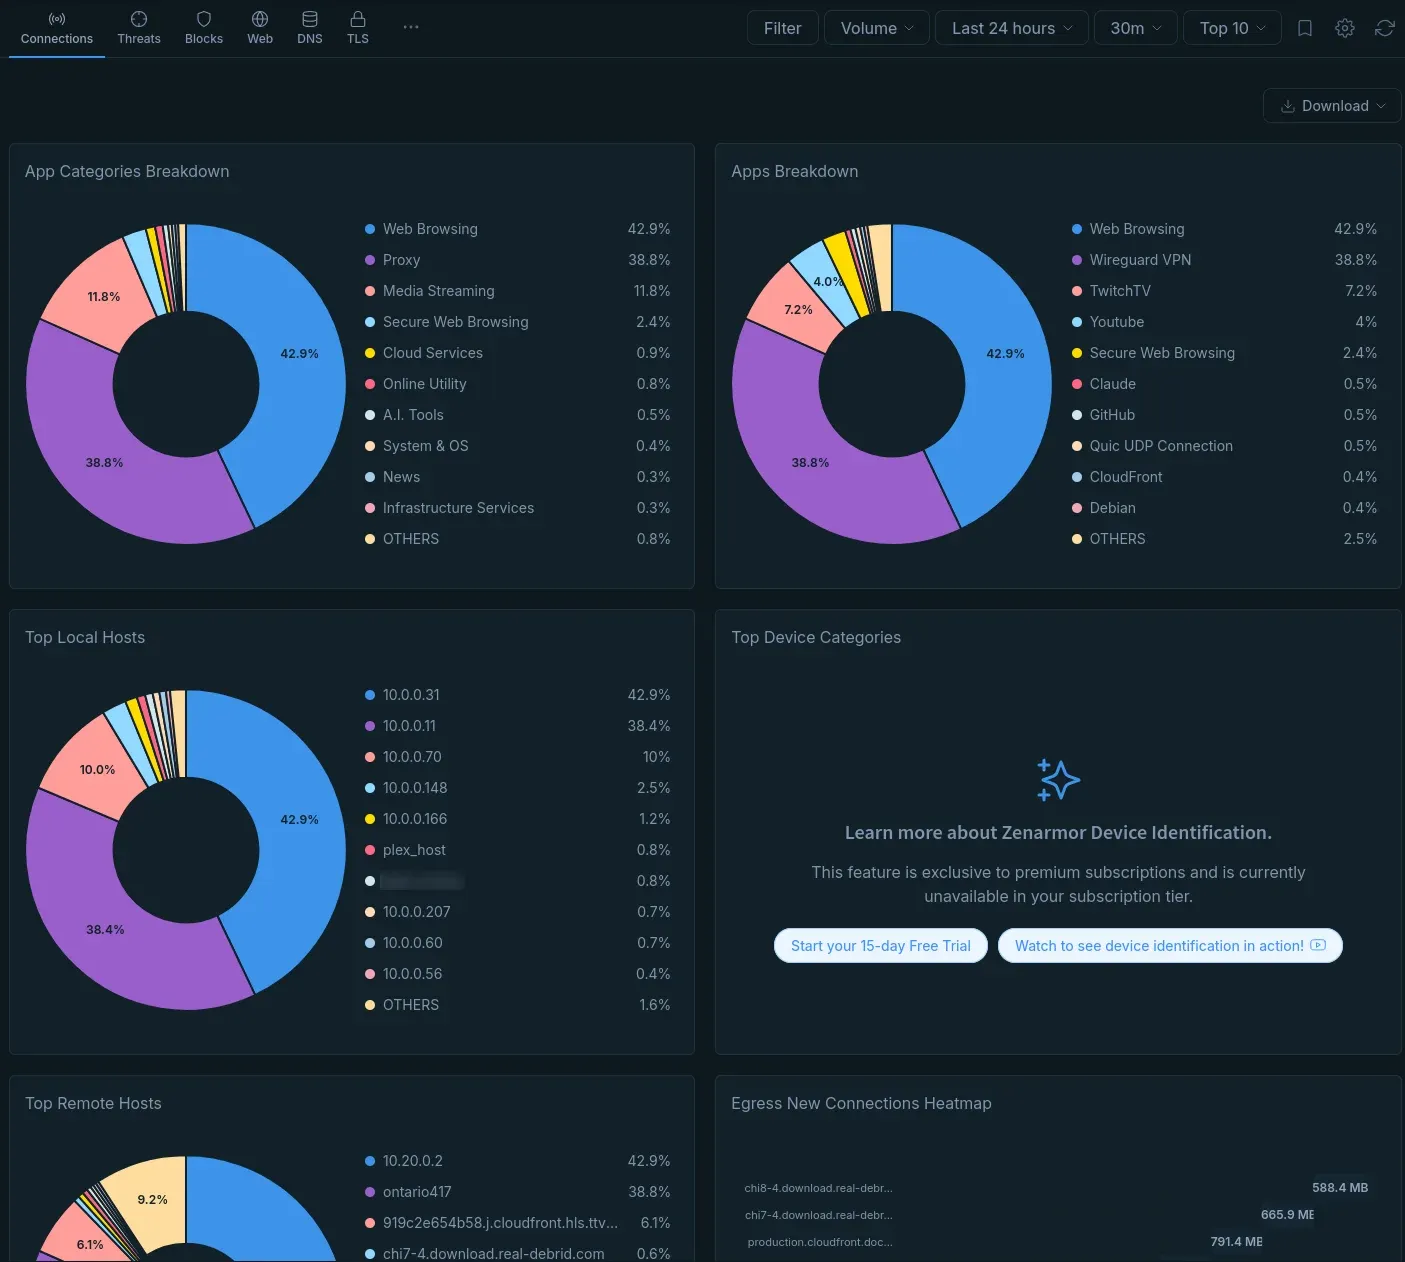
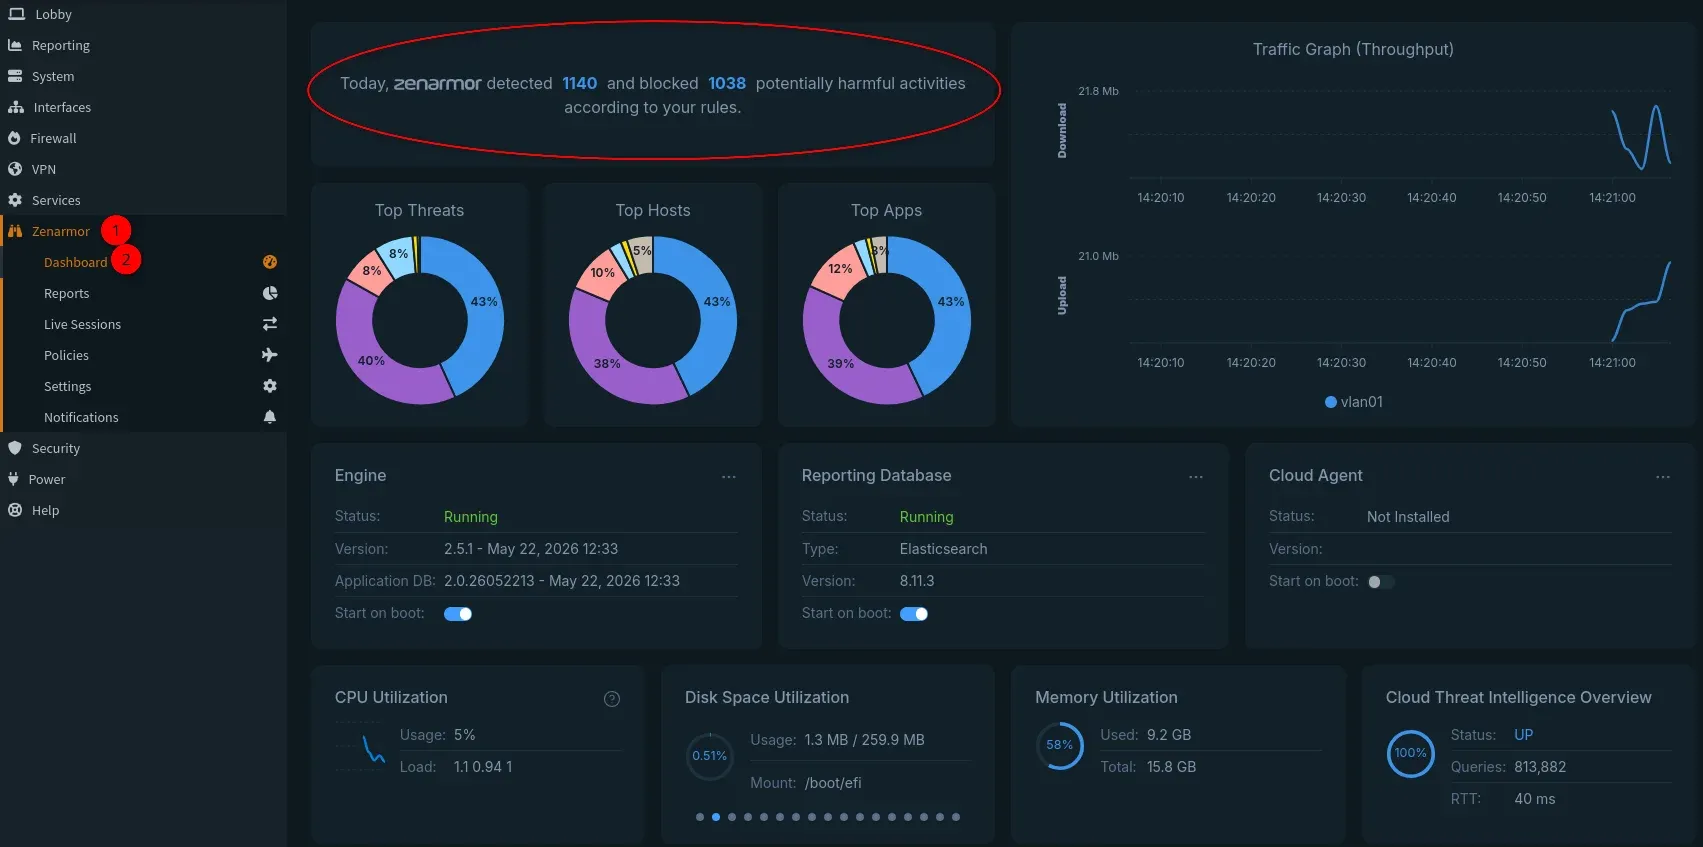
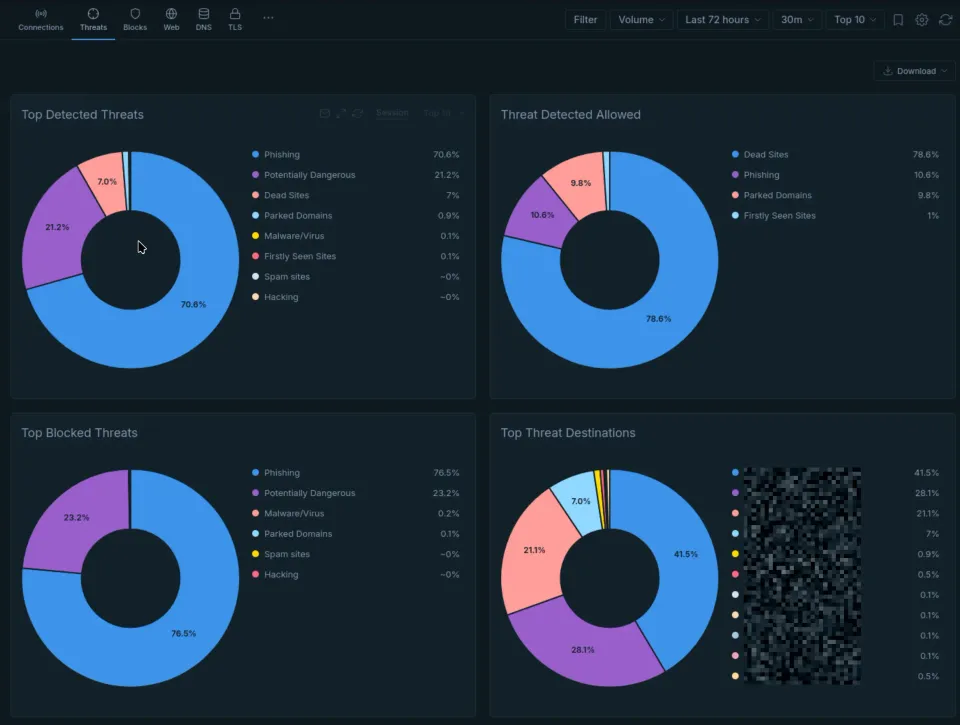
OPNsense showing Zenarmor dashboard in action, showing pie-charts, line graphs and status of Zenarmor services.
- Explore the Reports:
- Live Sessions: See every single connection being made right now.
- Top Applications: See a pie chart of what's actually using your bandwidth (e.g.,
Netflix,Google Services,Amazon,Tuya Smart). This is how you find out what your smart devices are really doing. - Web Activity: See the top-visited website categories.
- Threats: See a log of all the malicious sites and botnets Zenarmor has blocked.
- Devices: See a list of all devices on your network, their IP, and what's running on them.[Image: Zenarmor Main Dashboard with graphs and app breakdowns]
Conclusion
With the Zenarmor Free Edition, you've added a powerful Layer-7 inspection engine to your OPNsense firewall. You now have critical visibility into your network's applications and have enabled a solid baseline of security by blocking malware, phishing, and botnets.
You've also experienced the main limitation of the Free tier: a single policy for all networks.
From here, you can explore the dashboard & Reports tabs to understand your network better. If you find you need to block TikTok on your IOT network but allow it on your LAN, or you want more advanced, real-time threat protection, that's when you would consider upgrading to a paid plan. But for now, enjoy the newfound power and insight!
This is part 3 of the OPNsense series, preparing you to continue your self-hosted cybersecurity journey.
 Core Lab Joe


Member discussion