
The Ultimate OMV8 & Plex Media Server Guide (2026): Build Your Own 100TB NAS
Are you sitting on a massive media collection but still struggling to stream it reliably? Whether you’ve got 20+ years of "Linux ISOs" (like I do!) or a meticulously ripped 4K Blu-ray library, or not. Maybe you dumped it into one giant folder? But just having it isn't enough. You need to enjoy it. You need more than just storage - you need a powerhouse.
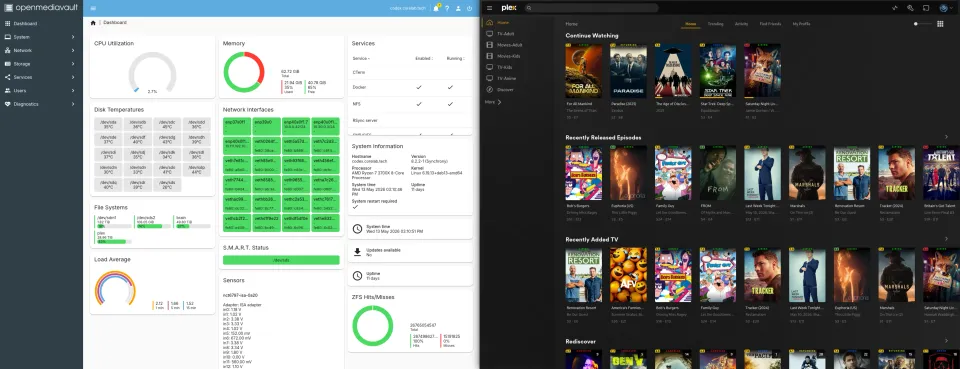
In 2026, the duo of OpenMediaVault 8 (Synchrony) and Plex Media Server remains the undisputed king of DIY NAS setups. Based on the rock-solid Debian 13 (Trixie), OMV8 offers 20-35% better memory management than its predecessor and native support for the latest hardware.
This post is part of a series about my beloved OMV:
Open Media Vault Guides
In this guide, we’ll walk through a fresh OMV8 install, ZFS pool configuration, and a modernized Docker-based Plex setup.
This is a lengthy one, so have a snack, grab your favourite beverage and strap in for the ride. I've been running Plex since 2013, OMV since 2022, and various Linux server distros since 2012 so I'll help you throughout the whole process!
Why Choose OMV8 Synchrony for Your Media Server?🤔
Before we dive into the "how," let’s talk about the "why." There are plenty of NAS operating systems - Unraid, TrueNAS SCALE, and more - but OMV8 stands out for its flexibility. It’s essentially "Debian with a beautiful face," giving you full root access without any proprietary overhead or hindrances.
Pre-Requisites
- A target x86 system: (OMV8 has officially dropped support for legacy 32-bit CPUs).
- USB Drive: To burn the OMV8 ISO.
- Network: An Ethernet connection (WPA3 is now supported for Wi-Fi, but wires are always better for 100TB+).
- The "Core Lab" Special: A strong coffee or a smoky whisky.🥃
Open Media Vault 8
We'll blast through this!
Phase 1: Creating Your OMV8 Bootable Media
- Download the OMV8 ISO: Grab the latest "Synchrony" image from the official OpenMediaVault downloads page.
- Flash the Drive: Use Rufus (Windows) or Etcher (Mac/Linux).
- Note: In 2026, most BIOS are UEFI-only. Ensure you select "GPT" as the partition scheme in Rufus for modern hardware (last 10 yrs or so).
- Check Hardware Compatibility: OMV8 runs on Linux Kernel 6.12+. If you’re using brand-new 2026 hardware, this kernel is your best friend for driver support.
Phase 2: Installing OMV8 (The Debian 13 Base)
- Boot from USB: Mash that
F12orDelkey and prioritize your USB drive. - Network Config: Stick with DHCP for now. You can set a Static IP or VLANs once the WebGUI is live.
- The Hostname: Pick something legendary. I named mine "Codex." (Ten points if you know the sci-fi reference!)🤓
- Root Password: Do not lose this. This is the keys to the (your new!) kingdom!
- Follow the onscreen prompts for initial setup which walks you through creating users and enabling some services.
- We'll cover the exact RAID/ZFS/storage array setup below!
- Once you're done this, do an update / apply any and all updates that are pending!
Pro Tip: Install OMV8 on a dedicated small SATA or NVMe SSD. Don't waste your massive 20TB storage drives on the OS; keep your data and OS separate! You can even install it and run OFF a USB - permanently!
Phase 3: Optimizing OMV-Extras and ZFS
Once you log into the Web Interface (using admin / openmediavault), we need to unlock the real power.
1. Install OMV-Extras
SSH into your server and run this "magic" command: wget -O -https://github.com/OpenMediaVault-Plugin-Developers/packages/raw/master/install | bash
2. The ZFS Deep-Dive
Go to System > Plugins and install openmediavault-zfs.
- The Kernel Secret: For the best ZFS performance, go to the OMV-Extras tab and install the Proxmox Kernel. This provides better ZFS compatibility and lower latency for media streaming. This bumps you from Linux Kernel v6.12+ to v6.17+!
- Create Your Pool: Under Storage > ZFS, create a new Pool. I recommend RAIDZ2 (dual-drive parity) for anything over 50TB. It gives you the peace of mind that even if two drives fail at once, your media and files are fairly safe.
- Give it a meaningful name that is different from our NAS itself.
Phase 4: Finalizing OMV8 Setup
- Configure Services: Configure the services you want to use, such as SMB/CIFS (for Windows file sharing), NFS (for Linux/Unix file sharing), and FTP.
- I VERY STRONGLY suggest utilizing NFS as much as you can; SMB is inferior in almost every way.
- Set up Users and Permissions: Create user accounts and set up appropriate permissions to control access to your files and services.
- Test, try to map your shares from linux (NFS) and/or Windows (SMB) clients.
I found setting the shared folder to accept clients in my whole "home lan" subnet was best, as I mapped my SMB & NFS shares from multiple systems across my home and subnet. You may chose to use /32 instead. Lastly, under "Extra options" for my shared folders, I put these in: rw,async,insecure,no_subtree_check,all_squash,anonuid=1000,anongid=100,crossmnt
Not the most secure settings, but if someone is poking around at my shares, I've already failed at securing my network.
Plex Media Server Setup
The easy part!
Phase 5: Installing Plex Media Server (The Docker Way)
In 2026, we no longer install Plex directly onto the OS. Why? Because Docker Compose makes backups, updates, and hardware transcoding WAY easier. From a cybersecurity standpoint it also allows you to not expose your new OMV8 NAS directly to the internet via a port forward, regardless of how much we may trust Plex.
To run Plex as a minimum, you should have 2GB of RAM available for it and an x86 processor.
- Install Compose: Go to Services > Compose and enable it.
- The Stack: Create a new "File" in the Compose tab and paste this optimized configuration:
services:
  plex:
    image: lscr.io/linuxserver/plex:latest
    container_name: plex
    network_mode: host
    environment:
      - PUID=1000
      - PGID=100
      - VERSION=docker
    volumes:
      - /path/to/your/zfs/config:/config
      - /path/to/your/media:/data
    devices:
      - /dev/dri:/dev/dri # This enables Intel QuickSync Transcoding!
restart: unless-stoppedHere's a post with a pile of info if you are just starting out with docker compose, this is a complete guide.
2026 CPU & Transcoding Requirements
If you want to stream 4K HDR to your friends, RAM and CPU matter more than ever. Although Plex's support for AMD CPU & Chips isn't "official", I'll tell you from firsthand experience it works NO PROBLEM. Google it, plethora of "field research" there stating performance. If you fully intend on setting up a transcoding beast like I have, have a deep dive read here.
| Transcode Type | Recommended CPU | Recommended RAM |
| Direct Play (No Transcode) | Intel N100 / Alder Lake-N | 8GB |
| 4K HDR (1-2 Streams) | Intel Core i5 (12th Gen+) | 16GB |
| 4K HDR (5+ Streams) | Ryzen 7 7000+ or Intel i7 | 32GB+ |
Intel Chips
| Transcode | Minimum CPU | RAM |
| No Transcode | Intel “Atom” 1.2GHz | 2GB |
| Single 720p transcode | Intel Core i3 3.0 GHz | 2GB |
| Single 1080p transcode | Intel Core i5 3.0GHz | 2GB |
| Single 2160p (4K) transcode | Intel Core i7 3.2GHz | 2GB |
"Unofficial" AMD Chips
| Transcode | Minimum CPU | RAM |
| A few 720/1080p transcodes | Ryzen 3 4300G | 2GB |
| Multiple 720p/1080p transcodes | Ryzen 7 5600G/5700G | 2GB |
| MANY 1080p transcodes, a few 4k | Ryzen 5 5800X | 2GB |
| Multiple (4K) transcodes | Ryzen 5 7600 | 2GB |
This Plex Optimization Guide will explain why and how you can use that RAM!
Troubleshooting & Conclusion
If the WebGUI becomes unresponsive, don't panic. Hop into the terminal and use the life-saving set of commands: sudo su and then omv-firstaid
This menu allows you to reset your network, fix the workbench port, and clear locks.
Also plenty of fantastic documentation & guides here:
https://help.openmediavault.org/
Conclusion
There you have it, your very own brand new NAS & streaming media server!
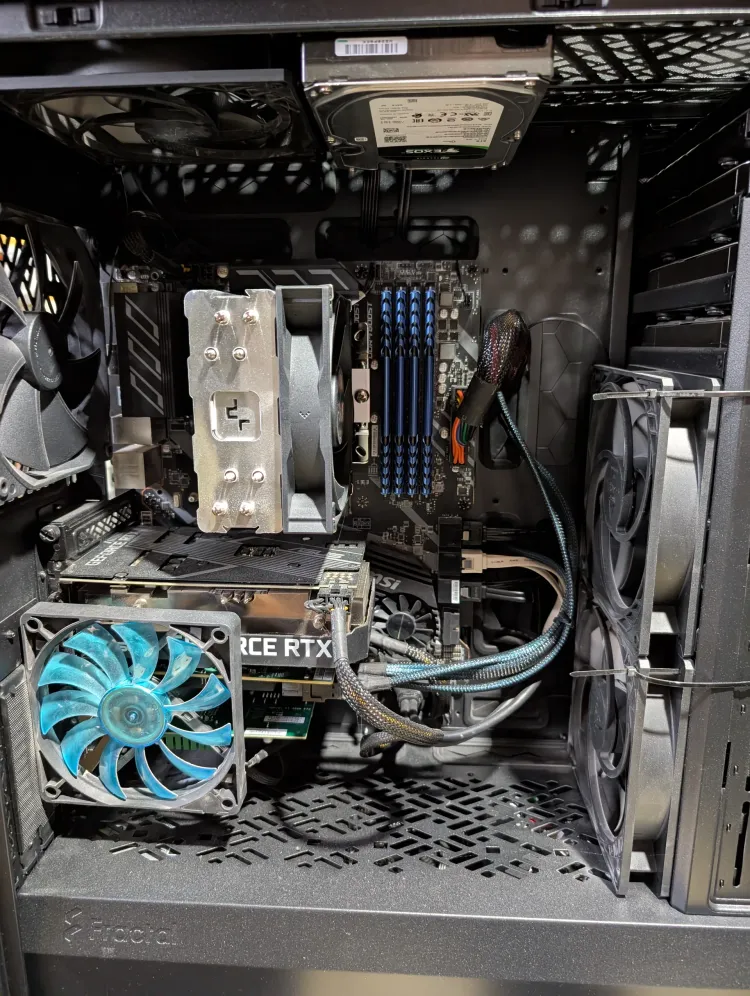
To get NVIDIA GPU hardware transcoding working, first you need to setup the NVIDIA Container toolkit.
Then I suggest you head on over to my Plex optimization guide and checkout how to take full advantage of your hardware.
Resources:

Member discussion