
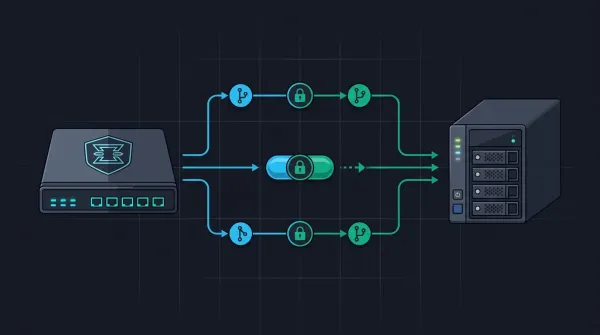
Automating OPNsense Backups: Hardened SFTP to NAS, Git Audits & REST API
How I automated my OPNsense firewall backups using hardened, key-only SFTP to OpenMediaVault, Git version control, and zero-dependency API scripts with full payload encryption.

You have spent hours meticulously tuning your OPNsense firewall, hardening your perimeter with CrowdSec, and dialing in a line-speed WireGuard tunnel for remote access. Your network is a fortress. Or maybe it is not quite there yet: perhaps you had a gruelling afternoon just getting your basic WAN interface, VLAN trunks, and DHCP scopes functioning properly. Either way, you cannot afford to lose that work.
When was the last time you actually backed up your firewall configuration?
If your current disaster recovery plan consists of "I will remember to download the XML next time I change a rule," you are leaving your network recovery entirely to chance. It's... Also what I've done for an embarrassingly length of time, but, it's better than nothing.

Solid-state drives degrade, flash drives fry, and late-night syntax errors can lock you out of your web GUI without a rollback path. The default advice across many homelab forums is to ship un-encrypted configuration files directly to commercial cloud buckets like Google Drive or Nextcloud. That hands a complete blueprint of your network topology, internal IP scheme, WireGuard private keys, and administrative password hashes to a third party.
Someone's cloud storage inevitably suffers a credential leak, and you do not want it to be the bucket holding your firewall's brain.
I prefer an air-gapped (cloudless), sovereign (privacy first!) approach. In this guide, I break down three local, automated methods to secure your OPNsense configuration with zero external cloud dependencies:
- Hardened SFTP to OpenMediaVault (My Primary Architecture): Using the native
os-sftp-backupplugin to push encrypted, key-authenticated configuration snapshots straight to an isolated directory on your local NAS. - Version-Controlled History with
os-git-backup: For homelabs running a private Git server (like Gitea or Forgejo) where off-box revision tracking and searchable commit logs are valuable. - The Zero-Dependency API Script: A standalone cron job using curl and OPNsense core API endpoints when you want backups without running additional plugins.
Mastering OPNsense Firewall Architecture
Deploy enterprise-grade routing on bare metal, construct resilient alias hierarchies, enforce Layer 7 threat defence, and automate encrypted off-site disaster recovery.
Method 1: Hardened SFTP Backups to OpenMediaVault (My Primary Architecture)
If your homelab already hosts a centralized storage server, sending encrypted firewall backups straight to it over SFTP is the cleanest, most durable architecture available. There are no third-party accounts, no external SaaS dependencies, and your snapshots land on storage pools that you already protect with your master backup routine.
Done carelessly, though, this connection can turn your NAS into an attack vector. If OPNsense authenticates to your storage server with root or an over-privileged account, any potential firewall compromise grants access to your entire storage array. In my lab, I enforce a strict least-privilege, key-only architecture. The firewall connects without a password, authenticates strictly via an ED25519 key, and is confined to a single dedicated backup folder with no traversal rights elsewhere.
Here is the automated workflow from memory encryption to storage retention:
flowchart TD
    subgraph OPN ["OPNsense Firewall (10.0.0.1)"]
        direction TB
        CFG["Config Change / Cron Trigger"] --> ENC["In-Memory AES Payload Encryption"]
        ENC --> SFTP_C["SFTP Client (ED25519 Private Key)"]
    end

    subgraph OMV ["OpenMediaVault 8 NAS (10.0.0.42)"]
        direction TB
        SSHD["OpenSSH Server (Port 22)"] --> AUTH["Auth via /var/lib/openmediavault/ssh/authorized_keys"]
        AUTH --> LZ["Isolated Landing Zone (/brain/home/omvbackup/opnsense)"]
        LZ --> ROT["Auto-Pruning Retention (Keep 30 Copies)"]
    end

    SFTP_C -- "Encrypted Transport (SSH Tunnel)" --> SSHD
Phase 1: Preparing the OMV Service User & Landing Zone
Before touching OPNsense, establish the destination directory and restricted service user on your OpenMediaVault server.
- Create a Dedicated Service Account: In OMV, navigate to Users > Users and click + (Create). Name the account
srv-opnsense-backup. Thesrv-naming standard clarifies that this is an automated system account rather than an interactive human user.- Group Membership: Add the user to the
_sshgroup (Debian and OMV require membership in_sshfor remote shell and SFTP access). Also ensure it belongs to the standardusersgroup. - Password Policy: Leave the password empty or disabled. Authentication will happen strictly through cryptographic SSH keys.
- Shell: Set the shell to
/usr/bin/bashor/bin/sh. I set mine to/usr/bin/bash.
- Group Membership: Add the user to the
- Establish the Directory on Disk: Create a dedicated subfolder inside your backup share specifically for the router (for example,
/brain/home/omvbackup/opnsense). Avoid pointing OPNsense directly to the root of a broad backup share that houses container databases or bare-metal host images.
Apply Native Linux Permissions (Bypassing the OMV ACL Trap): Assign ownership and set permissions from the server terminal:
sudo chown -R srv-opnsense-backup:users /brain/home/omvbackup/opnsense
sudo chmod 2770 /brain/home/omvbackup/opnsense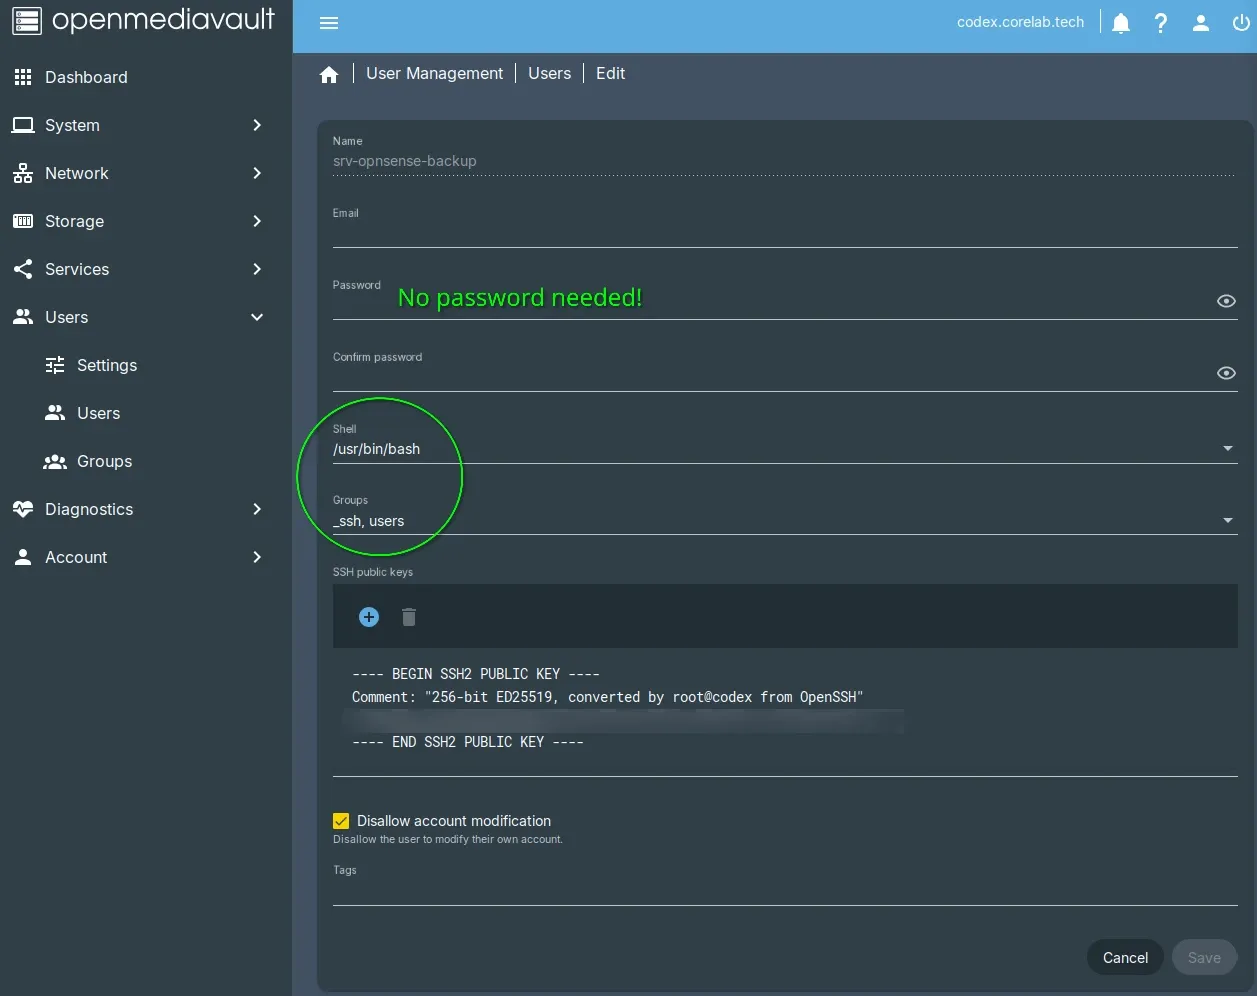
acltype=off is standard) or mounted with noacl, clicking Save in that dialog will throw an unhandled Server Error 500: setfacl: Operation not supported. Do not use the GUI ACL tool. Setting standard Linux ownership (chown srv-opnsense-backup:users) and directory permissions (chmod 2770) as shown above is completely reliable and avoids breaking underlying permissions.
Phase 2: Generating the ED25519 SSH Keypair & OMV Configuration
The os-sftp-backup plugin requires an SSH key for authentication. Generate a clean, dedicated ED25519 keypair on your firewall or management machine. When prompted for a passphrase, press Enter twice to leave it empty (automated backup jobs run non-interactively in the background and cannot prompt for a passphrase):
ssh-keygen -t ed25519 -C "srv-opnsense-backup@codex" -f opnsense_sftp_keyThis command generates two files:
opnsense_sftp_key: The Private Key (which is pasted directly into OPNsense).opnsense_sftp_key.pub: The Public Key (which is registered in OpenMediaVault).
Next, install the public key into OpenMediaVault:
- In OMV, open Users > Users, select
srv-opnsense-backup, and click the Edit (Pencil) icon. - Paste the entire single-line contents of
opnsense_sftp_key.pubinto the SSH Public Keys text field. Click Save. - Apply the Pending Configuration Changes: Look at the top of your OMV screen for the yellow confirmation banner ("Pending configuration changes"). You must click the checkmark to apply changes.
/etc/openmediavault/config.xml. The live authentication file at /var/lib/openmediavault/ssh/authorized_keys/srv-opnsense-backup is not written until you confirm the yellow banner. If you skip this, incoming SSH sessions fail immediately with Connection closed by authenticating user [preauth].2. Monit Namespace Crash: If your OMV server has been running for weeks or months, applying changes may throw an error:
Job for monit.service failed. ExecReload=/usr/bin/monit reload (code=exited, status=226/NAMESPACE). Systemd sandboxing causes stale mount namespaces when Docker containers and ZFS pools change over time. If this happens, run sudo systemctl restart monit in the OMV terminal to refresh the namespace, then re-click Apply.
Phase 3: Configuring the OPNsense os-sftp-backup Plugin
Now configure the client side on your OPNsense router.
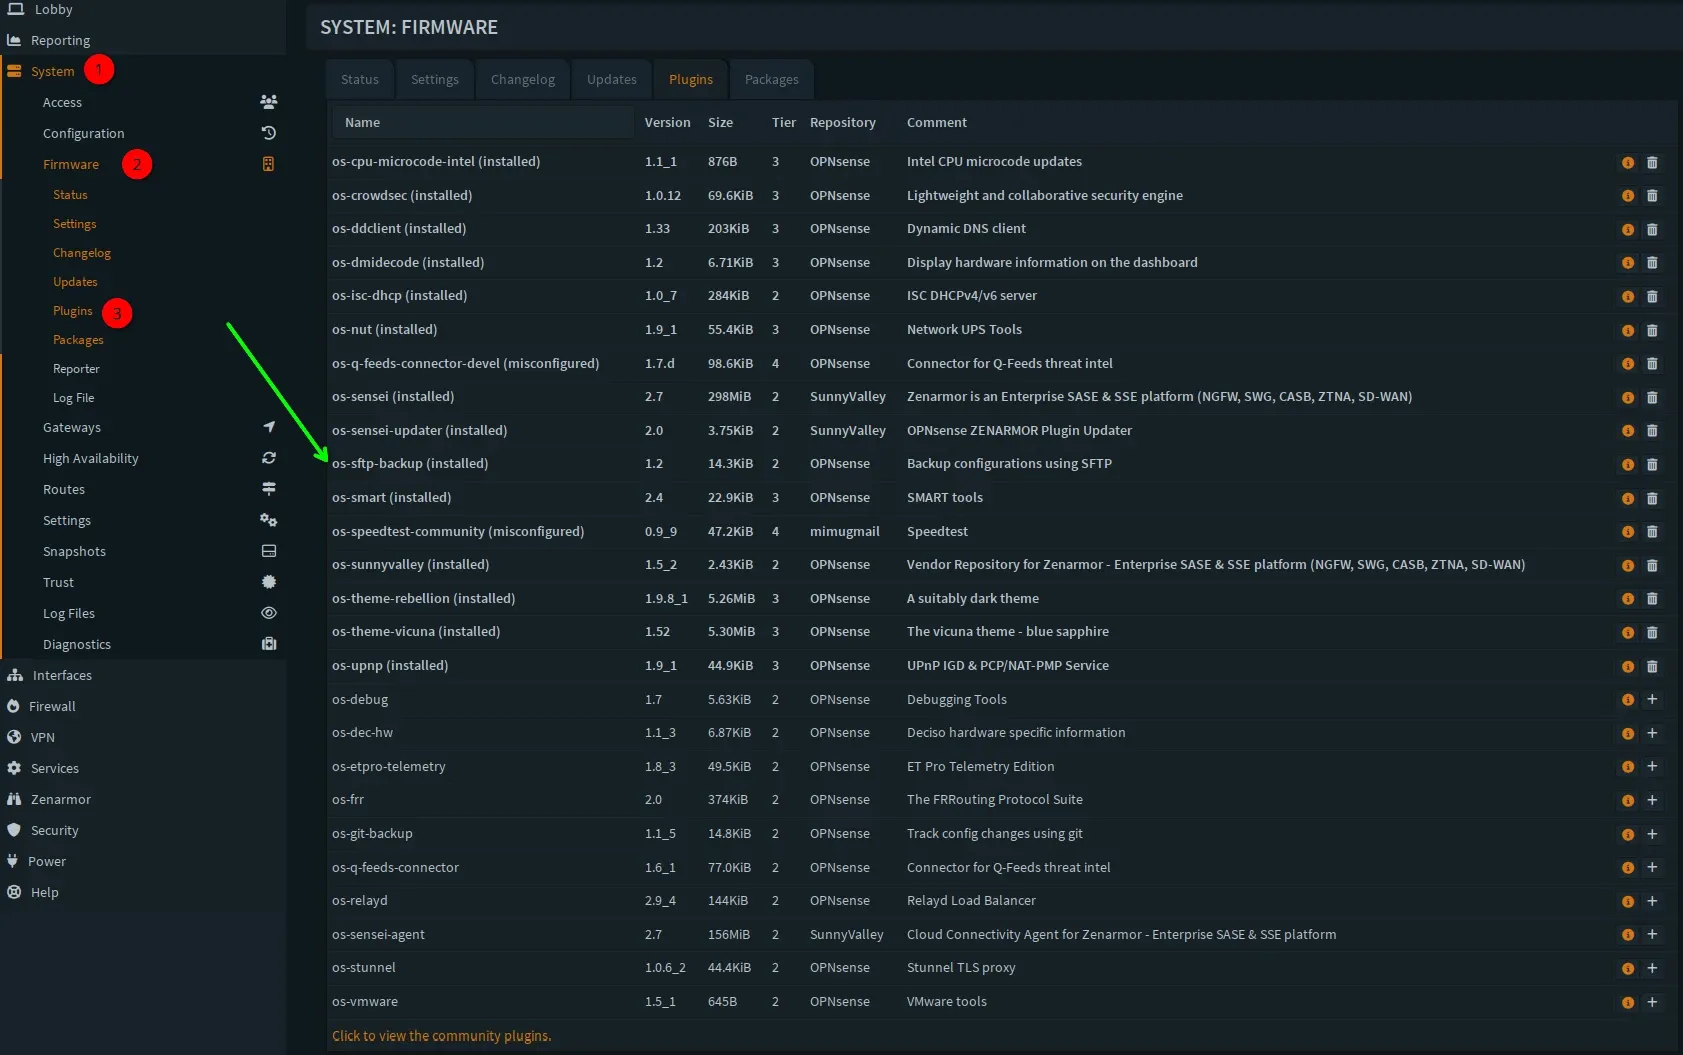
- Install the Plugin: Navigate to System > Firmware > Plugins. Search for
os-sftp-backupand click + (Install). Refresh your browser once the package finishes installing. - Establish Host Key Trust (Known Hosts): Before OPNsense can connect to an SFTP endpoint non-interactively, it must recognize and trust your NAS server's SSH host key. If you have never initiated an SSH connection from OPNsense to your NAS, the connection will be aborted. You can verify the host key by running an initial connection test or ensuring your NAS IP (e.g.
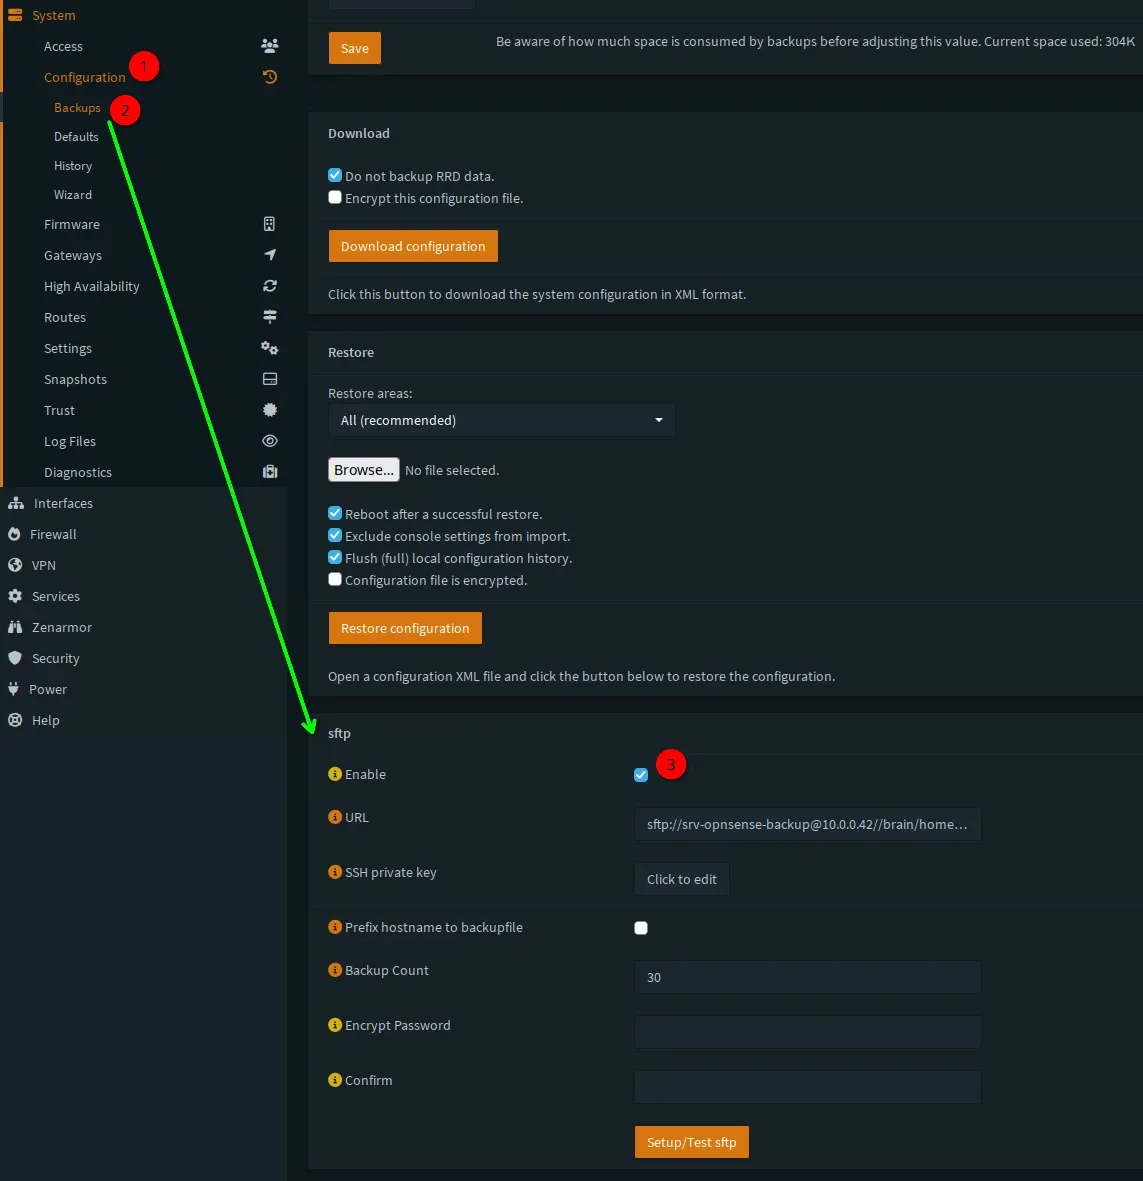
10.0.0.42) has its host key fingerprint accepted. - Configure the SFTP Backup Form: Go to System > Configuration > Backups > SFTP Backup and populate the fields:
- Enabled: Checked.
- SSH Private Key: Open your private key file (
opnsense_sftp_key) in a text editor, copy the entire block including the-----BEGIN OPENSSH PRIVATE KEY-----and-----END OPENSSH PRIVATE KEY-----lines, and paste it into this field. Ensure standard Unix LF line endings are preserved. - Backup Count: Enter your desired retention limit (e.g.,
30). OPNsense automatically prunes older backups once this threshold is exceeded. - Encrypt Password: Enter a strong passphrase here. This instructs OPNsense to encrypt the configuration XML using AES before it ever leaves system RAM. Even if someone manages to compromise your storage server, the backup files remain fully encrypted at rest.
URL: Enter the complete SFTP connection string. Use the double slash (//) syntax to specify an absolute path on the target server:
sftp://[email protected]//brain/home/omvbackup/opnsenseNote: The double slash immediately following the host or port indicates to the SFTP client that the path is absolute from the filesystem root, rather than relative to the user's home folder.
Phase 4: Test, Verify, and Trigger Mechanics
Click Save, then click Setup and Run Backup. OPNsense will initiate an immediate SFTP transfer. You should see a green confirmation banner indicating the backup completed successfully.
To verify the landing zone, log into your OpenMediaVault server and inspect the target directory:
ls -lh /brain/home/omvbackup/opnsense/You will see a fresh, timestamped configuration file (for example, config-1729605600.xml or an encrypted archive). If you open the file, you will observe the AES encrypted payload rather than plaintext firewall rules.

❯ ll /brain/home/omvbackup/opnsense/
.rw------- 261k srv-opnsense-backup 22 Oct 10:04 config-1792677895.3925.xmlGo check in OMV / your NAS to ensure the file is there!
How the Automated Triggers Work: The os-sftp-backup plugin hooks directly into OPNsense's internal configuration management system. Every time you modify a firewall rule, alias, or interface setting and click Apply Changes, an event trigger queues an automated background export.
Additionally, OPNsense runs a scheduled cron job (configured under System > Settings > Cron) to verify your remote backup schedule remains synchronized.
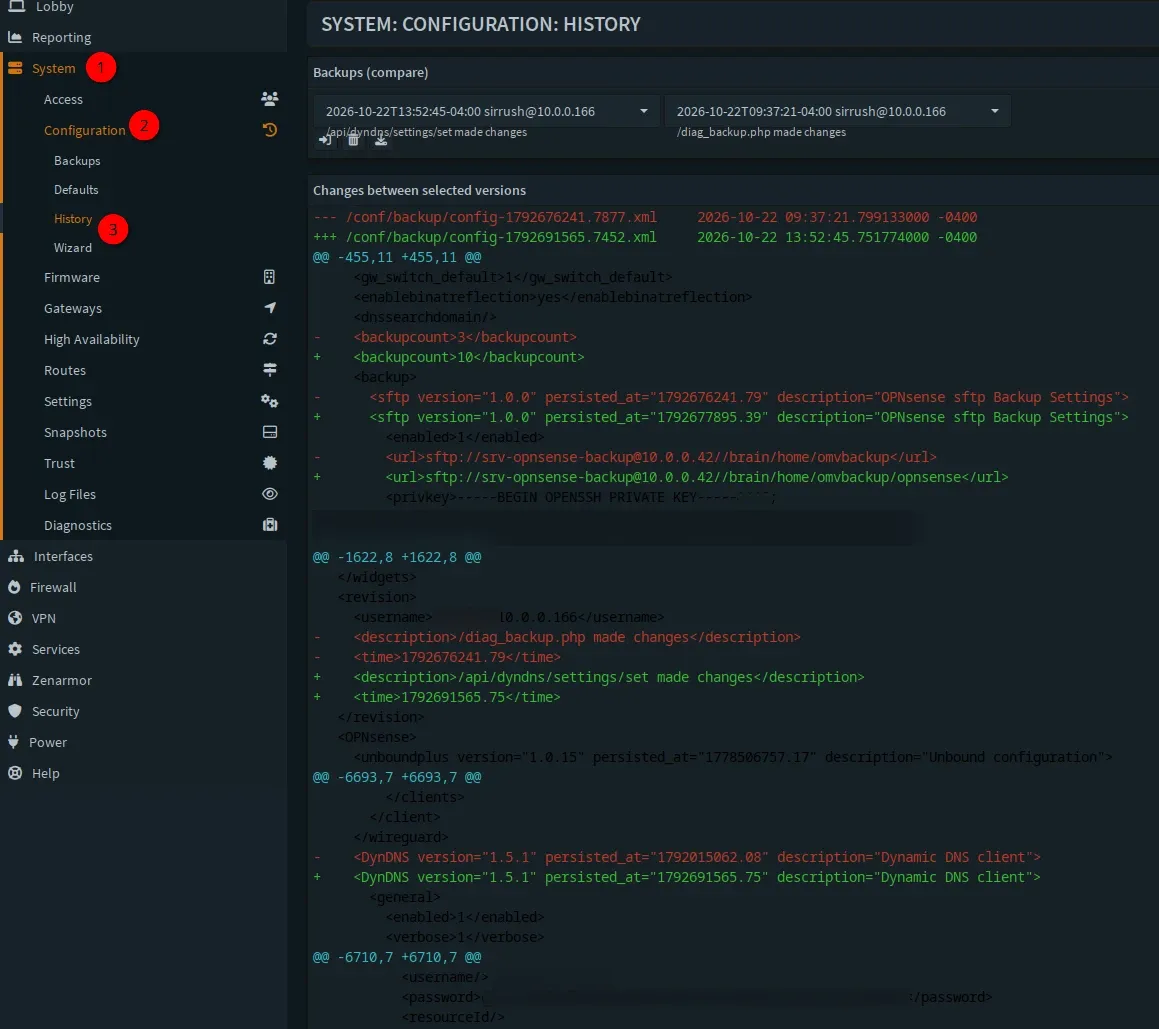
The nice thing about OPNsense configuration history tab, is you get a nice coloured CLI highlighting the differences and changes made there between versions.
Method 2: Version-Controlled History with os-git-backup (For Git-Centric Homelabs)
If you already run a self-hosted Git server (such as Gitea, Forgejo, or GitLab) or maintain a private GitHub repository, treating your firewall configuration like infrastructure-as-code is a powerful option. However, it is worth distinguishing between what Git genuinely adds versus what OPNsense already provides out of the box.
What Git Actually Adds vs. Built-in History
OPNsense already includes a built-in configuration audit tool under System > Configuration > History. This built-in screen provides unified colour-coded diffs between any two points in time and supports one-click rollbacks with zero plugins required.
What the os-git-backup plugin provides is off-box durability and centralized team auditing. If the physical SSD inside your firewall appliances dies completely, your local configuration history perishes with it. A remote Git repository preserves every commit safely off-box. Furthermore, if you manage your homelab alongside a family member or co-admin, a Git repository gives you familiar pull requests, blame annotations, and commit messages.
The Setup Workflow
- Create a Blank Private Repository: On your Git server, initialize a new empty repository (for example,
opnsense-firewall-backup). Do not add a README, license, or.gitignorefile. Copy the SSH clone URL. - Install the Plugin: In OPNsense, go to System > Firmware > Plugins, install
os-git-backup, and reload your browser tab. - Generate a Deploy Key: Navigate to System > Configuration > Backups > Git Backup. Click Generate Key to produce a dedicated SSH public key.
- Authorize the Deploy Key: On your Git server repository settings, add this public key under Deploy Keys and ensure you check the box granting Write / Push permissions.
- Configure the Repository URL: Return to OPNsense, enable Git Backup, paste the SSH clone URL, and click Save followed by Test Connection and Push.
Commit events occur automatically whenever changes are applied to your firewall. However, the push to your remote Git server defaults to a scheduled nightly batch. If you require immediate synchronization, create a scheduled cron job under System > Settings > Cron using the "Remote Backup" command.
If you run a self-hosted Gitea or Forgejo instance and want to see an enterprise-grade Infrastructure-as-Code pipeline with automated Ansible provisioning, in detail, check out the walk-through by fellow Canadian tech outlet Botum!
Method 3: The Zero-Dependency API Script
If you do not run a NAS or a Git server and prefer not to install third-party plugins on your router, you can pull automated backups using a lightweight shell script and OPNsense's native REST API.
First, create an API keypair with minimal privileges: Navigate to System > Access > Users, select your backup service account, and generate an API Key. This downloads an apikey.txt file containing your key and secret. In the user's privilege list, grant only Diagnostics: Configuration History. This restricts the API token strictly to configuration exports.
You can execute the following Bash script from any remote Linux server or local cron runner:
#!/usr/bin/env bash
# Pull an encrypted-in-transit OPNsense configuration backup via Core API
# Requires API key scoped strictly to "Diagnostics: Configuration History"

KEY="YOUR_API_KEY"
SECRET="YOUR_API_SECRET"
FW_HOST="10.0.0.1"
DESTINATION="/brain/home/omvbackup/opnsense"
DAYS_TO_KEEP=30

DATE_STAMP=$(date +%Y-%m-%d_%H%M%S)
OUTFILE="${DESTINATION}/config-${DATE_STAMP}.xml"

mkdir -p "${DESTINATION}"

HTTP_STATUS=$(curl -s -k -u "${KEY}:${SECRET}"   -o "${OUTFILE}"   -w "%{http_code}"   "https://${FW_HOST}/api/core/backup/download/this")

if [ "${HTTP_STATUS}" != "200" ]; then
  echo "Backup failed with HTTP status: ${HTTP_STATUS}" >&2
  rm -f "${OUTFILE}"
  exit 1
fi

gzip -f "${OUTFILE}"

# Prune archives older than retention window
find "${DESTINATION}" -name 'config-*.xml.gz' -mtime "+${DAYS_TO_KEEP}" -delete
Note: The authoritative endpoint is /api/core/backup/download/this. Older third-party forum posts occasionally reference legacy paths like /api/diagnostics/backup, which is an invalid route.
Architectural Comparison: Which Method Fits Your Lab?
The table below summarizes the trade-offs across storage locality, audit visibility, encryption capability, and maintenance complexity:
Conclusion: Resilient Perimeter Engineering
Automating your firewall backups eliminates the single point of failure that threatens every custom homelab setup. Whether you implement the encrypted SFTP pipeline to your OpenMediaVault server, configure an off-box Git repository, or run a five-line cron script, the engineering goal remains identical: rebuilding your entire network infrastructure after catastrophic hardware failure should take minutes, not an entire lost weekend.
Take twenty minutes today to configure least-privilege key authentication, verify that your snapshots are landing on disk, and retire manual XML downloads for good.
Frequently Asked Questions
Does OPNsense back up its configuration automatically?
Yes, locally. Every configuration change is saved to System > Configuration > History, providing diff viewing and one-click rollbacks. However, this history resides on the firewall's internal boot disk. If that physical disk fails or suffers corruption, your local history is lost. The automated off-box methods in this guide resolve this vulnerability.
Do I need Git to see what changed in my firewall configuration?
No. OPNsense's built-in Configuration History screen provides colour-coded unified diffs and instant revision rollback without requiring any plugins. The primary advantage of Git is securing an off-box copy of that audit trail that survives host hardware death.
Is backing up over SFTP to my NAS secure?
Yes, provided you enforce least-privilege access: assign a dedicated service user with SSH-key-only authentication, confine it to a dedicated subfolder with standard Linux permissions, and enable AES payload encryption in the plugin so your configuration is encrypted before transmission.
Can I restore from just part of a backup?
OPNsense allows selective section restores from the Configuration History interface, but doing so carries risks. For instance, restoring firewall rules without the corresponding interface aliases can create broken rule references. In a disaster recovery scenario, performing a full configuration restore is significantly safer.
Related Lab Blueprints to Explore Next
To further harden your homelab infrastructure, explore these Core Lab guides:
- How to Setup OpenMediaVault 8 (OMV8) for 2026: Building the storage foundation, storage pools, user management, and secure shares from scratch.
- Beyond Default Deny: Reducing Attack Surface & Exposure: Hardening your perimeter and securing services behind OPNsense.
- The Homelab Physical: A Guide to Annual & Bi-Annual Maintenance: Establishing automated health audits, snapshot verification, and storage testing routines.
Written by
On this page
What's Next?

Cybersecurity Threat Intel: What the Critical PHP RCEs and Tailscale Disclosures Mean for Homelabbers
The past 72 hours delivered a brutal one-two punch: critical PHP RCEs ('php2shell') followed by a 12-hour-old Tailscale SSH socket vulnerability disclosure. Here is my technical breakdown and how I hardened my homelab.