
Cloudflare Advanced - The Layered Cache Strategy (2026)

In Part 1, we secured your DNS. In Part 2, we enabled all the awesome free Cloudflare free security security features. Now, in Part 3, we unlock the real power of the Edge: Intelligent Caching.
This is the third post in the Cloudflare series, showcasing utilizing your domain with their free tier. if you missed the first two posts, click back with the series navigator below.
Cloudflare Free Tier Guides
Most guides tell you to "Cache Everything" and hope for the best. That breaks your site for logged-in members. Others tell you to create complex bypass rules first.
If you are self-hosting a Ghost blog (or any CMS/website), your server is in one physical location (e.g., your basement/rack/IKEA Lack table!). When a user in London visits, they have to wait for light to travel across the Atlantic ocean, which, is big! Thankfully fibre is quite fast, but there is a delay, and when your site gets busier there becomes contention for that data.
We are going to use a Layered Strategy. We set a "base layer" of caching for the whole site, and then we layer specific "overrides" on top of it for members and static files. This configuration is currently running on Core Lab, keeping the site instant for guests while ensuring members never see stale data. I may have to revisit this logic if the site grows much larger, but when we cross that bridge... One can hope! ;)
We can cheat physics using Cloudflare’s Edge Cache.
The goal of this guide is to make your dynamic content feel like a static site and react that quickly. We will force Cloudflare to cache everything (including the HTML pages that it normally does not) and then use a Cloudflare Worker to automatically clear that cache the instant you publish a post!
As I always say, a picture speaks a thousand words:
flowchart TD
    %% ===========================
    %% CLOUDFLARE LAYERED CACHE STRATEGY
    %% ===========================

    subgraph Base["🌍 Rule #1 — Base Layer
Cache Everything (HTML) for 7 Days"]
        R1["🟦 7-Day Cached HTML
• Speeds up guest traffic
• Default cache state for whole site"]
    end

    subgraph Override["🛑 Rule #2 — Override
Bypass Cache for Members & Admin"]
        R2["🔴 Cache Bypass
• Logged-in users
• Admin dashboard
• Dynamic pages (cart/checkout/etc)"]
    end

    subgraph Boost["🚀 Rule #3 — Static Asset Boost
Cache for 1 Month"]
        R3["🟨 30-Day Cache
• Images
• CSS/JS
• Fonts (woff2)
• Media assets"]
    end

    R1 --> R2 --> R3

    style Base fill:#e0f2fe,stroke:#0284c7,stroke-width:2px,color:#034168
    style Override fill:#fee2e2,stroke:#dc2626,stroke-width:2px,color:#7f1d1d
    style Boost fill:#fef9c3,stroke:#ca8a04,stroke-width:2px,color:#7c5800

    style R1 fill:#fff,stroke:#0284c7,stroke-width:2px
    style R2 fill:#fff,stroke:#dc2626,stroke-width:2px
    style R3 fill:#fff,stroke:#ca8a04,stroke-width:2px
Prerequisites:
- A Cloudflare account (Free Plan).
- A Ghost blog / website / something online (Self-hosted).
- Access to your Cloudflare Dashboard and Admin panel.
- For this example, I'll be showing how it's done for my blog here which is based on Ghost but the concepts should be the same for other sites.
🧠 The Concept: Static vs. Dynamic Caching
Before we click buttons, you need to understand the strategy.
- Static Content (Images, CSS, JS): Cloudflare caches these by default. You don't need to do anything.
- Dynamic Content (HTML): By default, Cloudflare does NOT cache the actual HTML pages of your blog. It fetches them from your server every single time. Not what you expected eh? Me neither!
The Strategy: We are going to force Cloudflare to cache the HTML too. This reduces the load on your server to near-zero and makes your site load instantly worldwide.
⚠️ The Warning (Ghost Members):
If you use the "Members/Login" feature of Ghost, aggressive HTML caching can break the "Logged in as..." functionality. I will show you a "Pro Tip" in Step 2 to handle this using modern Cache Rules.
🛠️ Part 1: Setting Up Edge Caching (The Modern Way)
We are going to use Cache Rules, which are the modern, more powerful replacement for the old "Page Rules."
The Core Lab Strategy: "Last Match Wins"
We will configure 3 Cache Rules in specific order. Cloudflare processes these top-to-bottom, meaning the last rule that matches is the one that applies.
- 🌍 Rule #1 (The Base): Cache Everything for 7 Days. (This sets the default state).
- 🛑 Rule #2 (The Override): Bypass Cache for Members & Admins. (This overwrites Rule #1 for logged-in users).
- 🚀 Rule #3 (The Boost): Cache Static Assets for 1 Month. (This overwrites Rule #1 for images/css, giving them an even longer life).
Navigate to your Domain->Rules->Cache Rules in your Cloudflare Dashboard.
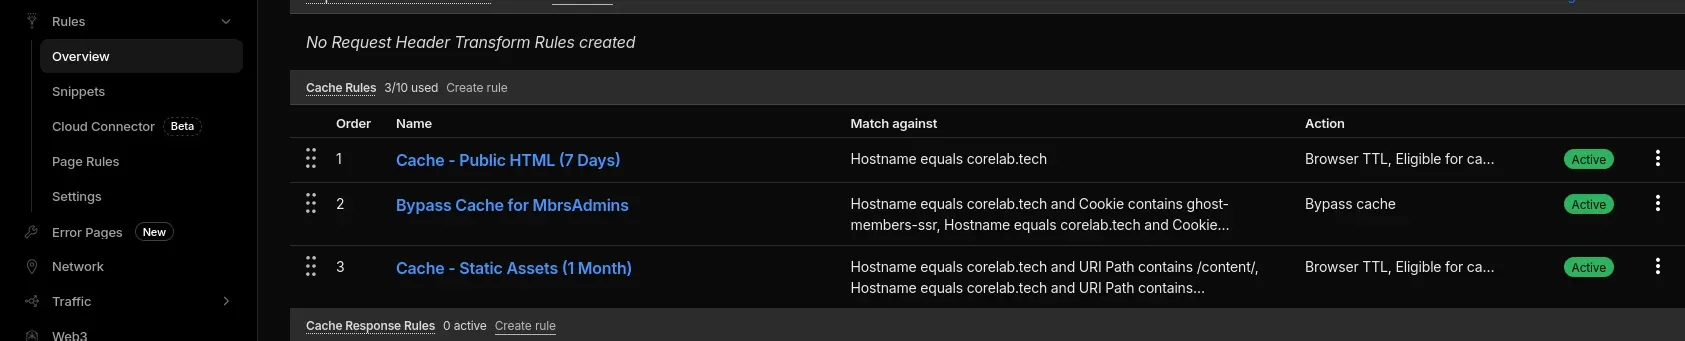
Create these rules in this exact order, the order absolutely matters.
Rule #1: The Base Layer (7 Days HTML)
First, we cast a wide net. We tell Cloudflare: "Unless I tell you otherwise later, cache everything on this domain for a week."
- Rule Name:
Cache Public Content (7 Days) - For If incoming requests match...
- Chose
Custom filter expression
- Chose
- Expression:
Hostnameequalscorelab.tech(Swap with YOUR domain of course)
- Cache Status:
Eligible for cache - Edge Cache TTL:
Ignore cache-control header->7 Days - Browser TTL (optional)
- I set mine to
Override origin and use this TTLand set that to4 hours.
- I set mine to
The Effect: Right now, everyone (including you) sees a cached version of the site. This makes it fast, but we need to fix the "logged in" experience next.
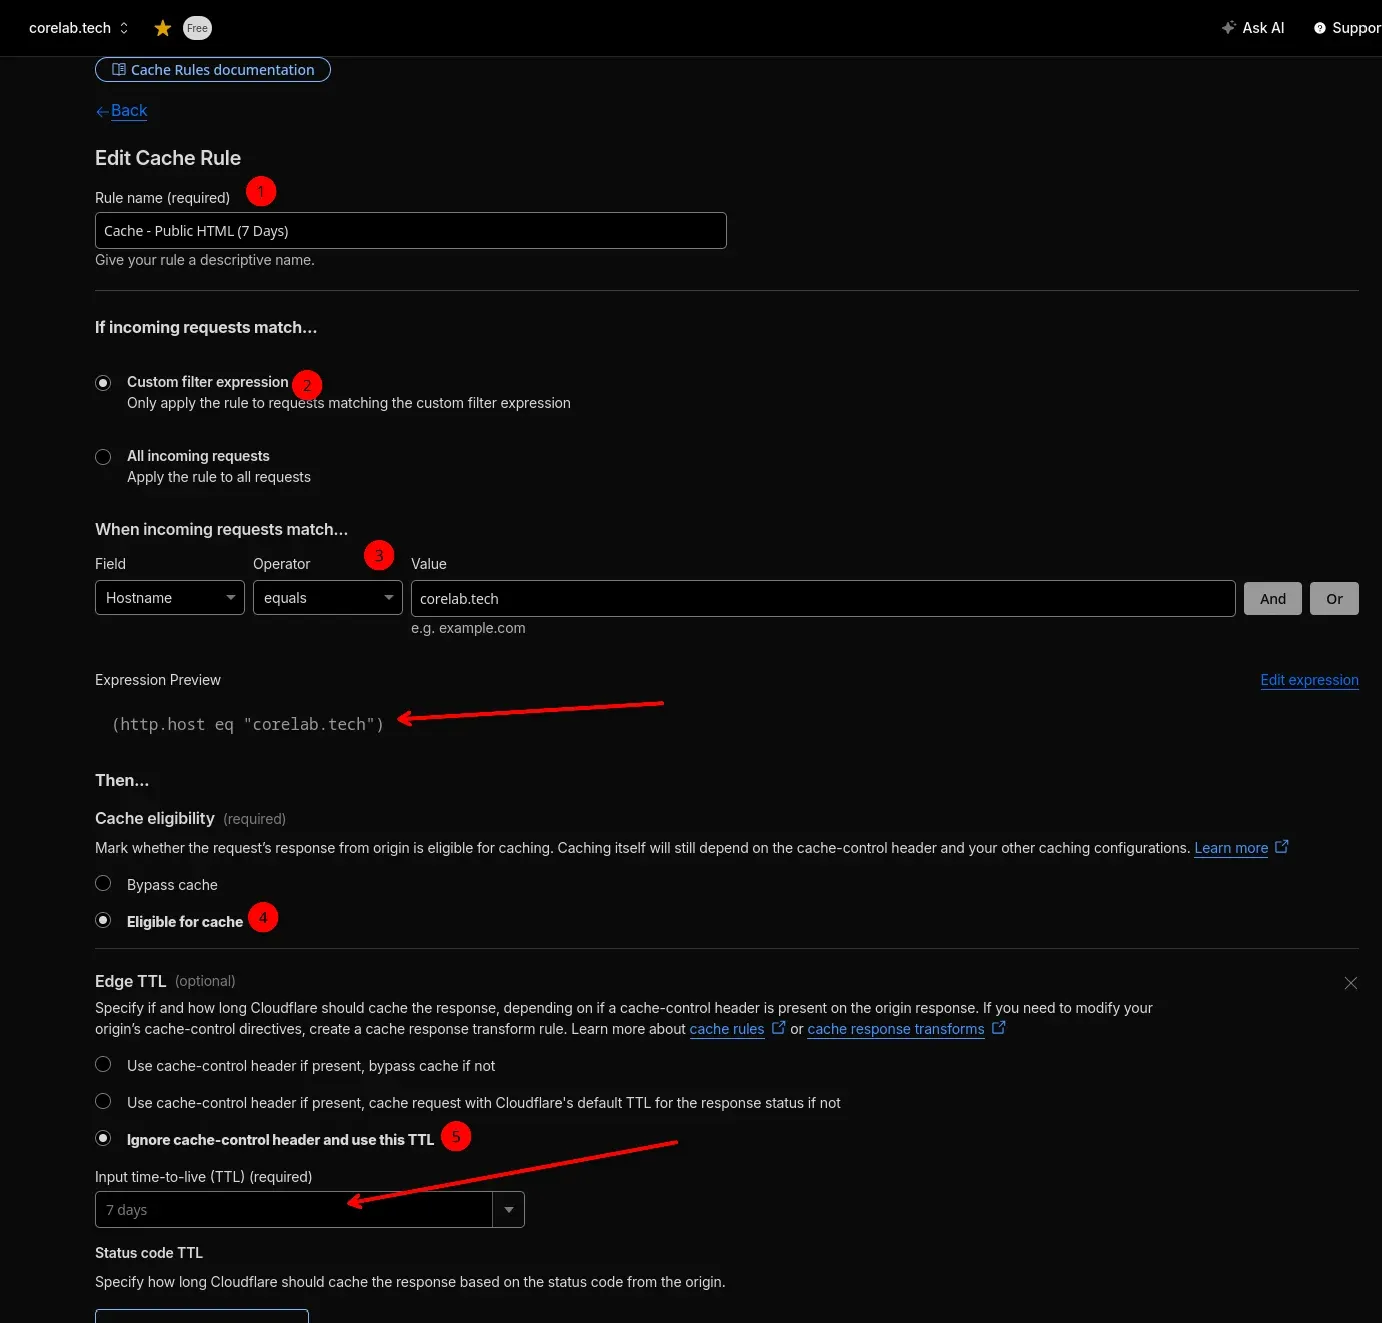
Rule #2: The Bypass (Members, Admin & SEO)
Now, we apply the critical overrides. We need to tell Cloudflare to stop caching immediately if a user is logged in (dynamic data) or if a search engine is looking for your site structure. This one will take a beat longer than the first one.
Rule Name: Bypass Cache for MbrsAdmins (or whatever makes sense to you)
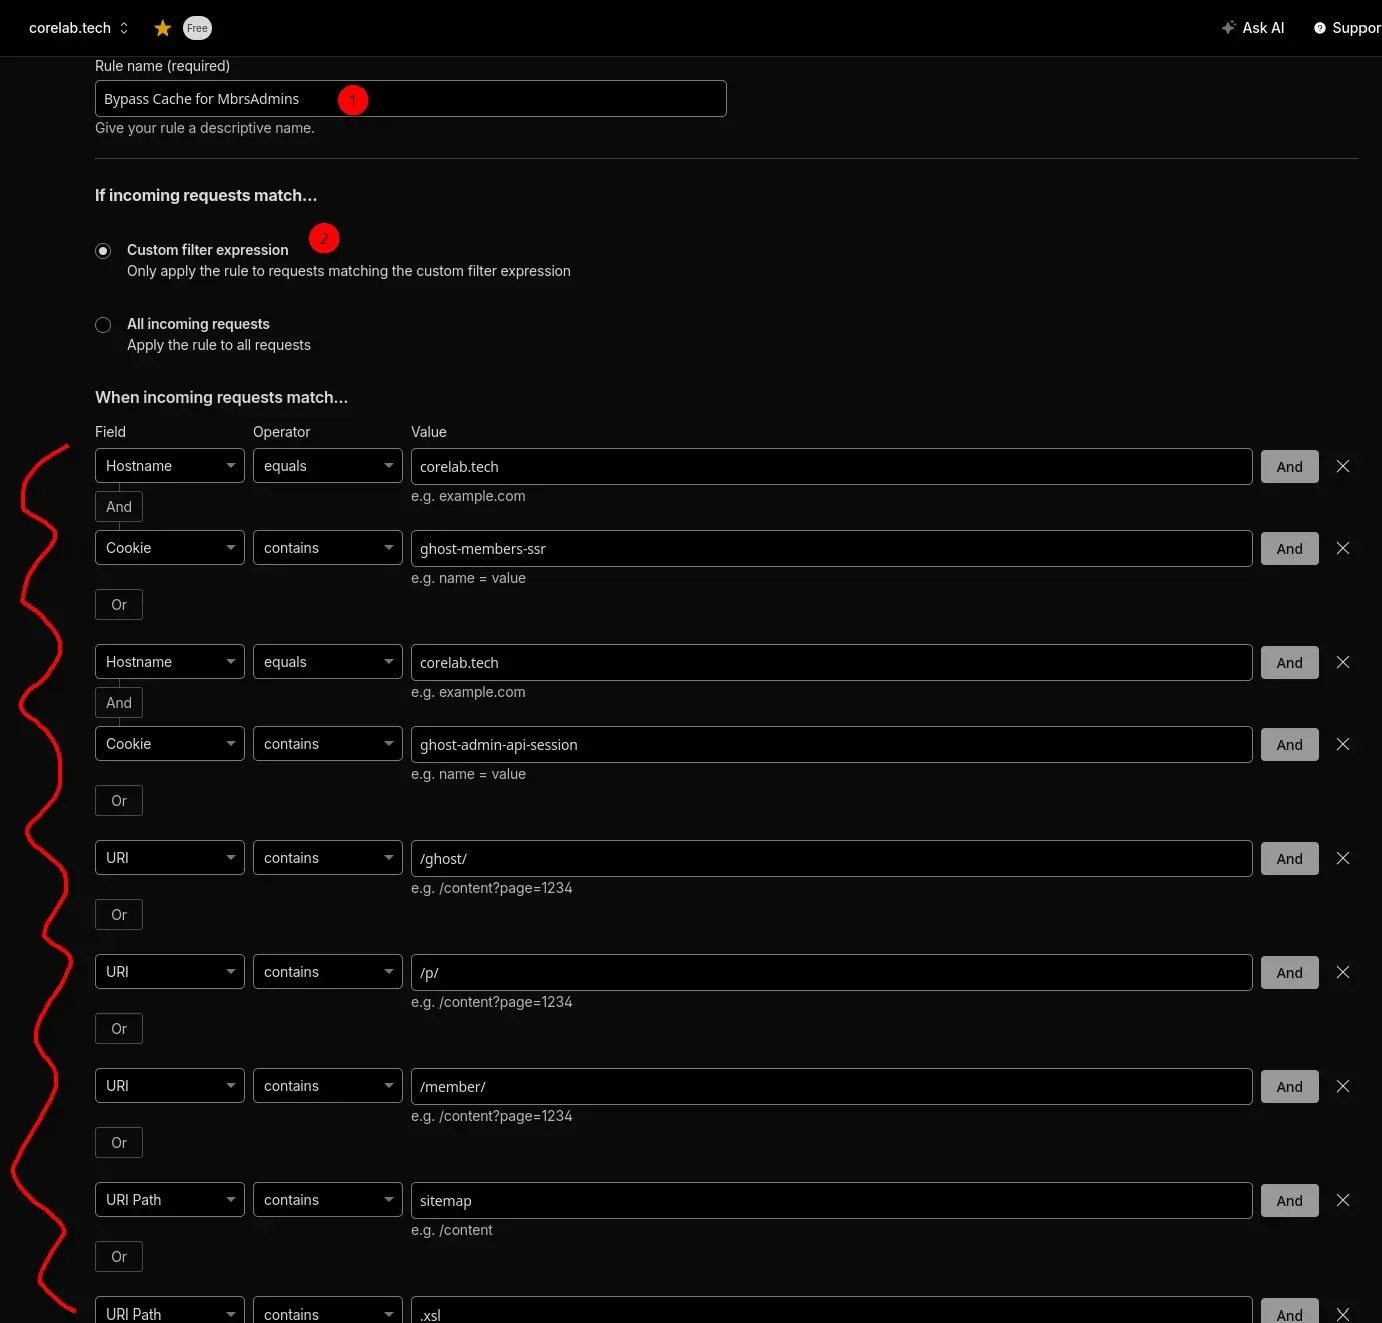
So there's 2 of those And sets of rules, then the rest have Or in between them.
Expression code block which you can copy & paste into the Expression builder:
(http.host eq "YOURDOMAIN.COM" and http.cookie contains "ghost-members-ssr") or (http.host eq "YOURDOMAIN.COM" and http.cookie contains "ghost-admin-api-session") or (http.request.uri contains "/ghost/") or (http.request.uri contains "/p/") or (http.request.uri contains "/member/") or (http.request.uri.path contains "sitemap") or (http.request.uri.path contains ".xsl") or (starts_with(http.request.uri.path, "/.ghost/activitypub/"))Once you paste this in and click to Use Expression Builder the rules above are converted to a more easily modifiable human format as the picture shows.
Cache Status: Bypass cache
The Logic: Because this rule comes after Rule #1 (the "Cache Everything" rule), rule #1 takes precedence first.
The Effects:
For Users: If Cloudflare detects a "Login Cookie," it discards the cache and fetches live data so your members never see a generic cached page.
For Google: By addingsitemapand.xslhere, we ensure that every time you publish a post, Googlebot sees the new link instantly - no waiting 7 days for the cache to clear.
Rule #3: The "Secret Sauce" (Static Assets)
Finally, we optimize the heavy files. Rule #1 set images to 7 days, but images rarely change. Let's override that and force them to cache for a full month.
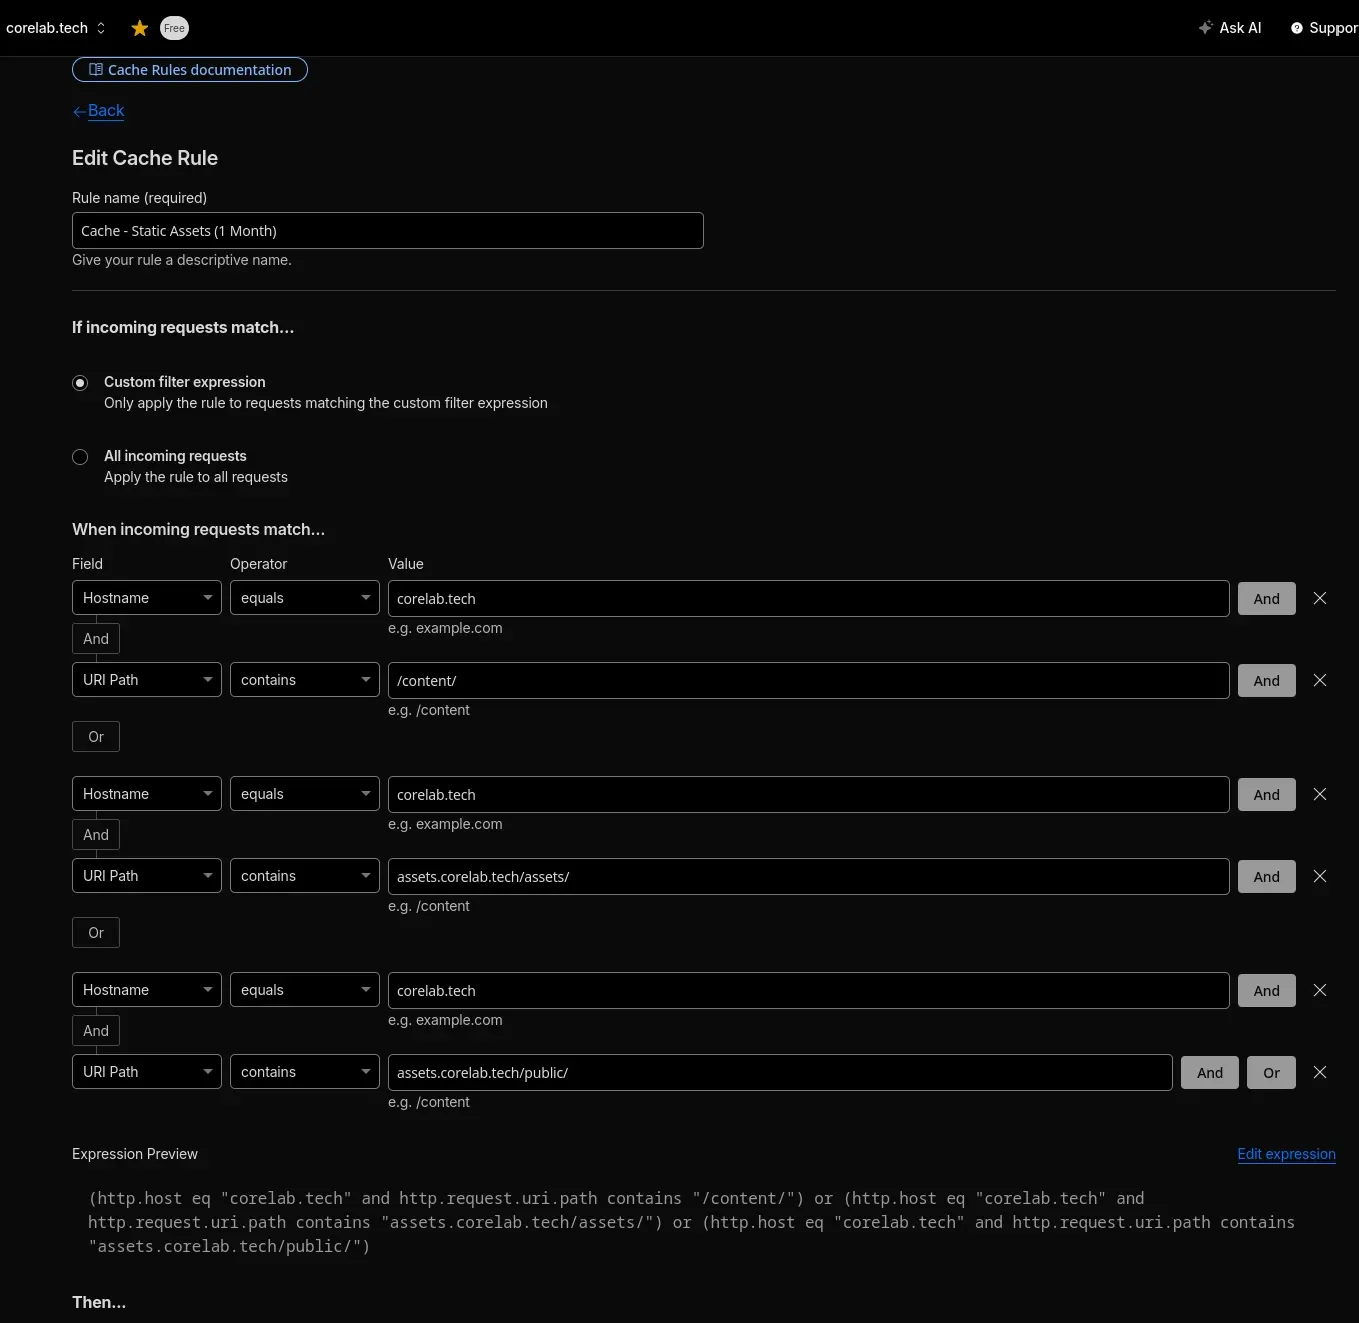
- Rule Name:
Cache - Static Assets (1 Month) - Expression Code Block (Don't forget to customize it to your domain!):
(http.host eq "YOURDOMAIN.COM" and http.request.uri.path contains "/content/") or (http.host eq "YOURDOMAIN.COM" and http.request.uri.path contains "assets.corelab.tech/assets/") or (http.host eq "YOURDOMAIN.COM" and http.request.uri.path contains "assets.corelab.tech/public/")- Cache Status:
Eligible for cache - Edge Cache TTL:
Ignore cache-control header->1 Month - Browser TTL:
Override origin->1 Month
The Result: Even if a user is logged in (Rule #2), this Rule #3 also matches for their images. It ensures that everyone, member or guest, gets lightning-fast images from the cache, while only the HTML is bypassed for members.
🕵️ Verification: How to Test
It is critical to verify that your "layering" is working.
1. Test as a Guest (Incognito Window): Visit your homepage. Check the Network tab (F12) for the main document request.
- Header:
cf-cache-status: HIT(orMISSthenHITon refresh) - Explanation: You matched Rule #1.
2. Test as a Member (Logged In): Log in to your site. Check the same request.
- Header:
cf-cache-status: BYPASS - Explanation: You matched Rule #1, but then you matched Rule #2, which overwrote it to "Bypass."
3. Test an Image: Right-click an image and open it in a new tab. Check the headers.
- Header:
cache-control: max-age=2592000(30 Days) - Explanation: You matched Rule #1 (7 days), but then matched Rule #3, which upgraded it to 1 Month.
⚙️ Part 2: The Automation (Cloudflare Workers)
If you stopped now, your blog would be fast, but stale. New posts wouldn't appear for a month! You could simply do a full purge every time you post, but that is just another thing you have to do... In 2026, we automate. We need a robot to tell Cloudflare: "I just published! Clear the cache!"
We will use a Cloudflare Worker (Free) triggered by a Ghost Webhook.
Step 1: Create a Cloudflare API Token
The Worker needs permission to purge your cache.
- Go to My Profile > API Tokens.
- Click Create Token.
- Use the "Custom Token" template.
- Permissions:
- Zone -> Cache Purge -> Purge
- Zone Resources:
- Include -> Specific zone ->
corelab.tech(you'd use YOUR domain here)
- Include -> Specific zone ->
- Create the token and COPY IT. You will not see it again.
Step 2: Create the Worker (Crazy this is free!)
- Go to Compute & AI -> Workers tab in the sidebar.
- Click Create Service.
- Name it:
ghost-purgeorautopurger. Select "HTTP handler" (standard). - Click Create service.
- Click Edit code.
- Delete the existing code and paste this script. This script listens for the Ghost webhook and commands Cloudflare to purge the specific URL that was updated.
addEventListener('fetch', event => {
  event.respondWith(handleRequest(event.request));
});

async function handleRequest(request) {
  const url = new URL(request.url);
  const { pathname, searchParams } = url;

  if (pathname === '/purge-full-cache') {
    const zoneId = searchParams.get('zone');

    if (!zoneId) {
      return new Response('Missing zone ID. Please provide a zone ID in the query parameter.', { status: 400 });
    }

    const apiKey = 'YOUR_API_KEY';
    const email = 'YOUR_CLOUDFLARE_LOGIN';

    const purgeResponse = await fetch(`https://api.cloudflare.com/client/v4/zones/${zoneId}/purge_cache/`, {
      method: 'POST',
      headers: {
        'X-Auth-Email': email,
        'X-Auth-Key': apiKey,
        'Content-Type': 'application/json',
      },
      body: JSON.stringify({ purge_everything: true }),
    });

    if (purgeResponse.ok) {
      return new Response(`Full cache purge initiated successfully for zone ${zoneId}.`);
    } else {
      const errorData = await purgeResponse.json();
      return new Response(`Failed to initiate full cache purge: ${JSON.stringify(errorData)}`, { status: 500 });
    }
  }

  return new Response('Not Found', { status: 404 });
}
Fairly straight forward.
🔗 Part 3: Connecting Ghost
The final step is telling Ghost to talk to your Worker.
- Log in to your Ghost Admin.
- Go to Settings (Gear) > Integrations.
- Click Add custom integration (bottom of page).
- Name it "Cloudflare Purge".
- In the Webhooks section, click Add webhook.
- There's two methodologies you can go with here, one webhook, or two separate. I chose simplest, using one.
- Option A - Create one webhook:
- Event: Site changed (rebuild) | Target URL: Your Worker URL.
- This means that if ANY change is made to any post on the site, the entire cache on CloudFlare is wiped and CloudFlare then has to re-cache & crawl the site. "Nuke from orbit".
- Event: Site changed (rebuild) | Target URL: Your Worker URL.
- Option B - Create two webhooks:
- Event:
Post published| Target URL: Your Worker URL. - Event:
Post updated| Target URL: Your Worker URL.- This is more granular and keeps a good chunk of your static content still cached.
- Event:
- Click Save.
🚀 The Result & Cache Score
- You publish a post.
- Ghost fires a signal to your Cloudflare Worker.
- The Worker tells Cloudflare, "Clear the cache for this specific URL."
- Global Cache: Your readers serve the super-fast cached version (HIT) from the edge.
- Zero Staleness: The moment you fix a typo, the cache clears instantly.
When done, after about a week (depending how busy your site is!) you should see some incredible statistics like this -
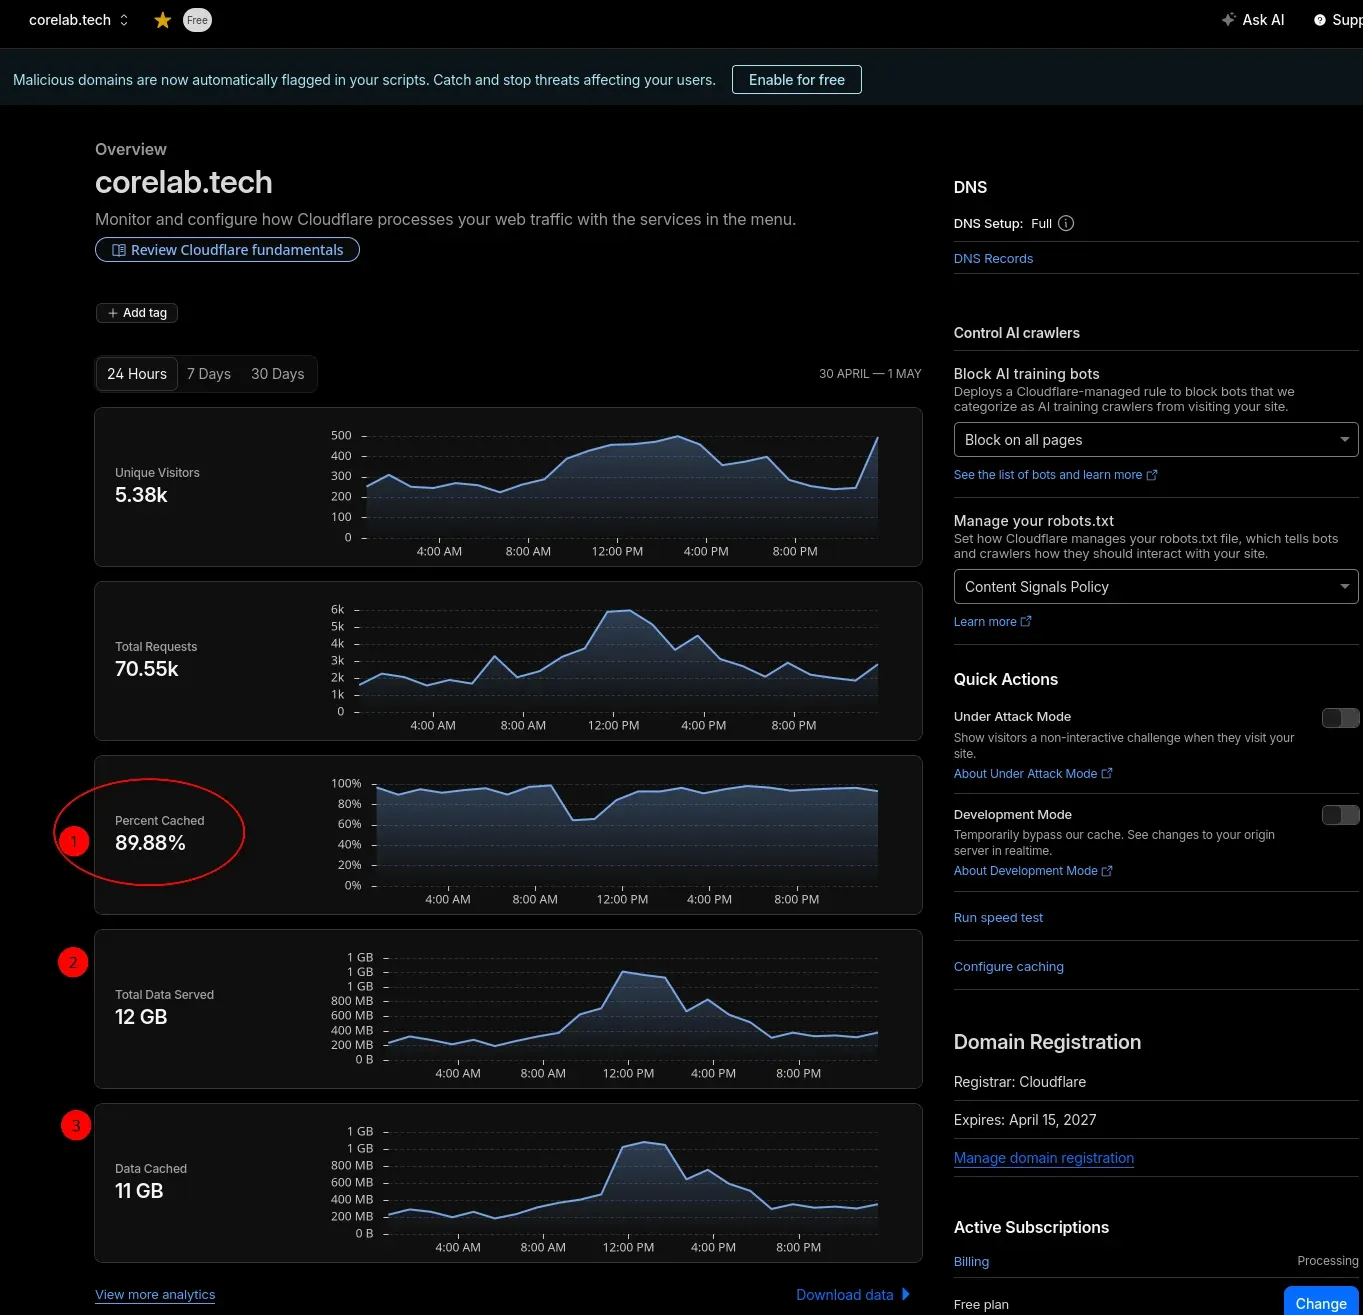
You now have the best of both worlds: the dynamic power of Ghost and the static speed of the Cloudflare Edge, all for $0/month.
This is a part of my practical cybersecurity roadmap for homelabs/self-hosters, hop over there to begin your next adventure!
 Core Lab Joe
If you are enjoying and getting use out of this post or the site, feel free to sign up or donate, this would be hugely appreciated by me and signals to me you value the content and want more!👇





Member discussion