
Frigate Setup Guide: NVIDIA TensorRT, Reolink & go2rtc (2026)
After years of fighting with Synology Surveillance Station and generic NVRs, I hit a wall. I was tired of "Smart Detection" that thought a swaying tree was a person. I was tired of 24/7 recordings burning out my hard drives. And I was tired of proprietary software getting "enshittified" with subscription fees.
If your Reolink cameras keep dropping RTSP streams in Frigate, or your CPU is pinned because object detection is not using your NVIDIA GPU, this guide walks through a working Docker Compose and Frigate config using go2rtc, TensorRT, and an RTX 3060.
This guide is the exact documentation of my production setup. It uses Frigate 0.17.1-416a9b7 (running on Docker), NVIDIA TensorRT (via an RTX 3060) for hardware acceleration, and Go2RTC to solve the notorious Reolink connection issues.
1. Install Frigate stable-tensorrt
2. Enable NVIDIA runtime in Docker
3. Use go2rtc with your Reolink substream
4. Set hwaccel_args to preset-nvidia
5. Confirm 10 - 15ms inference in System Metrics
This flowchart gives a high level overview of the architecture and flow of data processing in Frigate:
flowchart TD
    %% =============================
    %% CAMERA SOURCE
    subgraph CameraSource["📷 Reolink Source"]
        CAM["🎥 IP Camera"]
    end

    %% =============================
    %% STABILIZATION LAYER (The "Secret Sauce")
    subgraph Stabilizer["🛡️ Stabilization Layer"]
        RTC["go2rtc (Internal)"]
        CAM -->|"Raw RTSP"| RTC
    end

    %% =============================
    %% PROCESSING PIPELINE
    subgraph Pipeline["⚙️ Processing Pipeline"]
        RTC -->|"1. Sub-stream"| DEC["🧩 NVDEC (GPU Decode)"]
        DEC -->|"2. Frames"| MOTION["🌀 Motion Detection"]
        MOTION -->|"3. Crop"| TRT["⚡ TensorRT (NVIDIA GPU)"]
    end

    %% =============================
    %% NVR CORE & OUTPUT
    subgraph Core["🧠 Frigate NVR Core"]
        RTC -->|"4. Main-stream"| NVR["Recordings Engine"]
        TRT -->|"5. Metadata"| NVR
        NVR -->|"6. Store"| DISK["💾 ZFS / SSD Storage"]
        NVR -->|"7. Alert"| HA["🔔 Home Assistant"]
    end

    %% =============================
    %% STYLING (Dark Mode Optimized)
    style CAM fill:#2d3436,stroke:#0984e3,stroke-width:2px,color:#dfe6e9
    style RTC fill:#2d3436,stroke:#00cec9,stroke-width:3px,color:#fff
    style DEC fill:#2d3436,stroke:#6c5ce7,stroke-width:2px,color:#dfe6e9
    style TRT fill:#2d3436,stroke:#fdcb6e,stroke-width:3px,color:#fff
    style NVR fill:#2d3436,stroke:#e17055,stroke-width:2px,color:#dfe6e9
    style DISK fill:#2d3436,stroke:#b2bec3,stroke-width:2px,color:#dfe6e9
    style HA fill:#2d3436,stroke:#d63031,stroke-width:2px,color:#dfe6e9

    %% SUBGRAPH STYLING
    style CameraSource fill:transparent,stroke:#636e72,stroke-dasharray: 5 5
    style Stabilizer fill:transparent,stroke:#636e72,stroke-dasharray: 5 5
    style Pipeline fill:transparent,stroke:#636e72,stroke-dasharray: 5 5
    style Core fill:transparent,stroke:#636e72,stroke-dasharray: 5 5
The Reolink Problem: Why Your Streams Keep Dropping (And the go2rtc Fix)
If you are using Reolink cameras with Frigate, you’ve probably noticed streams dropping, freezing, or throwing endless FFmpeg errors in your logs. This is not your fault. While Reolink makes excellent, affordable hardware for a Scrap Lab setup, their native RTSP implementation is notoriously buggy and often drops packets. If you feed a raw Reolink RTSP stream directly into Frigate for AI detection, your system might eventually choke. I haven't noticed much of this myself, but I am using high quality CAT6A STP and powering them over said cable with PoE from an Ubiquiti switch.
The Fix: We use go2rtc (which is now built directly into Frigate) as a middleman. Instead of Frigate connecting directly to the camera, go2rtc pulls the stream from the camera once, stabilizes it, and then splits it into two flawless feeds:
- The Substream (Low-Res): Exclusively used for TensorRT object detection.
- The Main Stream (High-Res/4K): Exclusively used for 24/7 recording.
Here is the exact go2rtc configuration to add to the top of your config.yml to stabilize Reolink cameras.
📄 View Full YAML Configuration (Click to Expand)
# Add this to the very top of your Frigate config.yml
go2rtc:
  streams:
    # --- Front Porch Camera ---
    porch_main:
      # Use the high-res main stream for recording
      - "rtsp://admin:[email protected]:554/h265Preview_01_main"
    porch_sub:
      # Use the low-res h264 substream for AI detection
      - "rtsp://admin:[email protected]:554/h264Preview_01_sub"

cameras:
  porch:
    ffmpeg:
      hwaccel_args: preset-nvidia
      inputs:
        # Pull the stabilized detection stream from go2rtc (127.0.0.1)
        - path: rtsp://127.0.0.1:8554/porch_sub
          input_args: preset-rtsp-restream
          roles:
            - detect
        # Pull the stabilized recording stream from go2rtc (127.0.0.1)
        - path: rtsp://127.0.0.1:8554/porch_main
          input_args: preset-rtsp-restream
          roles:
            - record
Note: Notice how the camera inputs now point to 127.0.0.1 (localhost)? That ensures Frigate is grabbing the clean, stabilized stream from go2rtc, not the raw, buggy stream from the camera itself.
Installing Frigate in Docker Compose
Part 1 - Prerequisites & Hardware Requirements:
- Docker Compose running
- NVIDIA Container Tookit setup
- Since we'll leverage ONNX & yolov advanced ML/AI detection models, Git needs to be installed as well.
- A NVIDIA GPU (not a Google Coral)
- Storage (for the camera recordings)
Part 2 - Docker Compose Configuration
When you run the Frigate docker the first time, it will download a default config and place it in /yourpathto/DOCKERS/frigate/config/config.yml and you'll need to edit that after.
💡 Core Lab Tip: Calculate your SHM size: (Width * Height * 1.5 * Num_Cameras) / 1024 / 1024. For each 4K cam, just set at least 128mb to be safe.
📄 View Full YAML Configuration (Click to Expand)
services:
  frigate:
    container_name: frigate
    restart: unless-stopped
    networks:
      your_docker_net:
        ipv4_address: 10.x.x.10
    restart: unless-stopped
    image: ghcr.io/blakeblackshear/frigate:stable-tensorrt
    shm_size: "512mb" # update for your cams optimal size, based on calculation above
    environment:
      - NVIDIA_VISIBLE_DEVICES=all
      - NVIDIA_DRIVER_CAPABILITIES=compute,utility,video
    volumes:
      - /etc/localtime:/etc/localtime:ro
      - /yourpathto/DOCKERS/frigate/config/:/config/
      - /yourpathto/DOCKERS/frigate/cctv:/media/frigate
      - /yourpathto/DOCKERS/frigate/config/model_cache/tensorrt:/trt-models
      - type: tmpfs # Optional: 1GB of memory, reduces SSD/SD Card wear
        target: /transcode
        tmpfs:
          size: 1000000000
    deploy:
       resources:
           reservations:
               devices:
                   - driver: nvidia
                     count: all
                     capabilities: [gpu]
    ports:
      - "5000:5000"     # WebGUI
      - "554:554"       # Basic RTSP Reolink
      - "8554:8554"     # RTSP feeds
      - "8555:8555/tcp" # WebRTC over tcp
      - "8555:8555/udp" # WebRTC over udp
docker compose up -d to get it running.
This should be good enough for the container to fire up, run temporarily, download the config.yml, crash and close, that's ok.
Part 3 - Building YOLOv9 for TensorRT
Frigate's default model is "okay." But for 4K cameras, we want YOLOv9. Since we are using an NVIDIA GPU, we can't just download a file; we have to "build" the engine so it is optimized for our specific graphics card.
You'll need to do some reading from this page and determine what AI/ML model you want to utilize as it has an impact on the GPU and resources of your system. Generally you'll want to pare a model that is optimized for your cameras. Since I have 4k Reolink cams, I've chosen one of the latest yolov (v9) models to use and since my cameras operate their aperture at 640, that's what I chose.
From the page I referenced above:
Nvidia
Nvidia GPUs will automatically be detected and used with the ONNX detector in the -tensorrt Frigate image.
Step 1 -
- Read from this page to understand and select a model: https://docs.frigate.video/configuration/object_detectors/#downloading-yolo-models
Step 2 -
- You need to run the simple scripts they advise there, but if you run into an error the 1st thing you need to do is:
- install git itself! I was stuck on this for a few minutes wondering why it wasn't working.
↪️I chose MODEL_SIZE=m (Medium) and IMG_SIZE=640 as that is my cameras native setting.
... Once you've modified this script to suit your needs, you run it and then wait. It can take awhile (10, 20, 30 minutes depending on many factors).
RUN uv pip install --system onnx==1.18.0 onnxruntime onnx-simplifier>=0.4.1 onnxscriptThanks to u/tubl07 for pointing this latest update out to me!
📄 View Full Output of Build (Click to Expand)
docker build . --build-arg MODEL_SIZE=m --build-arg IMG_SIZE=640 --output . -f- <<'EOF'
FROM python:3.11 AS build
RUN apt-get update && apt-get install --no-install-recommends -y libgl1 && rm -rf /var/lib/apt/lists/*
COPY --from=ghcr.io/astral-sh/uv:0.8.0 /uv /bin/
WORKDIR /yolov9
ADD https://github.com/WongKinYiu/yolov9.git .
RUN uv pip install --system -r requirements.txt
RUN uv pip install --system onnx==1.18.0 onnxruntime onnx-simplifier>=0.4.1 onnxscript
ARG MODEL_SIZE
ARG IMG_SIZE
ADD https://github.com/WongKinYiu/yolov9/releases/download/v0.1/yolov9-${MODEL_SIZE}-converted.pt yolov9-${MODEL_SIZE}.pt
RUN sed -i "s/ckpt = torch.load(attempt_download(w), map_location='cpu')/ckpt = torch.load(attempt_download(w), map_location='cpu', weights_only=False)/g" models/experimental.py
RUN python3 export.py --weights ./yolov9-${MODEL_SIZE}.pt --imgsz ${IMG_SIZE} --simplify --include onnx
FROM scratch
ARG MODEL_SIZE
ARG IMG_SIZE
COPY --from=build /yolov9/yolov9-${MODEL_SIZE}.onnx /yolov9-${MODEL_SIZE}-${IMG_SIZE}.onnx
EOF
Official docs for reference here: https://docs.frigate.video/configuration/object_detectors/#yolov9
Step 3 -
- Once built, copy the
.onnxfile to your/config/model_cachefolder. Frigate will automatically convert this to a TensorRT engine on the first boot.cp yolov9.onnx (Tab complete for the full name) /yourpathto/DOCKERS/frigate/config/model_cache/
What does this all actually do?
The Python command you are running to "download & install" a YOLO model for Frigate is actually initiating a sophisticated two-step process to optimize the model for your GPU, which is often called model conversion or building the engine.
The Two-Step Model Conversion Process
1. Downloading the Generic Model
The first step is downloading the neural network model weights, typically in a generic format like ONNX (.onnx file) or another intermediate format.
- The Model: A YOLO model is simply a deep learning network architecture and a file containing millions of trained numerical weights. This base model is universal; it is not yet optimized for any specific hardware.
- The Download: Whether you are using a model from Frigate+ or a manually sourced ONNX file, this step just places the generic model file into your Frigate container's mapped model cache directory (e.g.,
/config/model_cache/onnx/).
2. The Critical NVIDIA-Specific "Build" (TensorRT Optimization)
The second step, which happens when Frigate (or an associated script) first attempts to load or convert the model, is the hardware-specific optimization powered by NVIDIA TensorRT. This is where your GPU gets involved.
- Detection of the GPU: Frigate (specifically the TensorRT/ONNX detector process within the
-tensorrtDocker image) does detect your NVIDIA GPU. It is aware of the GPU's presence because you successfully set up the NVIDIA Container Toolkit on the host, and you passed the GPU through in yourdocker-compose.ymlfile using theruntime: nvidiaordeploy: resources:commands. - The TensorRT Engine Build: TensorRT is a software development kit (SDK) designed to accelerate inference on NVIDIA GPUs. The "build" process converts the generic ONNX model into a highly optimized, GPU-specific TensorRT Engine (often a
.trtor.enginefile). This conversion is essential for maximum performance. - Optimization: During the build, TensorRT performs GPU-specific optimizations, which may include:
- Layer Fusion: Combining multiple neural network layers into a single, highly efficient kernel (a function that runs on the GPU).
- Precision Calibration (INT8/FP16): TensorRT can automatically calibrate the model to run with lower precision (like 16-bit or 8-bit floating point, if supported by your GPU's Tensor Cores) to drastically increase speed with minimal loss in accuracy.
- Kernel Auto-Tuning: It selects the absolute best, most efficient low-level code (kernel) for every operation in the network, specifically for the architecture of your GPU (e.g., RTX 3060 vs. RTX 4070).
- The Result: The output of this build is a binary engine file that is perfectly tuned for your specific NVIDIA GPU, CUDA version, and TensorRT libraries. This is why you must often re-build the model if you change the GPU or significantly update the NVIDIA drivers—the prior engine file is no longer optimal or compatible with the new hardware/software environment.
In summary, the Python command downloads the blueprint (ONNX model), and the Frigate/TensorRT environment uses that blueprint to build the custom, high-speed engine that is explicitly tuned for the capabilities of your specific NVIDIA GPU.
You're 2/3rd there, keep on trucking!
Part 4 - Frigate config.yml Breakdown
Now that you have the config downloaded, you can modify it to suit your needs. I'll provide an example config that you can base yours off of, but it's wildly configurable which is part of the beauty.
You have two options to configure the config.yml, from the GUI of Frigate, or from CLI. To get things initially running, you likely need to run from CLI for now.
nano /yourpathto/DOCKERS/frigate/config/config.yml
📄 View Full YAML Configuration (Click to Expand)
# Globally set nvidia hwaccel
ffmpeg:
  hwaccel_args: preset-nvidia  # Hardware acceleration for both H.264 and H.265 streams

# Disable MQTT unless you're connecting to Home Assistant
mqtt:
  enabled: false

# Enable 24/7/8 days recording (mode: all means all clips, not just clips with objects in)
# Keep 30 days worth of events (Frigate automatically deletes the oldest footage once space gets extremely low)
record:
  sync_recordings: true  # Sync your DB and records
  enabled: true
  retain:
    days: 8
    mode: all
  alerts:
    retain:
      days: 30
  detections:
    retain:
      days: 30

# Setup detectors using TensorRT (GPU acceleration)
detectors:
  onnx_0:
    type: onnx
# We used to use tensorrt, but now Frigate will autoload ONNX detector builds directly into Nvidia with the right model.
#  tensorrt:
#    type: tensorrt
#    device: 0  # Using the first GPU

model:
  model_type: yolo-generic
  path: /config/model_cache/onnx/yolov9_640-s.onnx  # YOLOv9 model path for 640x640 resolution
  input_tensor: nchw
  input_pixel_format: rgb
  input_dtype: float
  width: 640
  height: 640

# Set detection FPS and enable it
detect:
  enabled: true
  fps: 10

# Set birdseye view to always show a live stream of the cameras
birdseye:
  mode: continuous

# Snapshots configuration
snapshots:
  enabled: true
  clean_copy: true
  timestamp: false
  bounding_box: true
  crop: false
  height: 2160
  required_zones: [Front_porch]
  retain:
    default: 16
    objects:
      person: 16

# Objects to track from /labelmap.txt
objects:
  track:
    - person
    - bicycle
    - car
    - motorcycle
    - bird
    - cat
    - dog
    - airplane
    - backpack
    - frisbee
    - skateboard
    - pizza

# Config for each camera
cameras:
  porch:
    ffmpeg:
      hwaccel_args: preset-nvidia # H/W Accel for each stream, can set 'auto'
      inputs:
        - path: rtsp://frigate:[email protected]:554/h265Preview_01_main
          input_args: preset-rtsp-generic
          roles:
            - record
        - path: rtsp://frigate:[email protected]:554/h264Preview_01_sub
          input_args: preset-rtsp-generic
          roles:
            - detect
      output_args:
        record: preset-record-generic-audio-aac
#        record: preset-record-generic-audio-copy

    motion:
      mask: 0.645,0.835,0.614,0.94,0.663,1,0.695,0.998,0.662,0.829
      threshold: 35
      contour_area: 20
      improve_contrast: 'true'

    zones:
      Front_porch:
        coordinates:
          0.471,0.995,0.803,0.394,0.912,0.446,0.894,0.529,0.896,0.664,0.84,0.989
        loitering_time: 0

    review:
      alerts:
        required_zones: Front_porch

    objects:
      filters:
        car:
          mask: 0.092,0.233,0.086,0.124,0.404,0.065,0.447,0.102

version: 0.17-0
So that looks like a lot at first, but break it down into each chunk of config and it'll make more sense. Here is a short breakdown (scroll left/right as needed) of each major section of your Frigate config.yml:
| Section | Purpose | Key Configuration Points |
ffmpeg (Global) | Sets global FFmpeg parameters, primarily for video processing performance. | hwaccel_args: preset-nvidia: The critical line. This globally enforces NVIDIA hardware acceleration for video decoding (and encoding) across all streams, offloading the heavy lifting from your CPU to your NVIDIA GPU. |
mqtt | Configures integration with MQTT brokers, typically for linking to Home Assistant or other automation platforms. | enabled: false: MQTT communication is currently disabled. Events and detections will not be published to an MQTT broker. |
record | Manages the configuration for 24/7 video storage. | enabled: true and mode: all: Confirms 24/7 recording is active, saving all footage, not just clips with detected objects. retain: days: 8: Keep 8 days of the full recordings. alerts and detections are set to retain for 30 days, meaning the metadata for significant events is kept much longer than the raw video. |
detectors & model | Configures the AI model and the hardware it runs on (the object detection process). | onnx_0: type: onnx: ONNX detector, leveraging the ONNX Runtime for inference, which is highly compatible with NVIDIA GPUs, especially when using a specific Frigate image. (The tensorrt section is commented out). path: ...yolov9_640-s.onnx and width: 640/height: 640: Specifies the use of a high-performance YOLOv9 model with a input resolution for maximum detection accuracy. |
detect | Controls the rate and activation of the main object detection process. | enabled: true and fps: 10: Frigate will analyze frames for objects at a rate of 10 frames per second. This is a good balance between responsiveness and GPU load. |
birdseye | Configures the multi-camera overview stream in the Frigate UI. | mode: continuous: The Birdseye view will always show a live stream of all active cameras, regardless of whether motion or objects are detected. |
snapshots | Defines how still images (snapshots) of events are captured and stored. | height: 2160: Captures high-resolution snapshots at 4K vertical resolution. required_zones: [Front_porch]: Only take a snapshot if a detected object is inside the "Front_porch" zone, reducing unnecessary snapshots. retain: Keeps snapshots for 16 days by default for all objects, including "person." |
objects | Lists the types of objects the AI model should attempt to track. | track: A comprehensive list of objects is enabled, from common security targets like "person" and "car" to less common, but perhaps useful, items like "airplane" and "pizza." |
cameras: porch | Camera-specific configuration. | ffmpeg Inputs & Roles: This is crucial. My camera has two streams: a high-resolution H.265 stream for **record**ing, and a lower-resolution H.264 stream for **detect**ion. This conserves detection processing power while preserving high-quality archival footage. motion: mask: Defines an area where motion is ignored to prevent false motion triggers (often used for trees/bushes). zones: Front_porch: Defines a specific geographic area for targeted alerts. review: alerts: required_zones: Only trigger an alert if a detected object is in the Front_porch zone. objects: filters: car: mask: Defines a specific mask for the "car" object type, likely to ignore cars parked or moving in a specific, non-critical part of the frame. |
NOW - you're there, at the finish line. If you've checked your work above, and all is well, take'r for a spin!
docker compose up -d --force-recreate frigate && docker logs -f frigate
This re-creates frigate, now it'll use the new config, should be hardware accelerated and you can watch the log live as it starts up! CTRL-C to drop out of those logs.
Theory & Architecture: Why "Motion Detection" is Dead
Old NVRs record when pixels change. Frigate records when it understands what it sees since it's actually viewing the objects.
Here is the "Dark IT Magic" workflow:
- Motion: Frigate watches a low-res sub-stream.
- Detection: When movement happens, it crops that area and sends it to the NVIDIA GPU.
- Inference: The GPU (running a custom YOLOv9 model) decides: "Is this a person? Or just a shadow?"
- Action: If it's a person, it records the High-Res stream and alerts Home Assistant.
NVIDIA TensorRT vs. Google Coral vs. OpenVINO in 2026
Most guides tell you to buy a Google Coral TPU. In 2026, I disagree. The Coral hardware has been depreciated in favour of an NPU based platform, to come out some time later. Or never, it's Google, so who knows.
- Corals are scarce: Scalpers still love them. No official support and no replacement options.
- GPUs are versatile: My RTX 3060 sits in my server. It transcodes my Plex library, does ML / AI tasks for Immich and runs my Frigate object detection simultaneously.
- Performance: With TensorRT, my inference speed is ~12ms. That is near-instant.
Which detector should you use for a Scrap Lab build? Here is the 2026 breakdown:
| Feature | NVIDIA TensorRT (RTX 3060+) | Google Coral TPU | Intel OpenVINO |
| Inference Speed | < 10ms (Blazing Fast) | 10-15ms (Fast) | 30-70ms (Moderate) |
| Max Resolution | 640px - 1280px | 320px (Native) | Variable |
| Availability | Easy (Used Market) | Hard (Often OOS) | Built-in (Intel CPUs) |
| Multi-Purpose? | Yes (Plex/AI/LLMs) | No (Detection Only) | Yes (QuickSync) |
| Complexity | High (Requires Build) | Low (Plug & Play) | Medium |
The "Secret Sauce": Kernel Auto-Tuning
When you run the YOLOv9 build script, Frigate isn't just downloading a file; it is performing Kernel Auto-Tuning. TensorRT analyzes your specific GPU architecture - whether it's an RTX 3060 or a 4070 - and selects the absolute best low-level code for every operation in the neural network.
This optimization is why we can achieve sub-10ms inference times. It's the difference between a "universal fit" part and a custom-machined component for your specific engine.
- Detector: NVIDIA RTX 3060 (TensorRT)
- Cameras: Reolink 4K (822A's) + Reolink Doorbell
- OS: OMV8 + Docker Compose
Background - Unleash Smart Surveillance: Introducing Frigate NVR and its Core Concepts
For the modern homelab user, self-hosting is more than just a hobby—it's a commitment to control, privacy, and customization. In the world of home security, few tools embody this ethos as powerfully as Frigate Network Video Recorder (NVR). Frigate is an open-source, complete (stable!), and local NVR solution built from the ground up to integrate real-time Artificial Intelligence (AI) object detection into your security camera feeds. It sounds complex, and the software itself is but implementing it is not. Therein lies the beauty!
Forget the outdated systems that endlessly record, only to trigger a false alarm every time a shadow moves or a tree branch sways; Frigate leverages cutting-edge machine learning models, primarily based on TensorFlow and OpenCV, to intelligently analyze video streams locally on your own hardware.
The fundamental difference lies in its approach: Frigate first uses a low-overhead motion detection step to identify if something is happening, and then directs only the relevant frames to a powerful AI detector. This targeted processing minimizes resource usage and maximizes performance, ensuring you get high Frames Per Second (FPS) detection where it matters most. It’s a resource-efficient, privacy-focused solution that ensures your camera feeds and processing stay entirely within your local network, bypassing the need for expensive, cloud-dependent subscription services.
For homelab users who value performance and data autonomy, Frigate represents the next evolution in self-hosted surveillance. It's typically deployed via Docker, making it highly portable and easy to manage alongside other services in your existing environment, whether that’s on a dedicated server, a powerful NAS, or a single-board computer like an NVIDIA Jetson.
Key Features: Why Frigate Beats Traditional NVRs
Frigate's feature set is specifically designed to address the major shortcomings of legacy NVR software. The most critical feature is its AI-Powered Object Detection. Utilizing models that can be run on various accelerators, including the popular Google Coral Edge TPU or, as we'll detail, NVIDIA GPUs, Frigate accurately identifies specific objects like a "person," "car," "dog," or "cat" in real-time. This capability drastically reduces false positives, meaning you only get alerts for events that truly matter. Also, it's free! Did I mention FREE!?
Building on this core concept are Customizable Zones and Masks. You can define specific geometric zones in your camera view—like a driveway or a package drop-off area—and configure alerts based on objects entering or exiting those zones. For example, you can get a "person detected in the driveway" alert only between 9 AM and 5 PM.
Conversely, Motion Masks allow you to completely ignore areas that frequently cause spurious motion, such as a neighbour's waving flag or wind-blown foliage, optimizing performance by preventing the system from wasting detection cycles on non-threats.
Frigate boasts a Seamless Integration with Home Automation Platforms, particularly Home Assistant. It communicates via the lightweight MQTT protocol, enabling powerful automation scripts like "turn on the porch light when a person is detected at night" or "pause HVAC when the back door opens."
Last but not least, the Intelligent Recording and Storage feature is a boon for hard drive longevity and storage management. Instead of continuous, raw recording, Frigate focuses on event-based recording, saving clips only when an object of interest is detected, resulting in a searchable, organized library of relevant video evidence. This smart management approach, combined with its user-friendly web interface for live viewing and configuration, makes Frigate an indispensable tool for a robust, modern homelab security setup. I do have mine setup to record 8 days worth of 24/7/365 video, but that is not necessary.
Frigate NVR Visualization Diagram: Displays Frigate NVR data flow with Go2RTC and NVIDIA acceleration.
flowchart TD
    %% =============================
    %% CAMERA SOURCE
    subgraph CameraSource["📷 Camera Source"]
        CAM["🎥 IP Camera"]
        CAM -->|"① RTSP Main Stream (High Res / FPS)"| NVR["🧠 Frigate NVR Core"]
        CAM -->|"② RTSP Sub Stream (Low Res / FPS)"| DEC["🧩 FFmpeg Decoder + HW Accel"]
    end

    %% =============================
    %% FRIGATE CORE PROCESSING
    subgraph Core["⚙️ Frigate Core Processing"]
        DEC -->|"③ Decoded Frames"| MOTION["🌀 OpenCV Motion Detection"]
        MOTION -->|"④ Motion Detected (AOI)"| QUEUE["📦 Detection Queue"]
    end

    %% =============================
    %% AI ACCELERATION LAYER
    subgraph AI["🤖 AI Acceleration Layer"]
        QUEUE -->|"⑤ Cropped Frame Section"| DET["⚡ AI Detector: Coral TPU / Nvidia GPU / OpenVINO"]
        DET -->|"⑥ Object & Bounding Box Data"| NVR
    end

    %% =============================
    %% EVENT HANDLING & OUTPUT
    subgraph Output["📡 Event Handling & Output"]
        NVR -->|"⑦ Write High-Res Clips & Snapshots"| STORAGE["💾 Storage (Disk / NAS)"]
        NVR -->|"⑧ Publish Detection Event"| MQTT["🔔 MQTT Broker / Home Assistant"]
    end

    %% =============================
    %% STYLING
    style CAM fill:#6fa8dc,stroke:#3671a5,stroke-width:2px,color:#fff
    style NVR fill:#f8c291,stroke:#e98e35,stroke-width:2px
    style DEC fill:#93c47d,stroke:#599440,stroke-width:2px
    style MOTION fill:#b5e48c,stroke:#76c893,stroke-width:2px
    style QUEUE fill:#d9ed92,stroke:#99d98c,stroke-width:2px
    style DET fill:#f9f98c,stroke:#f0a800,stroke-width:2px
    style STORAGE fill:#a64d79,stroke:#6a006a,stroke-width:2px,color:#fff
    style MQTT fill:#d9534f,stroke:#c9302c,stroke-width:2px,color:#fff

    %% SUBGRAPH STYLING
    style CameraSource fill:transparent,stroke:#888,stroke-width:1px,stroke-dasharray:4 4
    style Core fill:transparent,stroke:#888,stroke-width:1px,stroke-dasharray:4 4
    style AI fill:transparent,stroke:#888,stroke-width:1px,stroke-dasharray:4 4
    style Output fill:transparent,stroke:#888,stroke-width:1px,stroke-dasharray:4 4
How Frigate NVR Processes Video Feeds
Frigate achieves its real-time object detection efficiency by cleverly splitting the workload across two separate video streams from your IP camera:
1. Dual-Stream Acquisition
The process begins with the IP Camera providing two independent Real-Time Streaming Protocol (RTSP) feeds.
- Main Stream (High Res/FPS): This high-resolution feed is sent directly to the Frigate NVR Core (Node NVR) for continuous 24/7 video buffer retention and high-quality event clip saving.
- Sub Stream (Low Res/FPS): This low-resolution feed is routed to the FFmpeg Decoder (Node DEC), where it is decoded using Hardware Acceleration (HW Accel) to minimize CPU usage. This stream is used only for detection.
2. Motion and AI Pipeline
The decoded, low-resolution frames (Node DEC) then enter the core processing pipeline:
- Motion Detection: The frames first hit the low-cost OpenCV Motion Detection (Node MOTION). This is Frigate's crucial filter, which only looks for general pixel changes, drastically reducing the number of frames that need expensive AI processing.
- AI Inference: If motion is detected, a cropped Area of Interest (AOI) is placed in the Detection Queue (Node QUEUE) and passed to the AI Detector (Node DET). This is where the dedicated hardware—like a Coral TPU or Nvidia/Intel GPU—runs the object detection model to confirm if the motion is a specific object (person, car, etc.).
- Detection Data: The result (the object and its bounding box) is sent back to the Frigate NVR Core (Node NVR).
3. Event and Output
Upon receiving confirmed object data, the Frigate NVR Core triggers two simultaneous actions:
- Recording: It uses the pre-buffered High-Resolution Main Stream to generate and Write High-Res Clips & Snapshots to Storage (Node STORAGE).
- Notification: It immediately Publishes a Detection Event via the MQTT Broker (Node MQTT), allowing integration with platforms like Home Assistant for instant alerts and automations.
This multi-threaded, two-stream approach allows Frigate to perform highly accurate AI analysis while keeping the NVR recording at maximum resolution and frame rate.
Verifying GPU Inference in System Metrics✅
Browse to http://IPyouPicked:5000 and you should see frigate webGUI open and your first camera in the Birds' Eye view already!
Obviously seeing the name of your GPU at the bottom with a little green dot means things are likely functioning smoothly as well.
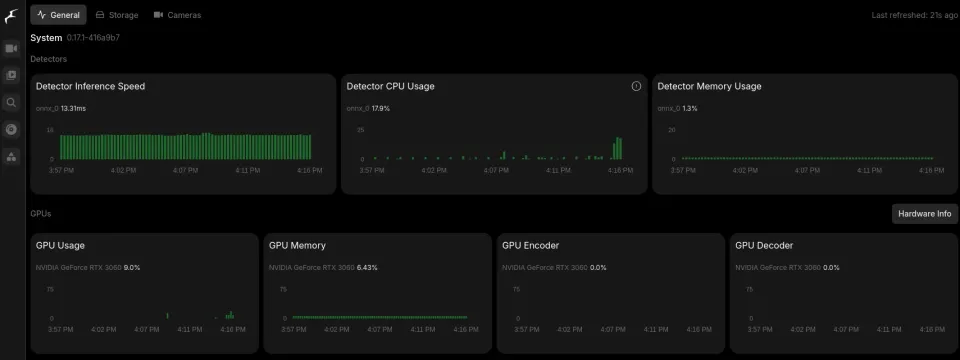
Once you click system metrics, you should now have a wonderfully informant view like this:
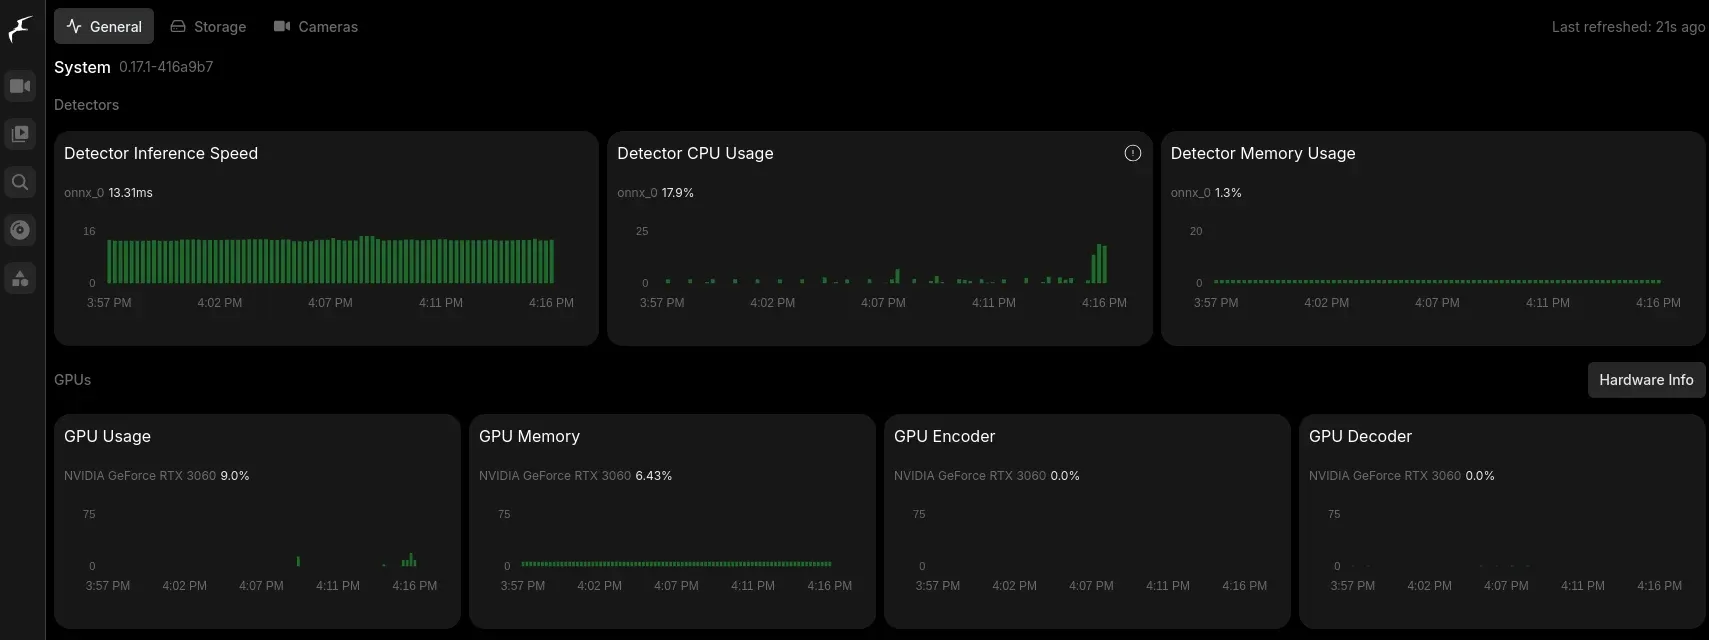
Check the tabs at the top - General, Storage & Cameras. All should load and all should display some stats & info. Between a live view of your cameras and these pages, you've successfully setup Frigate, accelerated by your GPU with a hardware based neural net trained AI!
Final note: As you can see in my snip above, my average detection inference speed is about 12ms. This is extremely fast! 12 thousands of a second... This is the advantage of using a GPU with Frigate...
What's Next?
Now that Frigate is running, you need to connect it to Home Assistant to get those rich notifications on your phone.👇

🎬 Exporting Your Frigate Footage (Evidence Retrieval)
You’ve set up the NVR, the AI is detecting objects, and now you have caught something. Whether it’s a friendly fox visiting your porch or a porch pirate stealing a package, you need to get that video OFF the server and onto your computer.
Frigate handles this differently than traditional NVRs. It splits "Events" (AI detections) from "Recordings" (24/7 Timeline).
Method 1: The "Quick Grab" (Downloading an Event)
If Frigate sent you an alert saying "Person detected on Front Porch," the clip is already packaged and ready to go.
- Navigate to "Review": Click the Review (or Events) tab in the sidebar. This feeds you a list of all recent detections.
- Select the Event: Click on the thumbnail of the event you want. The video player will pop up.
- Download: Look for the Export Icon (usually a downward arrow ⬇️) in the player controls.
- Result: Select the exact timeframe of the event as shown in your clip!


Method 2: The "Custom Export" (Timeline & Time-Lapse)
Sometimes the AI misses the start of an event, or you want to export a 1-hour chunk of time to show the police everything that happened between 2:00 PM and 3:00 PM.
- Navigate to "Explore" (or "Export"): Click Export in the sidebar menu.
- Create New Export: Click the + or New Export button.
- Configure the Clip:
- Camera: Select the camera (e.g.,
front_porch). - Date/Time: precise Start and End times.
- Playback Factor: Choose Realtime for normal video, or Time-lapse to compress 24 hours into minutes (great for construction projects or weather watching!).
- Camera: Select the camera (e.g.,
- Start Export: Click Create.
- Note: This does not download instantly. Your NVIDIA GPU (or CPU) is now working in the background to stitch those files together.
📥 Retrieving the File
Frigate processes exports in the background so you don't have to keep your browser open.
- Go to the Exports tab in the sidebar.
- You will see your request in the list.
- Processing: The server is still stitching.
- Ready: The file is done.
- Click the Download icon next to the finished file to save the
.mp4to your device.
💡 Core Lab Pro Tip: If you are exporting massive files (like 8 hours of 4K footage), it is often faster to map the /media/frigate/exports folder in Docker to a shared folder on your NAS/PC. That way, you can grab the files directly over your network via SMB/NFS instead of downloading them through the web browser!Leave a comment below on your Frigate setup or how this guide worked out for you! This part of our ongoing Cybersecurity series for Homelabs.
Frequently Asked Questions
- Why is my CPU pinned even though I have an NVIDIA GPU?
- Check your
ffmpegsettings. Detection (the AI) might be on the GPU, but decoding the video stream is likely still hitting your CPU. Ensure you havehwaccel_args: preset-nvidiaset globally or per camera.
- Check your
- Do I really need
go2rtcfor Reolink cameras?- Yes. Reolink's native RTSP implementation is notoriously unstable in Frigate.
go2rtcacts as a high-performance buffer that prevents the "smeared" or dropped frames that break object detection.
- Yes. Reolink's native RTSP implementation is notoriously unstable in Frigate.
- Why should I choose an NVIDIA GPU over a Google Coral in 2026?
- While Coral is efficient, NVIDIA TensorRT offers significantly lower inference speeds (often under 10ms) and allows you to use the same hardware for Plex transcoding or local LLMs. It's the ultimate "Scrap Lab" multi-tool.
- Should I use the 4K Main Stream for detection?
- No. Using a 4K stream for object detection is a waste of resources. Always use the camera’s Substream (usually 640x480 or 720p) for detection and the Main Stream only for recording.
- How much Shared Memory (SHM) do I need?
- Frigate requires SHM to pass frames between processes. A safe bet for a 4-6 camera setup is 512MB. Use the formula:1024×1024Width×Height×1.5×Num_Cameras=MB
- Why does the YOLOv9 build take so long?
- TensorRT is literally "compiling" the AI model to fit your specific GPU architecture (e.g., RTX 3060 vs. 4070). This one-time optimization is what allows for near-instant object detection.
What’s Next for your Homelab?
Setting up Frigate is just one piece of the data sovereignty puzzle. If you’ve successfully offloaded your security to a local AI, consider these next steps for your infrastructure:
- Secure the Perimeter: Now that your cameras are local, ensure your NVR isn't leaking data. See the OPNsense Setup Guide.
- Automate the Cleanup: Don't let Docker logs or Ghost images eat your SSD. Check out my Ghost Image Cleanup Guide.
- Expand the Stack: Ready to move beyond NVRs? Head over to the Self-Hosting Roadmap to see the full architecture.
Member discussion